Settings
1.1 Creating Storage Pool Space
After users complete the hard drive installation and enter the NAS system for the first time, Zettlab AI NAS will remind you to create storage pools with various RAID modes (RAID mode can recover data using new hard drives when some hard drives are damaged, better protecting your data security). Special reminder: The process of creating a storage pool will format the disk. If the disk contains important files, please back up the hard drive files first, and confirm that there is no risky data on the hard drive before installing it in the NAS.
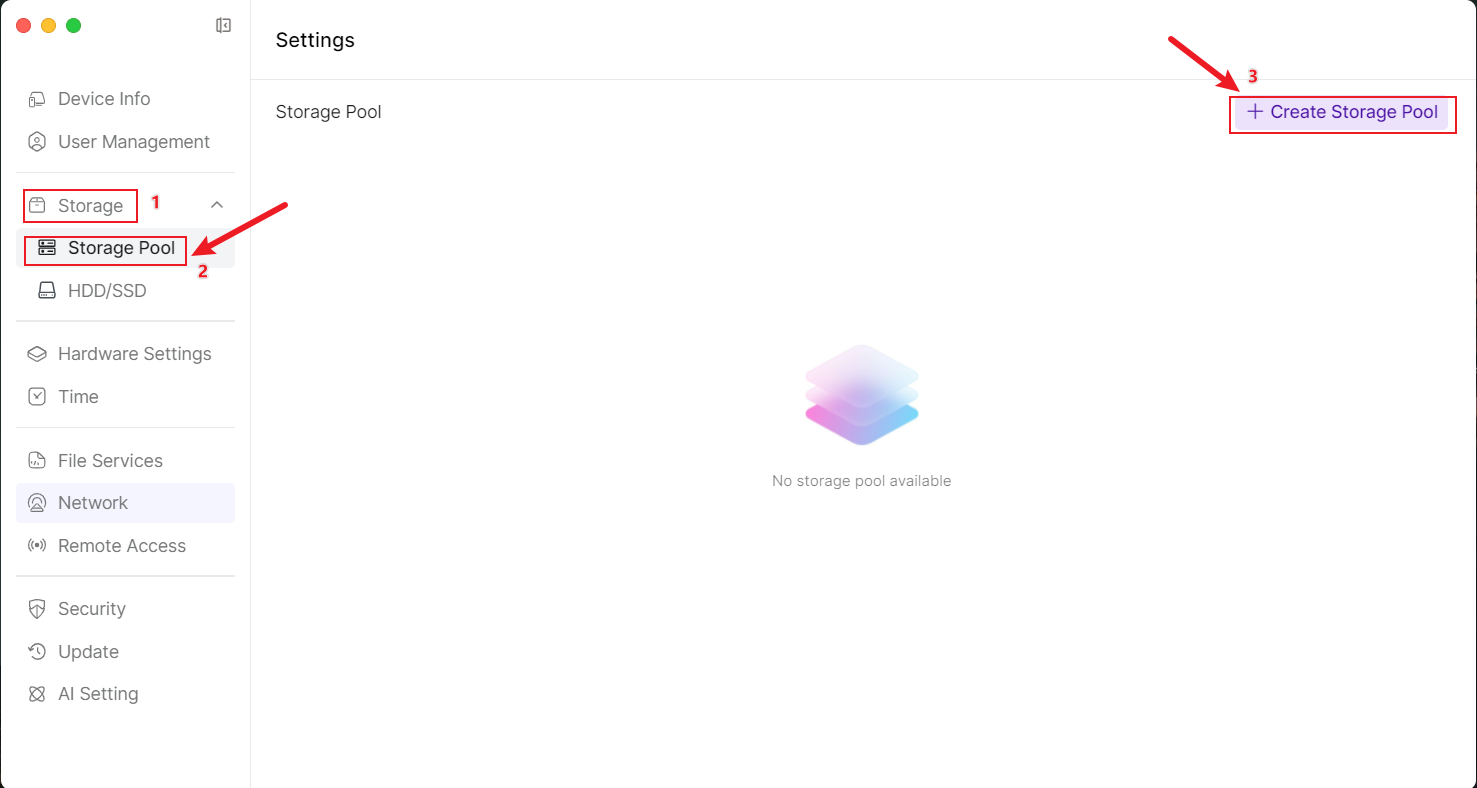
- After logging in to Zettlab AI NAS, open the [Settings] application at the bottom of the main interface.

- After entering the page, click [Storage] > [Storage Pool] > Continue to click [+Create Storage Pool] in the upper right corner.
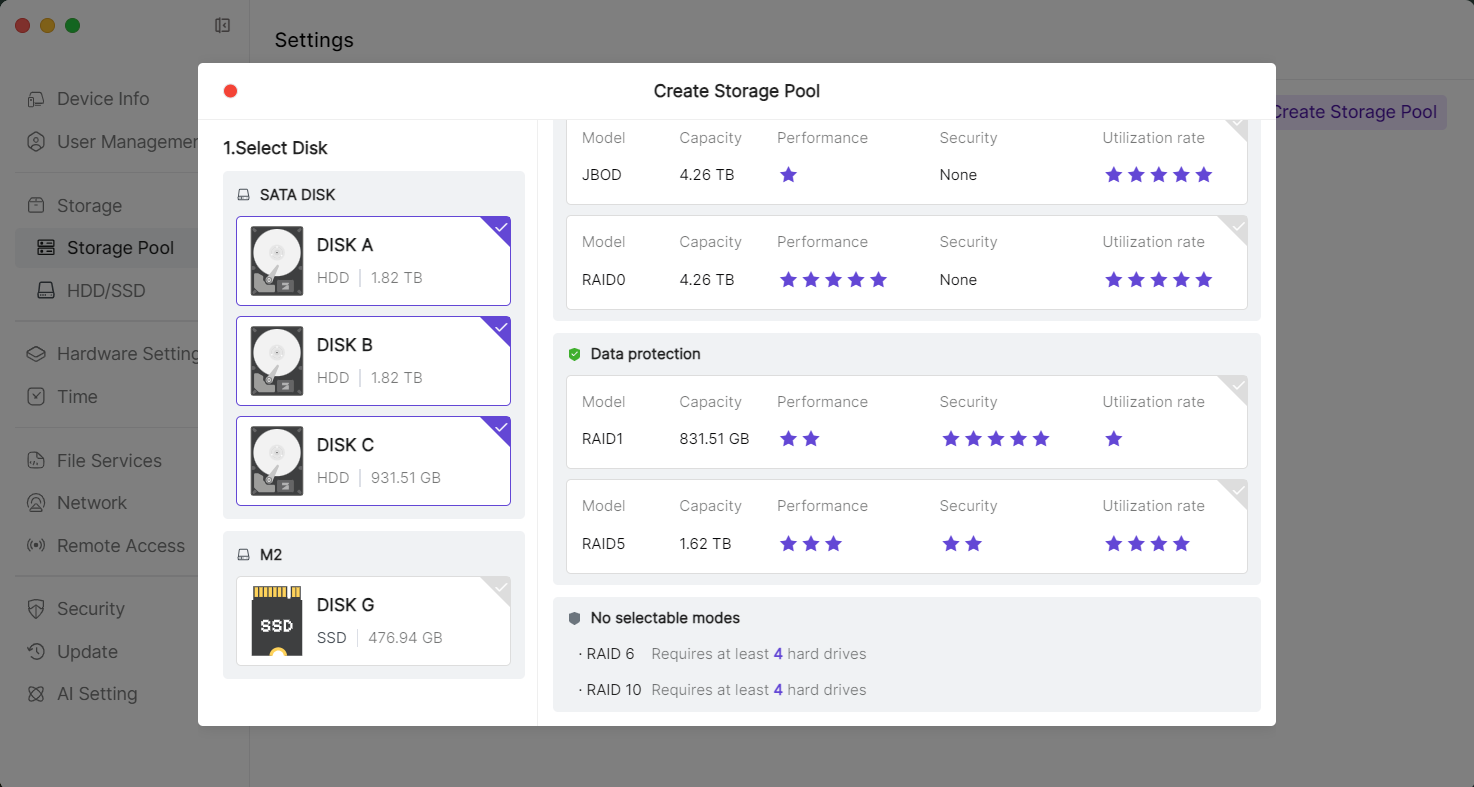
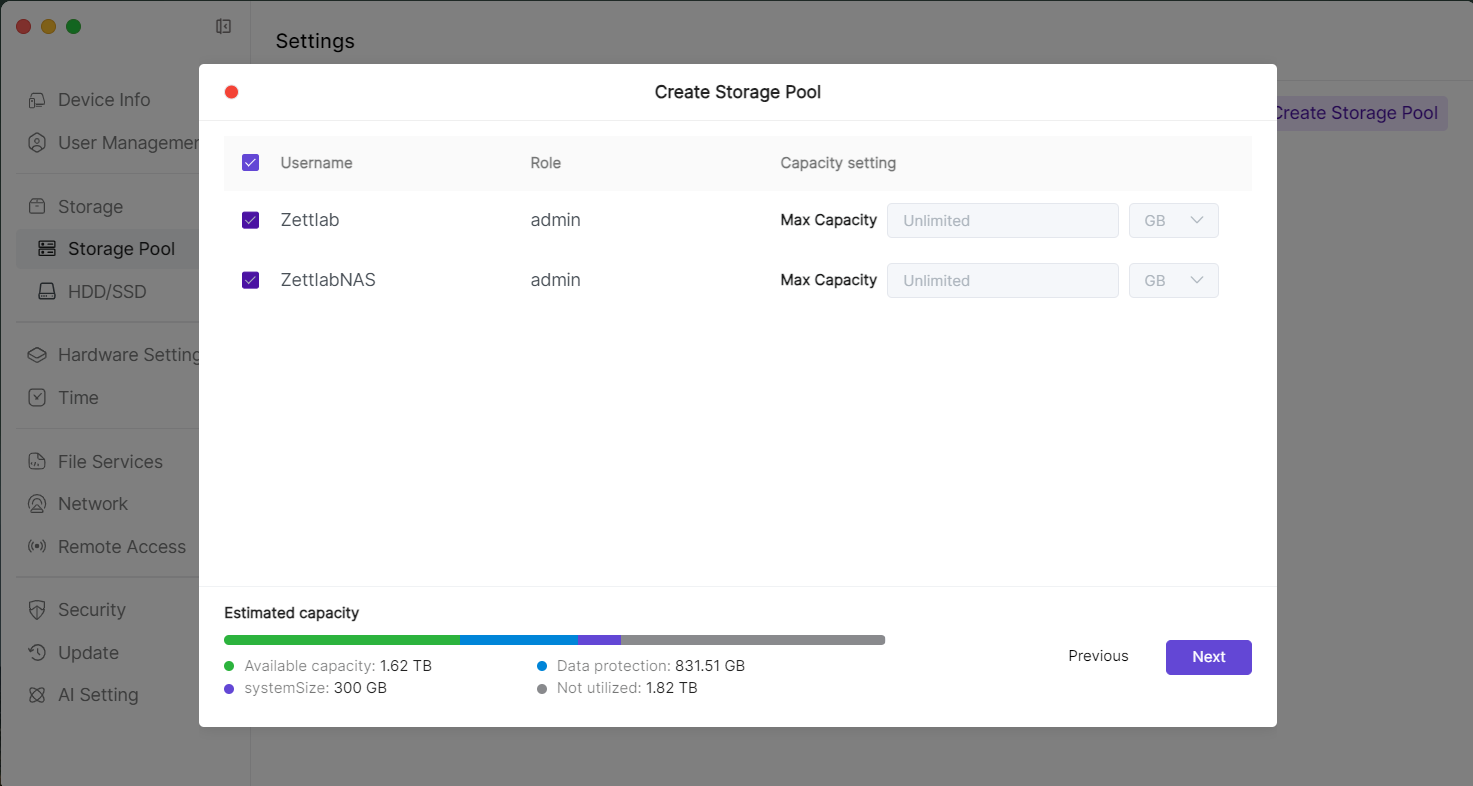
- First select the disks to form a Storage Pool on the left, and the right will display the available storage pool modes based on the number of selected disks. You can choose the appropriate mode based on data protection, performance priority, or storage space priority (how to choose RAID mode). After selecting the storage mode, click [Next] in the lower right corner. *SSD only supports Basic mode and JBOD mode.
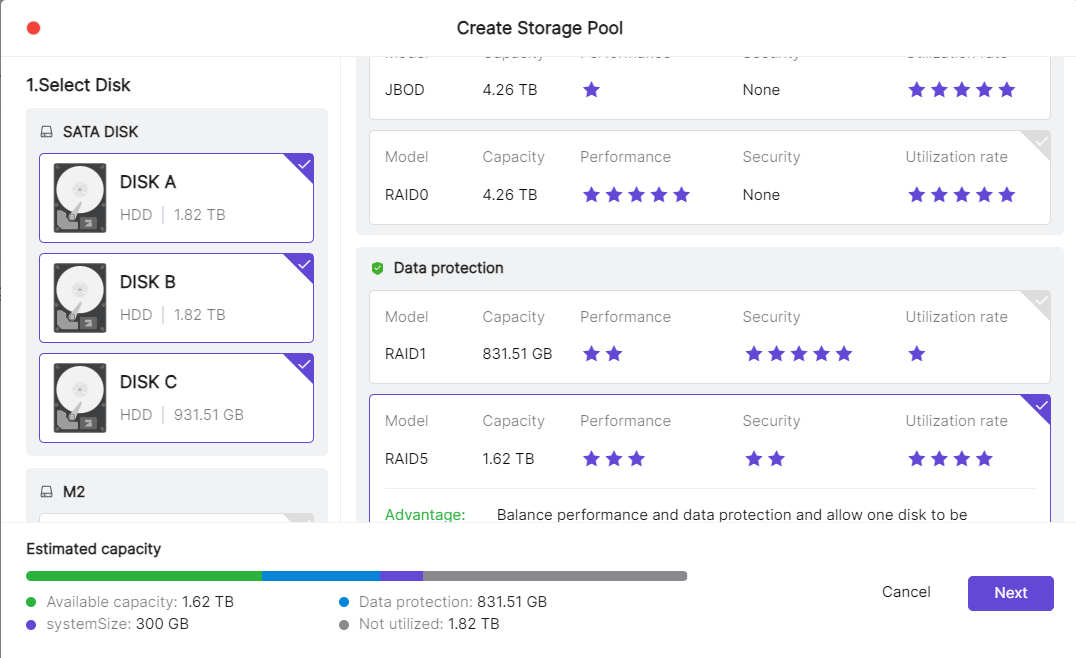
- You can set the capacity for the user, then continue to click [Next] in the lower right corner. *If the administrator user does not set it, the default is maximum capacity. *If ordinary users do not set it, the default is no usage capacity.
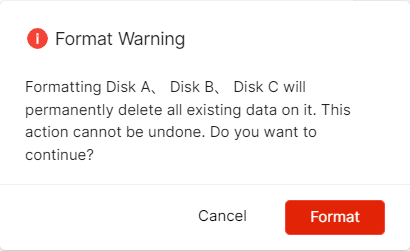
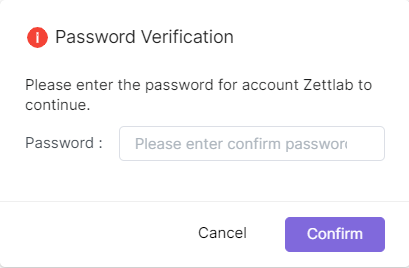
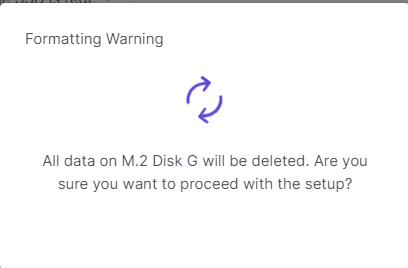
- After ensuring that the disk has no important files, click [Format] > Enter password > Click [Format] again. *Special reminder: The process of creating a storage pool will format the disk. If the disk has important files, please complete the backup before installing it in the NAS.
- Wait for 2-5 minutes, creation completed. Creating
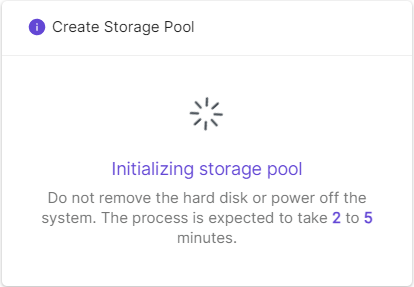
 Creation completed
1.2 Selecting RAID Mode
Choose the appropriate storage mode according to specific needs to balance performance, capacity, and data security. The following are detailed introductions to several storage modes: Basic, JBOD, and RAID 0, 1, 5, 6, 10:
- Basic (Single Disk Mode)
- Principle: Use a single hard drive to store data, without redundancy or striping.
- Advantages:
- Simple and easy to use, no complex configuration required.
- Low cost, suitable for small-scale storage needs.
- Disadvantages:
- No redundancy, hard drive failure will lead to data loss.
- Limited performance, unable to utilize parallel read/write of multiple disks.
- Applicable Scenarios: Personal users, small storage needs, or scenarios with low requirements for data security.
- JBOD (Just a Bunch of Disks)
- Principle: Combine multiple hard drives into one logical volume, data is stored sequentially, without redundancy or striping.
- Advantages:
- Fully utilize all hard drive capacities.
- Simple configuration, suitable for expanding storage space.
- Disadvantages:
- No redundancy, any hard drive failure will lead to partial data loss.
- No performance improvement, unable to utilize parallel read/write of multiple disks.
- Applicable Scenarios: Scenarios that require large-capacity storage and have no requirements for performance and data redundancy.
- RAID 0 (Striping)
- Principle: Data is divided into blocks and alternately stored on multiple hard drives.
- Advantages:
- Significantly improves read/write performance (parallel operations on multiple disks).
- High storage space utilization (no redundant data).
- Disadvantages:
- No redundancy, any hard drive failure will lead to all data loss.
- Applicable Scenarios: Scenarios with high performance requirements and low data security requirements, such as video editing, temporary caching.
- RAID 1 (Mirroring)
- Principle: Data is completely copied to multiple hard drives, each hard drive stores the same data.
- Advantages:
- High data security (when one hard drive fails, data can still be recovered from other hard drives).
- Improved read performance (can read from multiple hard drives simultaneously).
- Disadvantages:
- Low storage space utilization (for example, two hard drives can only use half the capacity).
- No improvement in write performance (data needs to be written to multiple hard drives).
- Applicable Scenarios: Scenarios with high data security requirements, such as financial systems, databases.
- RAID 5 (Striping with Parity)
- Principle: Data is divided into blocks and stored on multiple hard drives, while storing parity information (used for data recovery).
- Advantages:
- Balances performance and data security (allows one hard drive to fail).
- High storage space utilization (only loses one hard drive capacity for parity).
- Disadvantages:
- Lower write performance (needs to calculate parity).
- Significant performance degradation when rebuilding data.
- Applicable Scenarios: Scenarios with moderate requirements for performance and security, such as file servers, small and medium-sized databases.
- RAID 6 (Dual Parity Striping)
- Principle: Similar to RAID 5, but uses two sets of parity information, allowing two hard drives to fail simultaneously.
- Advantages:
- Higher data security (allows two hard drives to fail).
- Still high storage space utilization (only loses two hard drive capacities for parity).
- Disadvantages:
- Even lower write performance (needs to calculate two sets of parity).
- More significant performance degradation when rebuilding data.
- Applicable Scenarios: Scenarios with extremely high data security requirements, such as large databases, critical business systems.
- RAID 10 (Mirroring + Striping)
- Principle: Combines RAID 1 (mirroring) and RAID 0 (striping), first groups hard drives for mirroring, then stripes the groups.
- Advantages:
- High performance (striping improves read/write speed).
- High data security (allows one hard drive to fail in each mirror group).
- Disadvantages:
- Low storage space utilization (can only use half of the total capacity).
- Higher cost (requires at least 4 hard drives).
- Applicable Scenarios: Scenarios with extremely high requirements for both performance and data security, such as databases, virtualization platforms.
1.3 SSD Cache Management
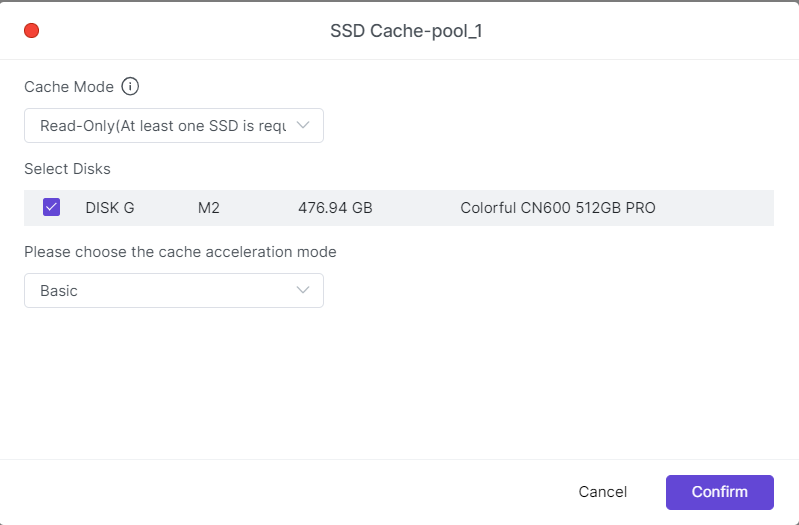
SSD cache (also known as flash cache) is a cost-effective solution that improves the performance of HDD arrays by storing the most frequently accessed data on SSDs. You can create an SSD cache on a storage pool to improve random read/write performance of files. Zattlab AI NAS supports two cache modes: read-only cache and read-write cache. Read-write SSD cache always has redundancy functionality. At least 1 SSD is required to create a read-only cache, while read-write cache requires at least 2 SSDs. Please note: This mode is only supported for setting up SSD cache on storage pools created with SATA mechanical disks, and each storage space can only configure one SSD cache.
1.4 Creating SSD Cache
Before configuring SSD cache, please ensure the following conditions are met:
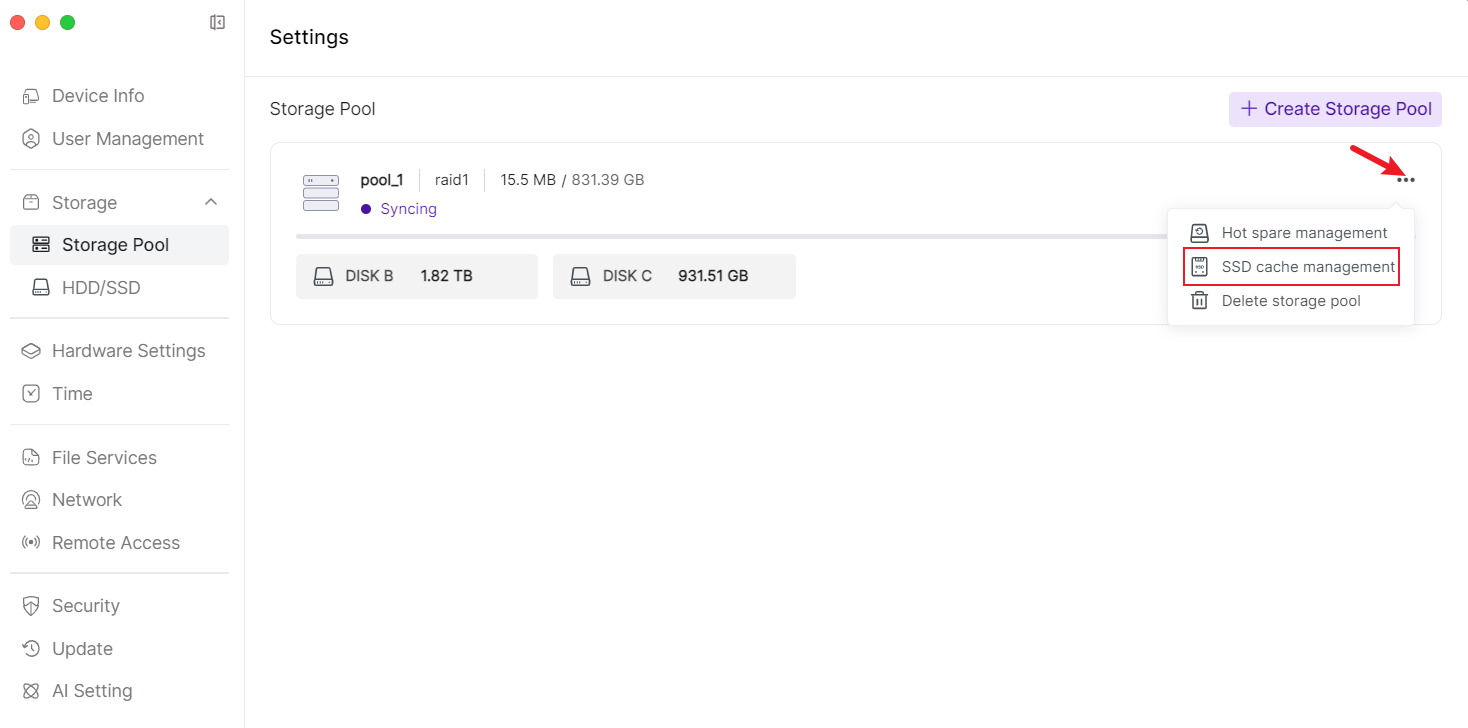
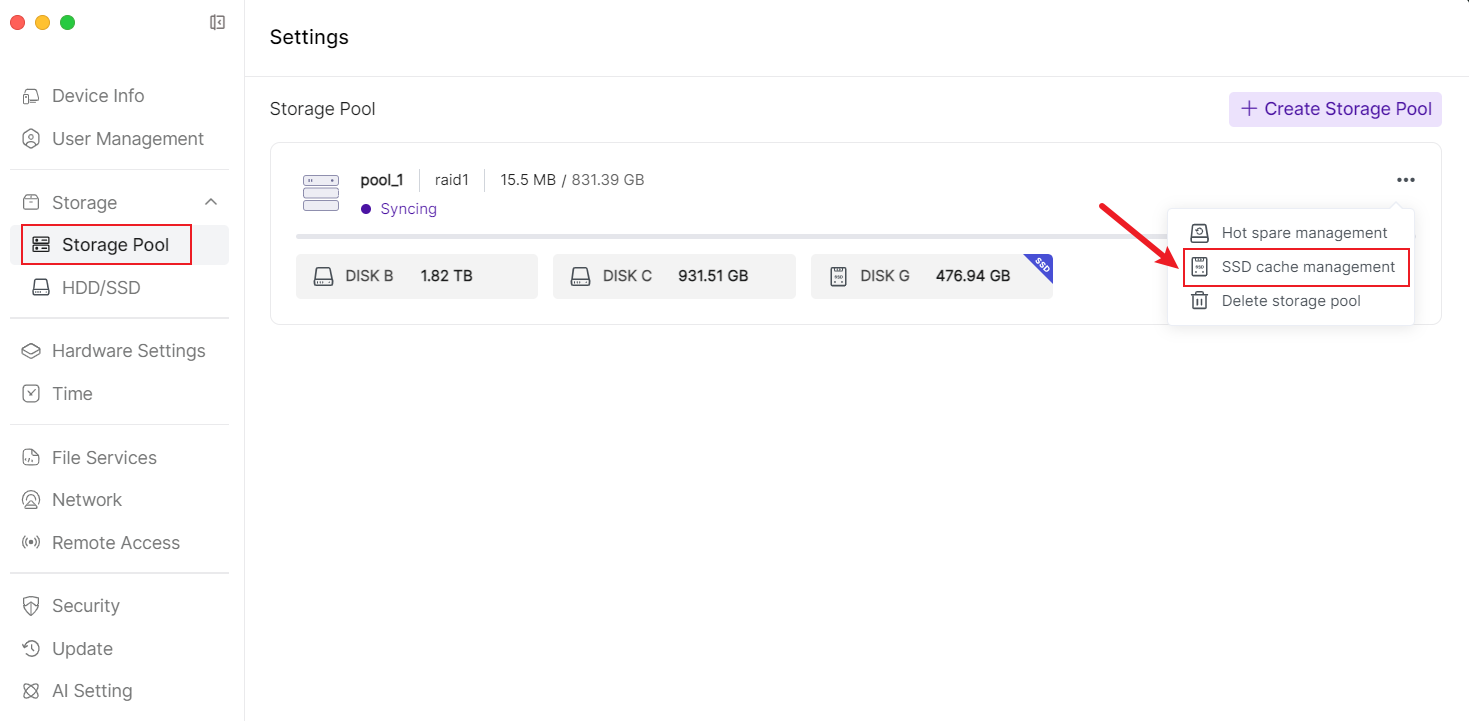
- Go to [Settings] > [Storage] > [Storage Pool] and click the [...] button on the right side of the corresponding storage pool, and select "SSD Cache Management".
- Select Cache Mode > Check SSD > Select Basic mode, and click [Confirm] after confirmation.
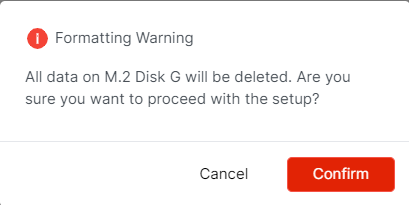
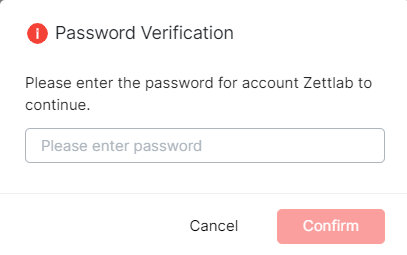
- Please carefully read the risk warning and confirm the information, enter the password for verification, and click "Confirm". The system will create an SSD cache for the selected storage space.
1.5 Removing SSD Cache
Removing SSD cache will temporarily disable applications installed under this storage space. Please do not shut down or restart the system during the process. The operation steps are as follows:
- Go to [Storage Pool] and click the [...] button on the right side of the corresponding storage pool, and select "SSD Cache Management".
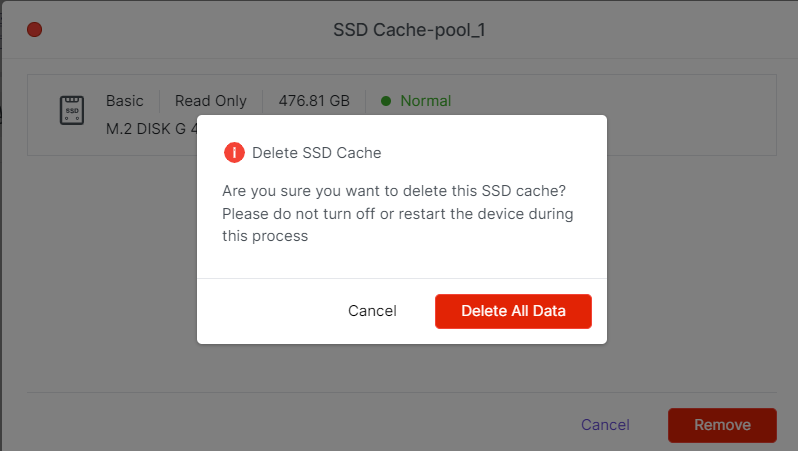
- In the SSD cache management interface, click [Remove], and the system will prompt the removal risk.
- After understanding the risks of removing SSD cache, click "Confirm" and start removing the cache.
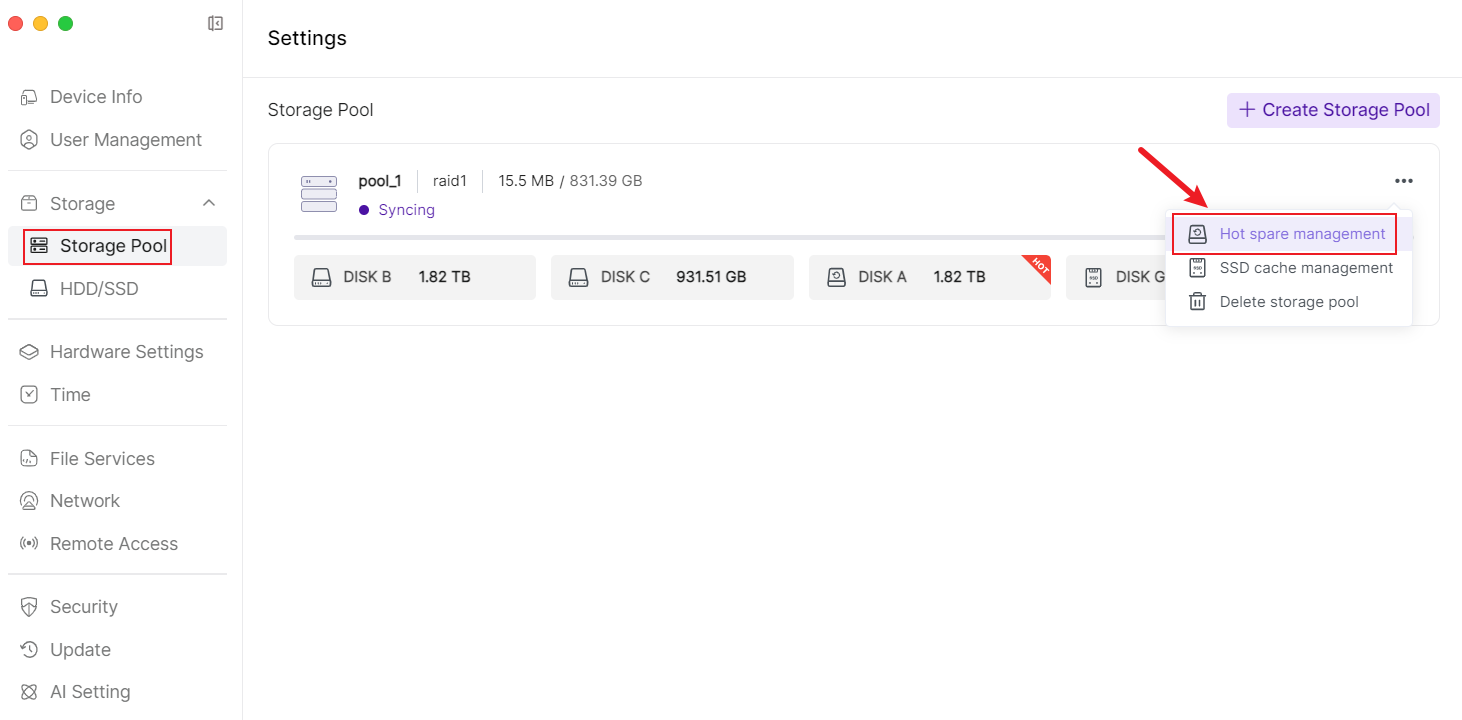
1.6 Hot Spare Management
In the ZettOS system, you can configure spare hard drives (Hot Spare) for storage pools. When a hard drive in the storage pool fails or enters a critical state, the Hot Spare hard drive will automatically replace the failed hard drive, thereby repairing the degraded storage pool and improving data security.
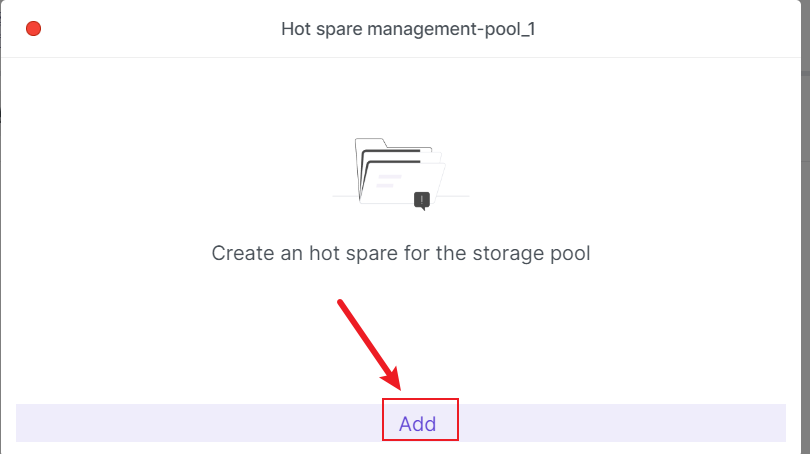
1.7 Adding Hot Spare Hard Drive
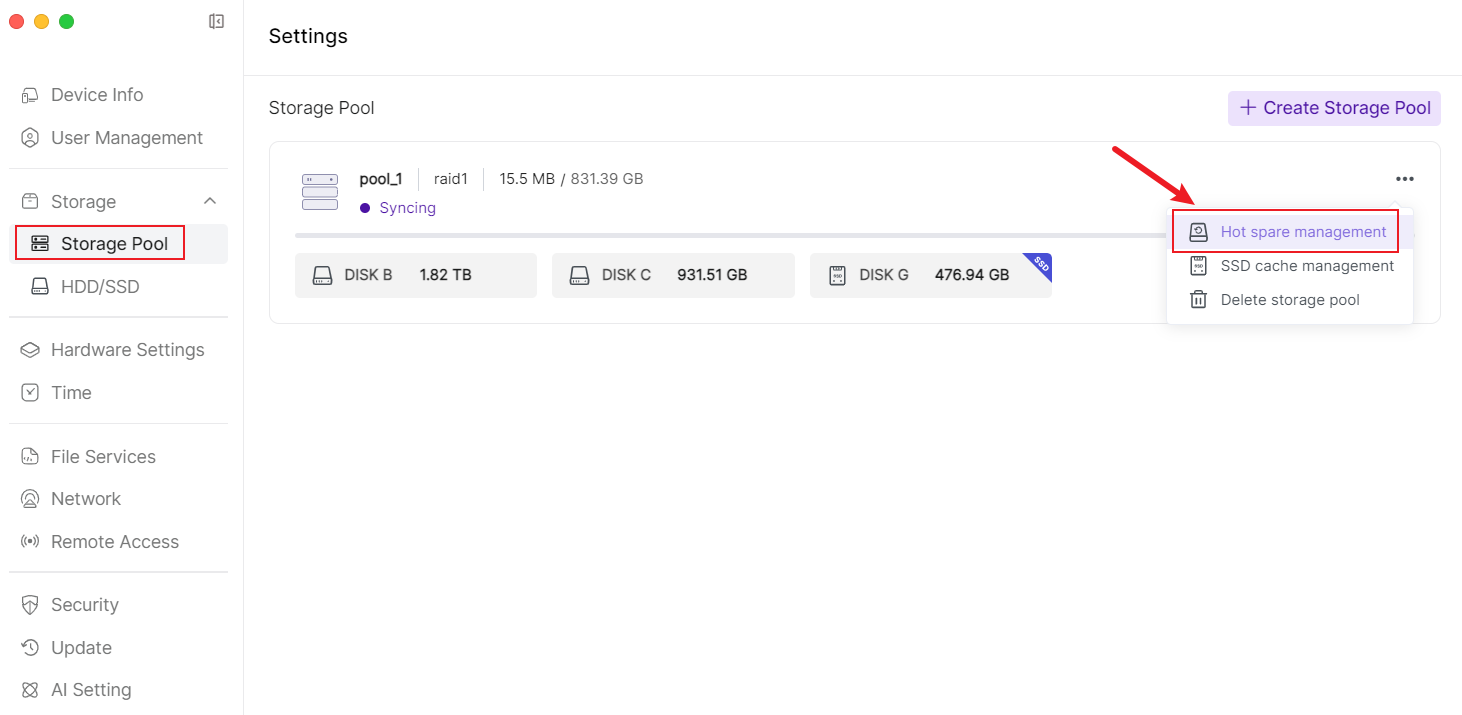
- Go to [Settings] > [Storage] > [Storage Pool] and click the [...] button on the right side of the corresponding storage pool, and select "Hot Spare Management".
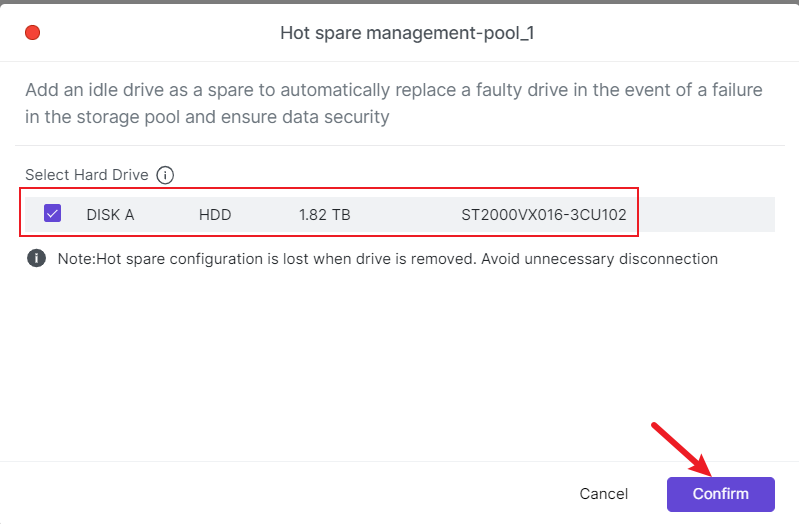
- Select the HDD hard drive to be used as Hot Spare, and click [Confirm].
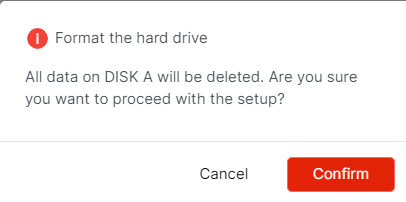
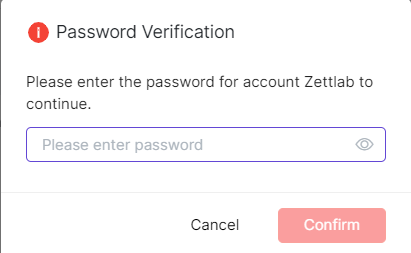
- Please read the information carefully and confirm, then enter the password for verification. The system will create a Hot Spare for the selected storage space.
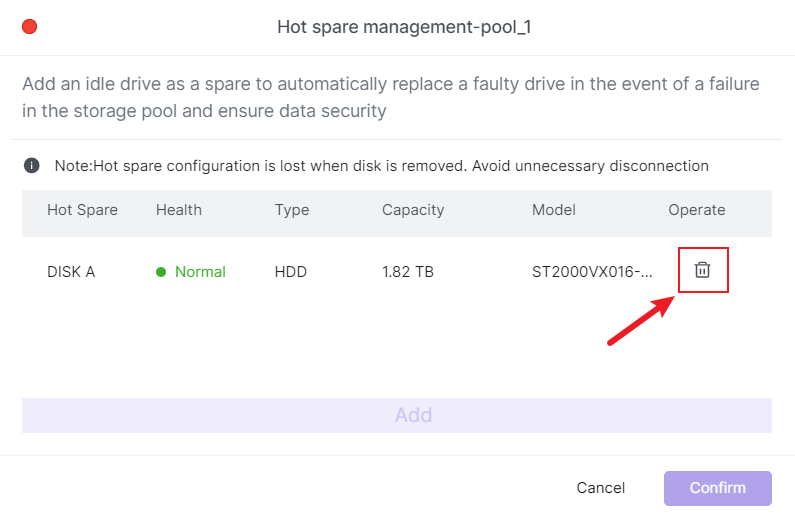
1.8 Removing Hot Spare
- Go to [Storage Pool] and click the [...] button on the right side of the corresponding storage pool, and select "Hot Spare Management".
- Click the "Remove" button. After confirming the removal, if the storage pool is degraded, it will no longer be automatically repaired through the Hot Spare hard drive.
2. User Management
2.1 Adding New Users and Setting User Permissions
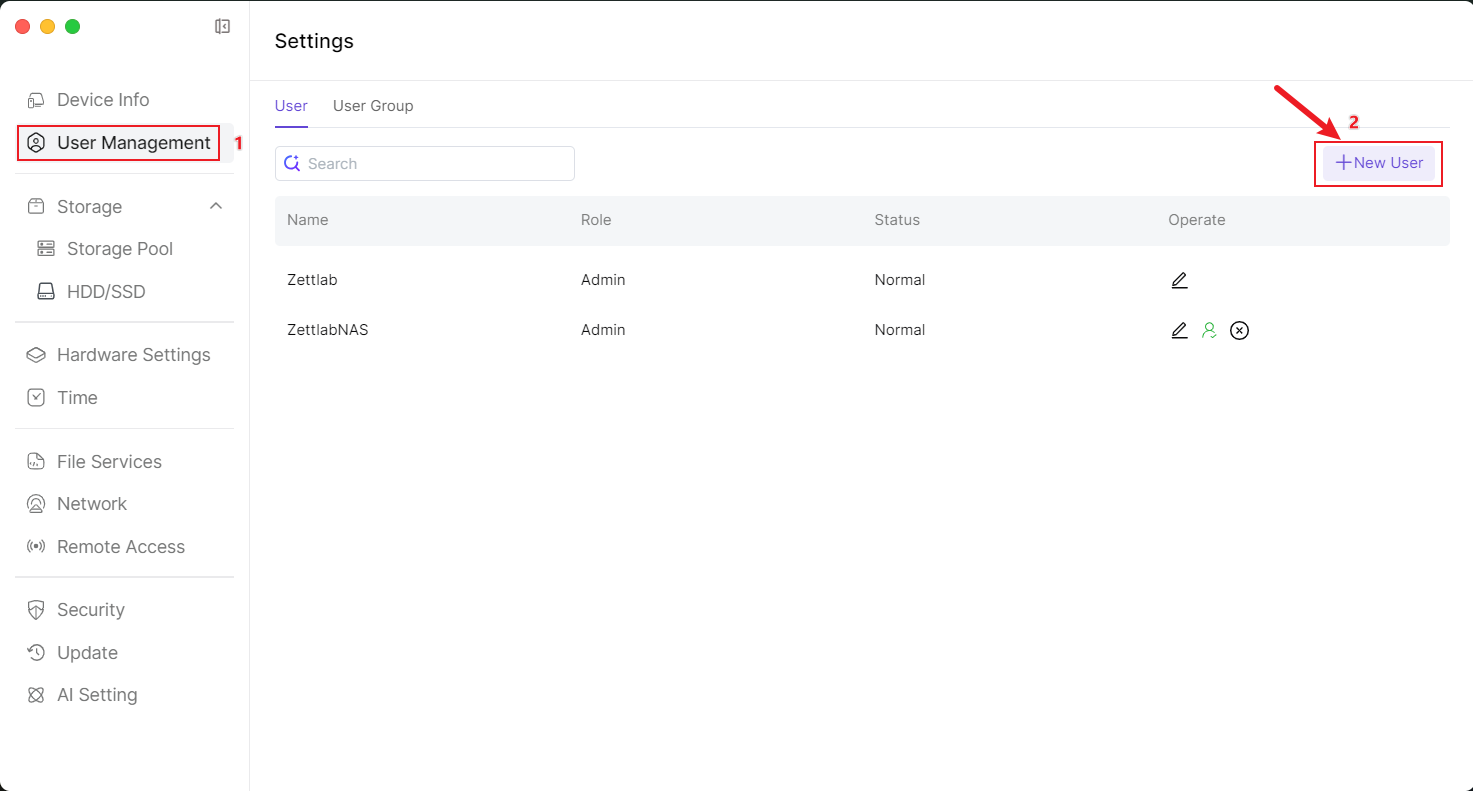
- At the bottom of the main interface, open the 【Settings】 application.
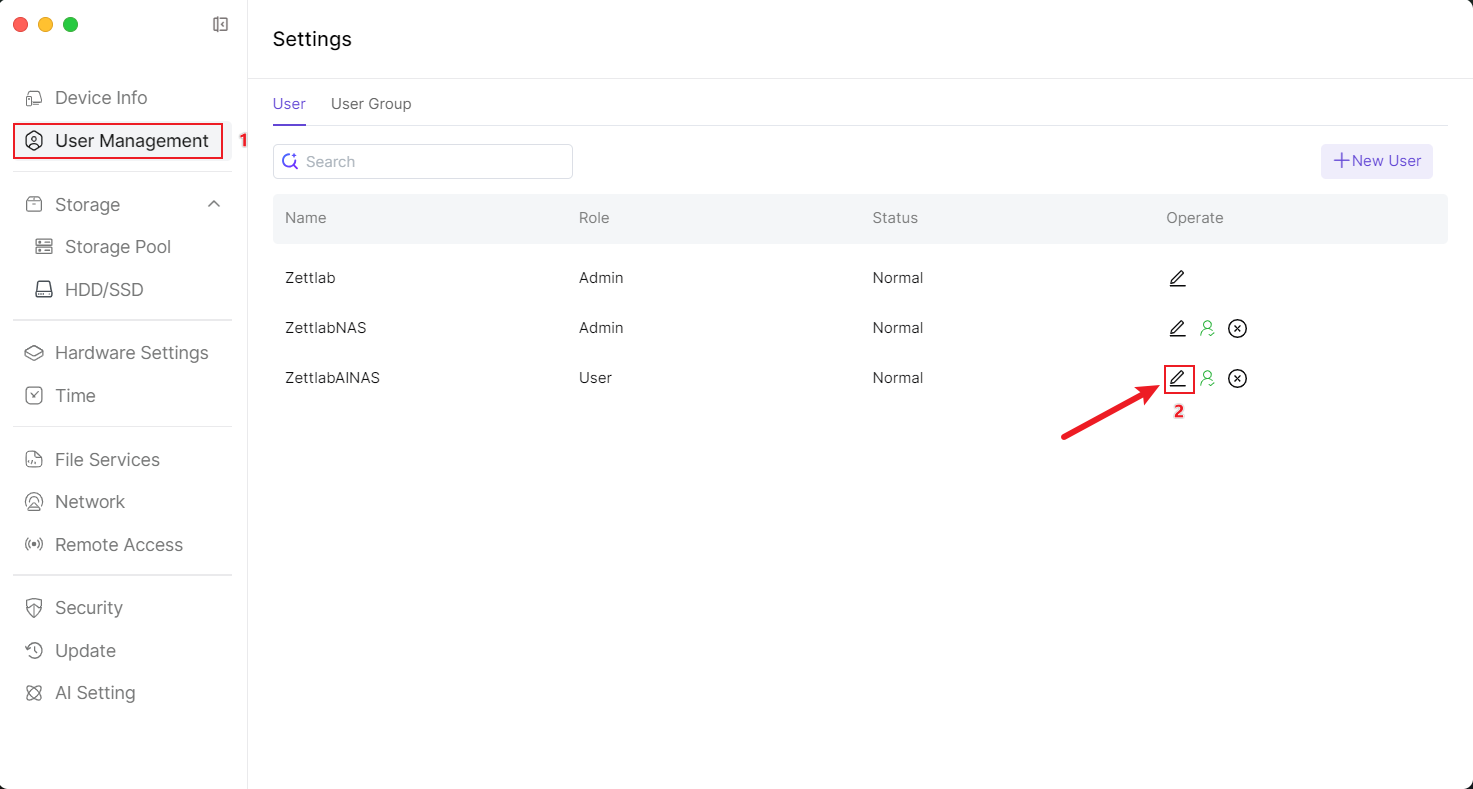
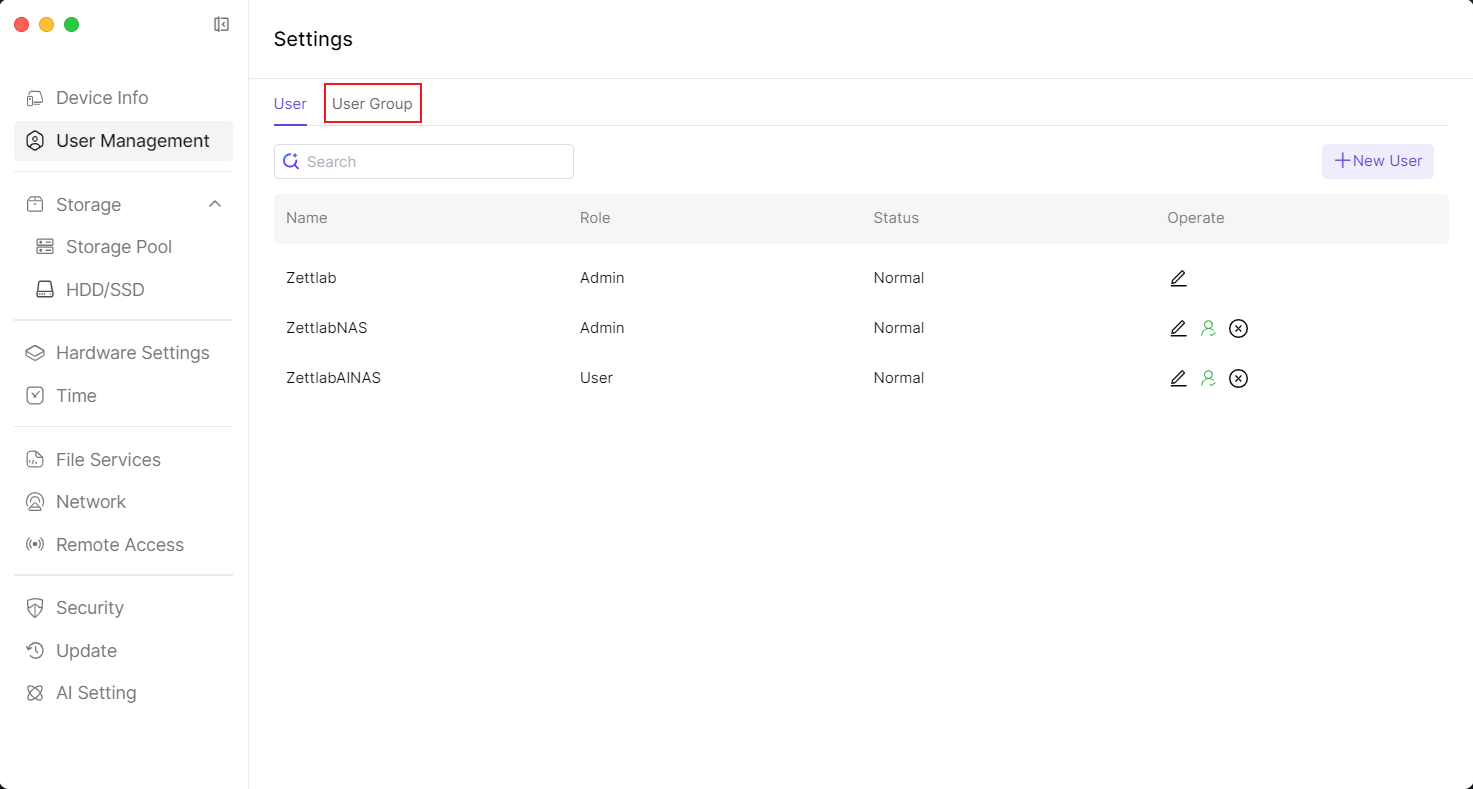
- After entering the "Settings" page, click 【User Management】 in the left sidebar to enter the user management page, then click 【+New User】 in the top right corner to display the user creation window.
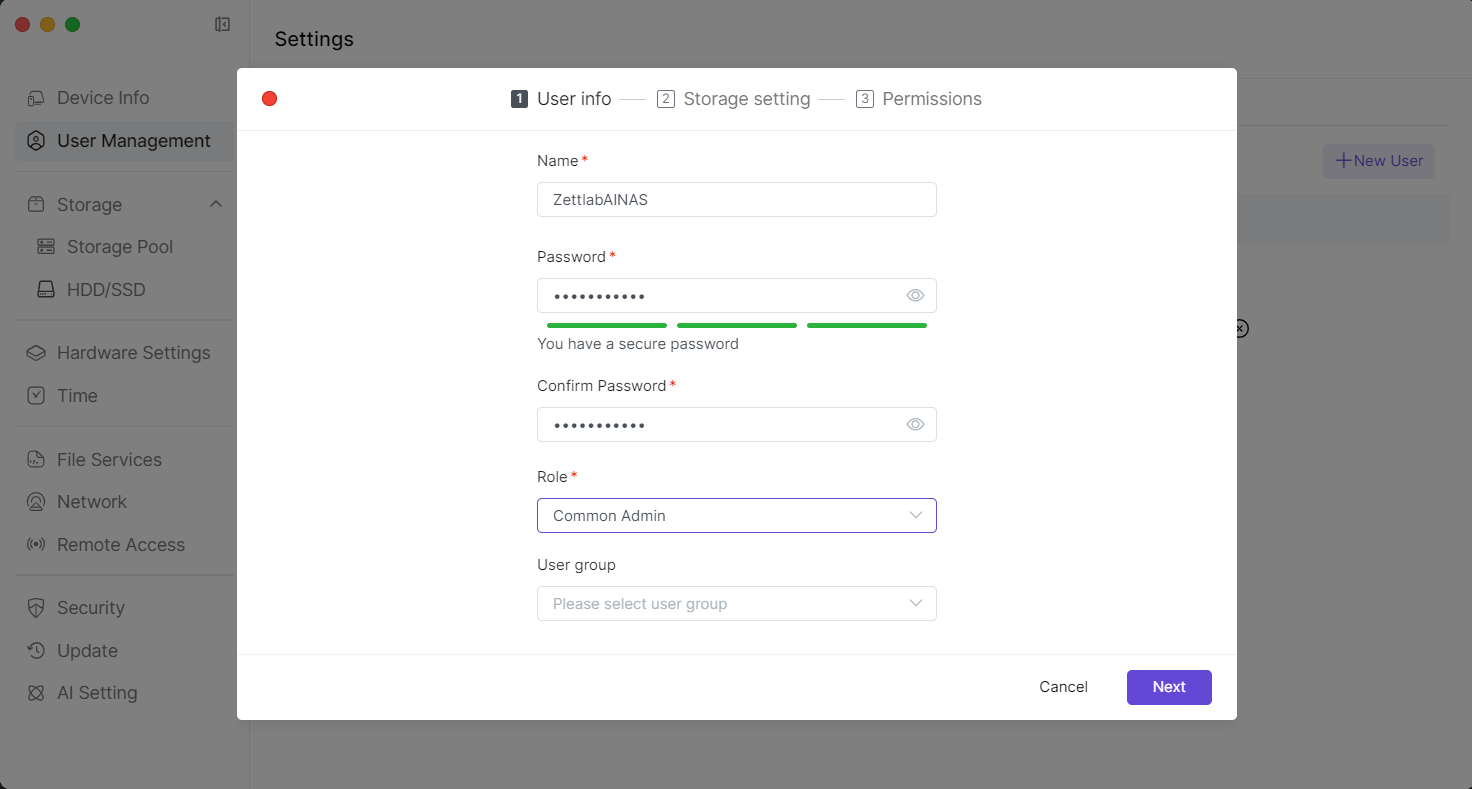
- In the "User info" window for creating a user, sequentially enter "name", "Password", "Confirm Password"; for "Role", you can select "Common Admin" or "Common User"; "User group" is optional.
- After filling in the user information, click Next in the bottom right corner to enter "Storage Setting".
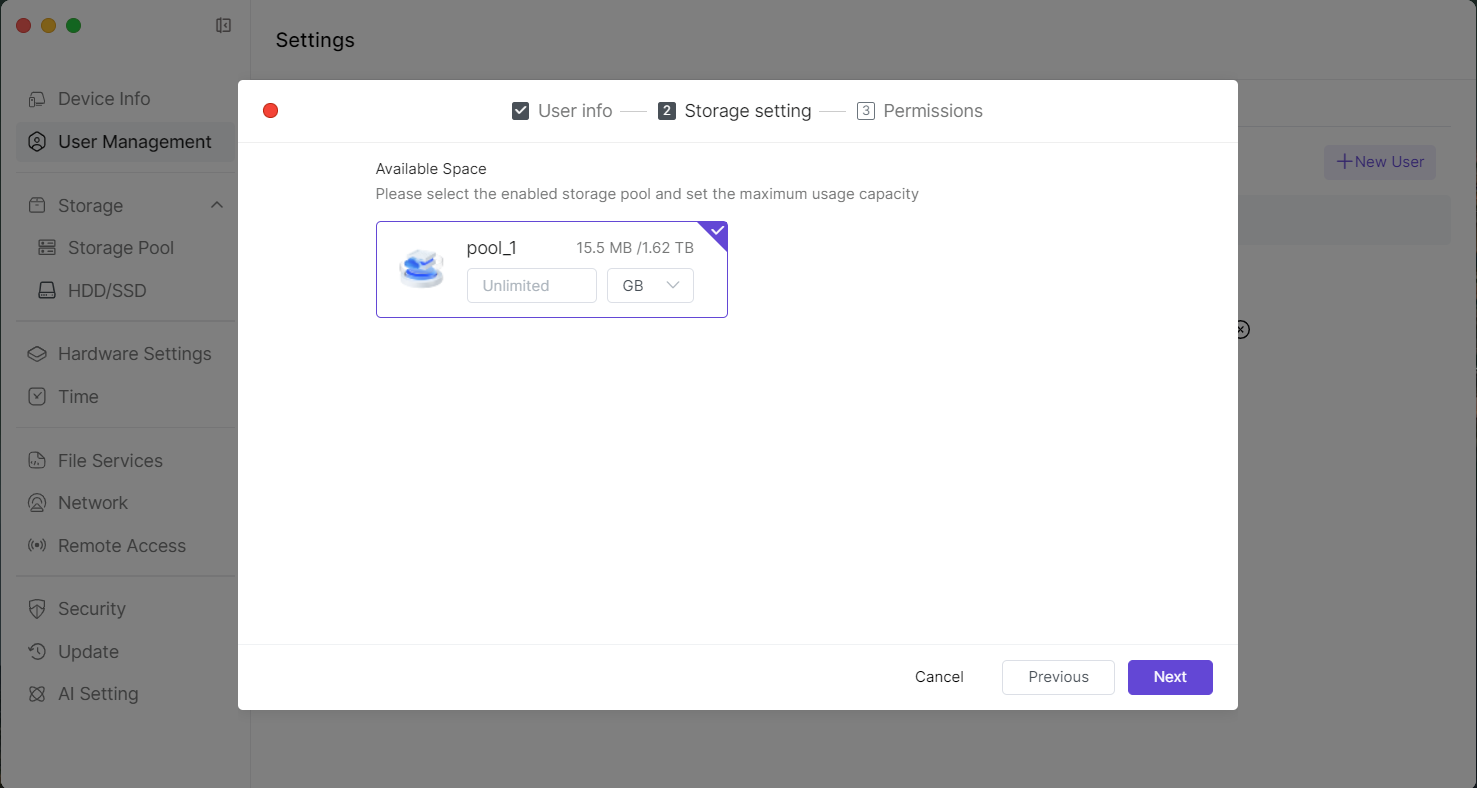
- In the "Storage setting" page, check the available pools for the new user and set the usable capacity for each pool, then click Next in the bottom right corner to enter "Permissions". *Common Admin has all permissions checked by default and cannot be modified.
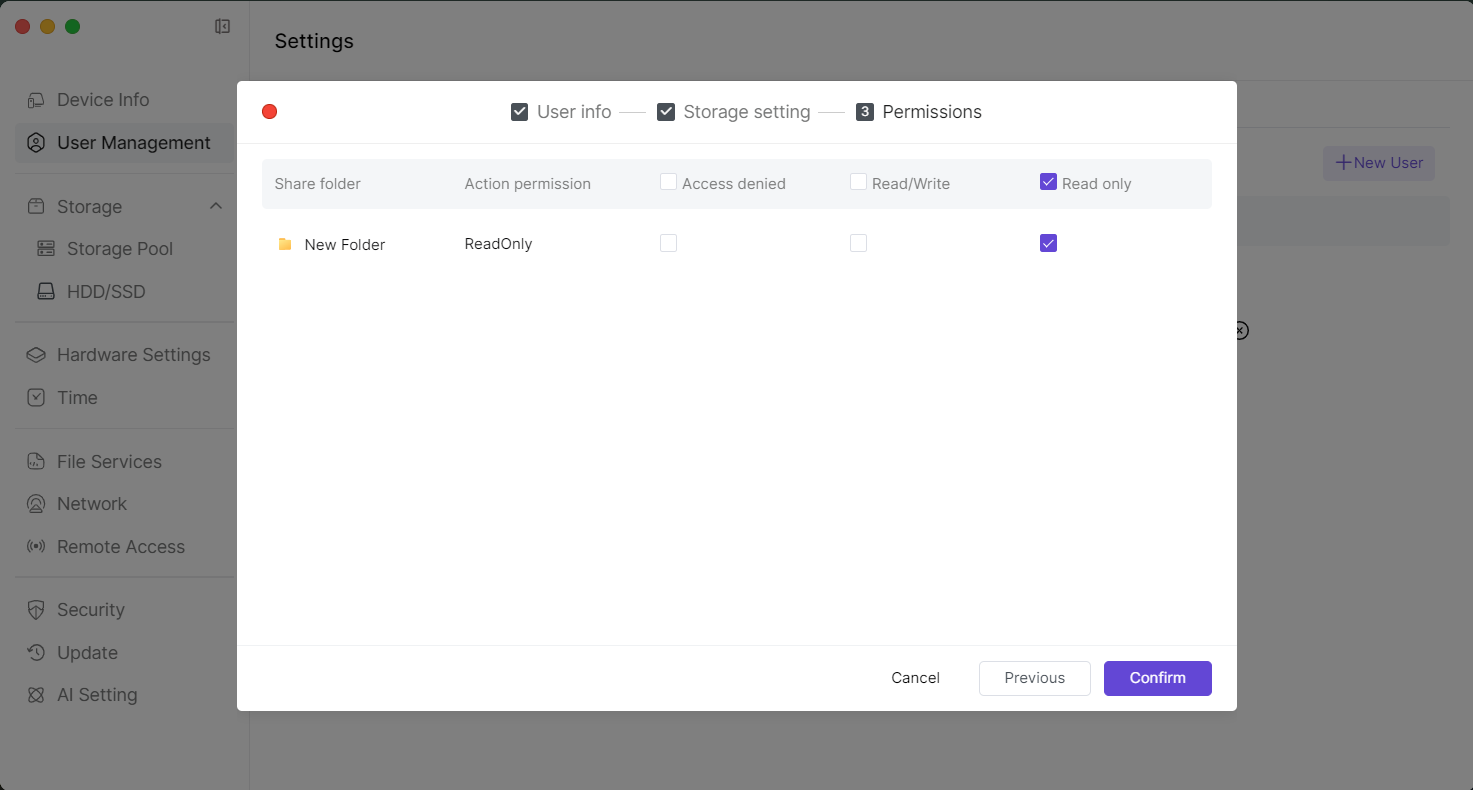
- In the "Permissions" page, you can set the folder permissions for the new user, then click Confirm in the bottom right corner to complete user creation. You can skip this setting initially and modify user folder permissions later in "User Management" if needed.
 PS: In the user management interface, you can create User Groups and add users to these groups. You can then centrally manage and set permissions for users within the same group, including default permissions for file storage, read/write access, etc.
2.2 Modifying User Permissions
- At the bottom of the main interface, open the Settings application.
- After entering the "Settings" page, click User Management in the left sidebar to enter the user management page, then click the Modify button (the button in the red box) to enter the user permission modification window.
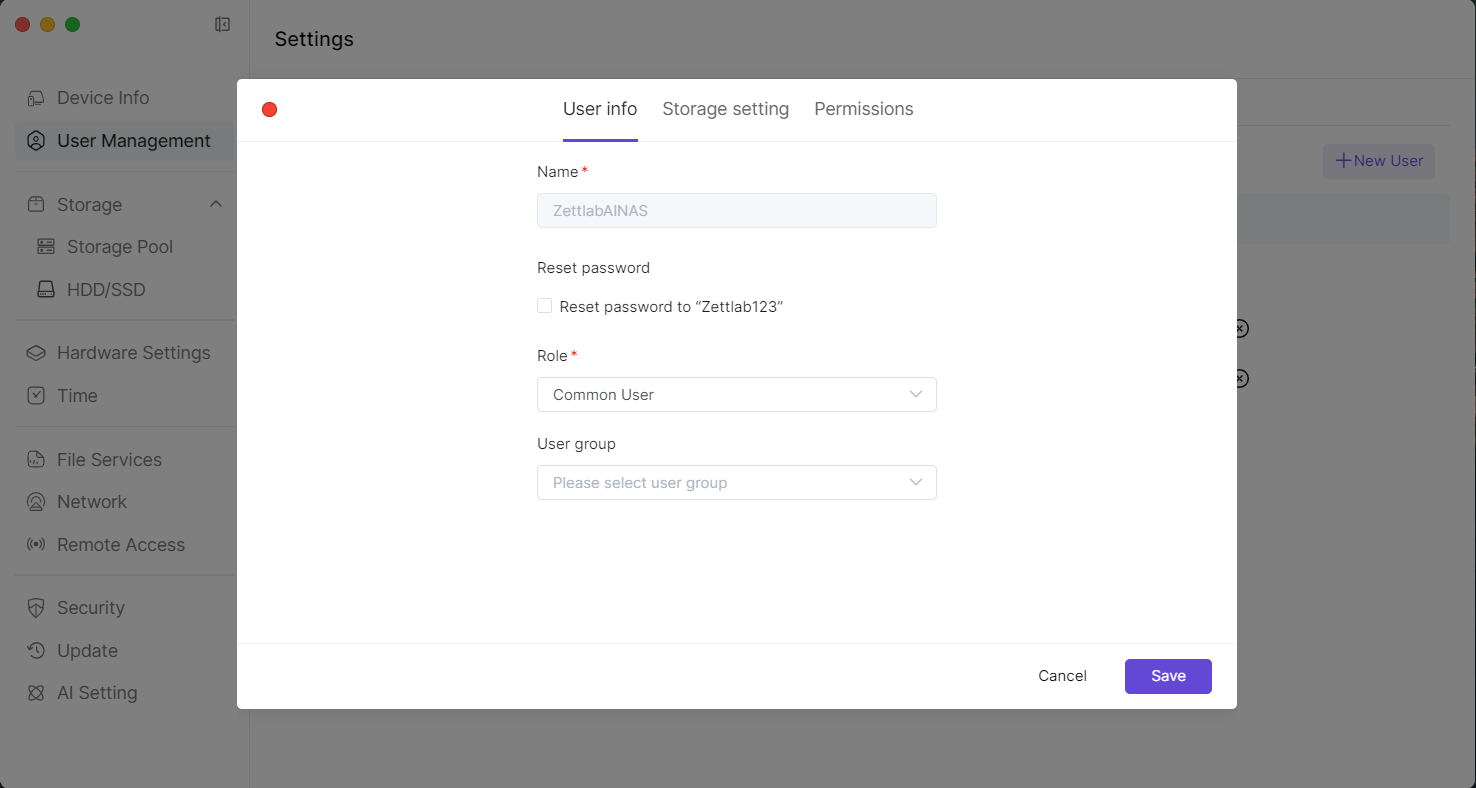
The user permission modification window at the top contains "User info", "Storage setting", and "Permissions". After modifying each item, click Save in the bottom right corner to save your changes.
3.1 "User info" modification page
 3.2 "Storage setting" modification page.
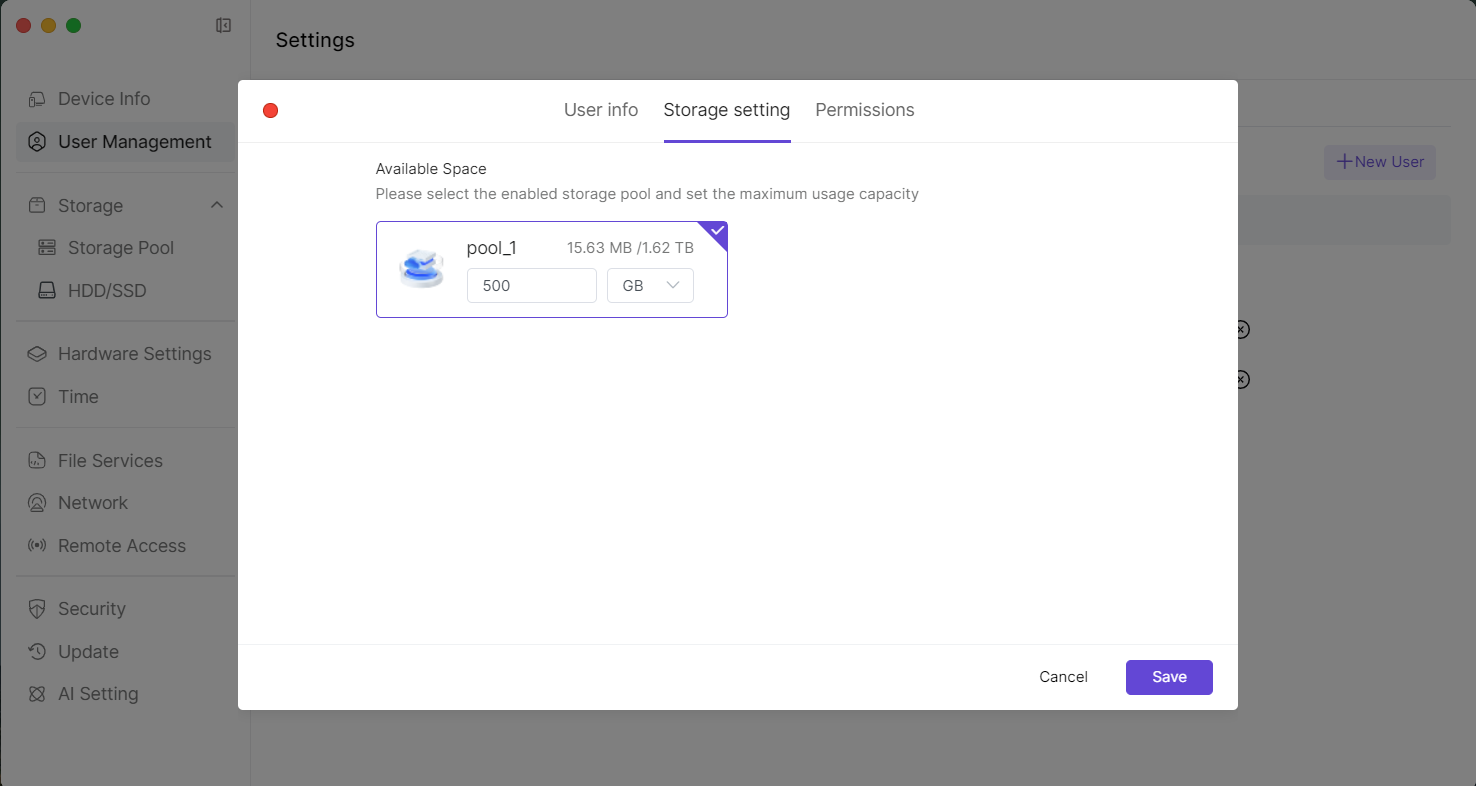 3.3 "Permissions" modification page.
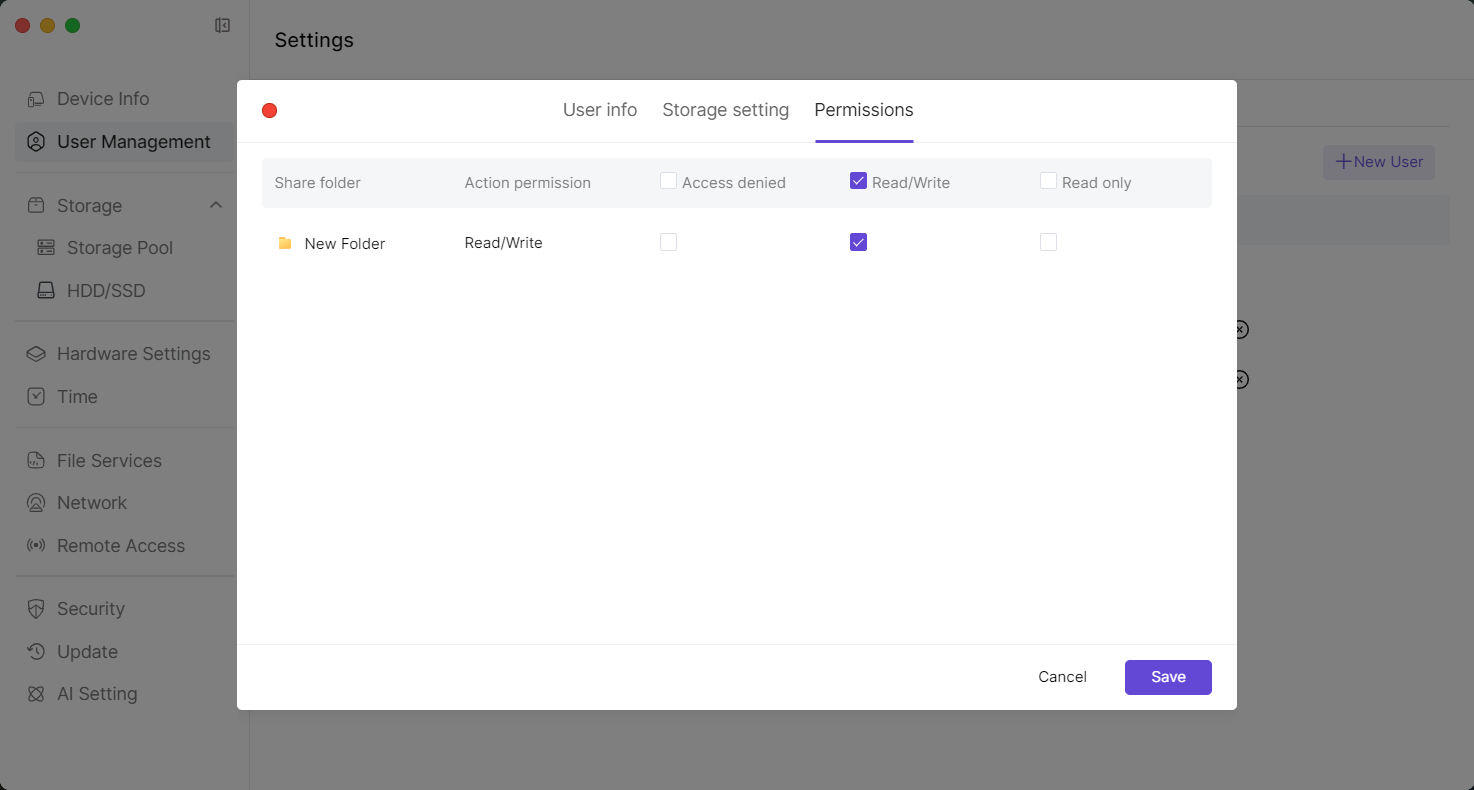
2.3 User Group Management
- Open the [Settings] application at the bottom of the main interface.
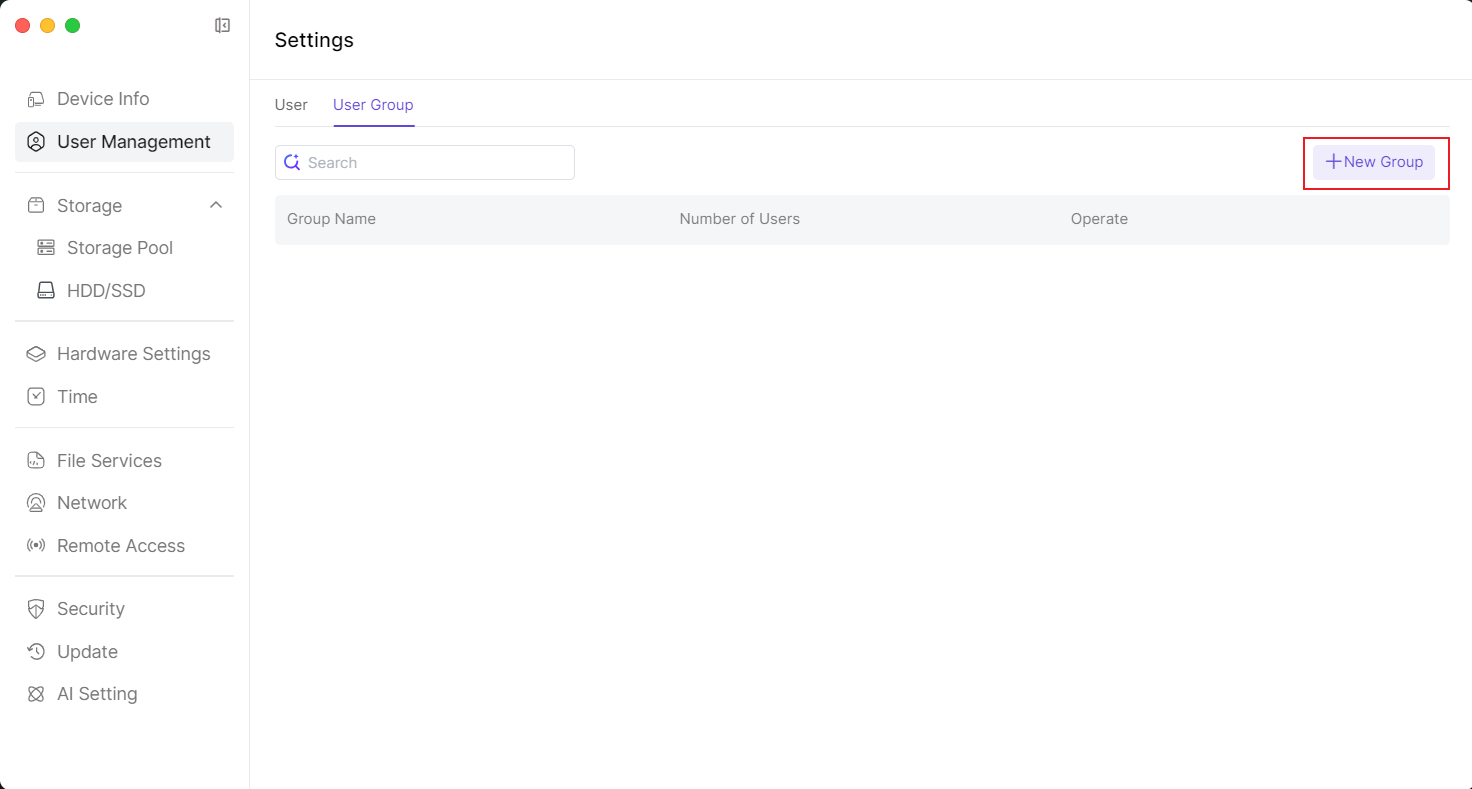
- After entering the "Settings" page, click [User Management] in the left sidebar to enter the user management page, then click [User Group] (the button in the red box).
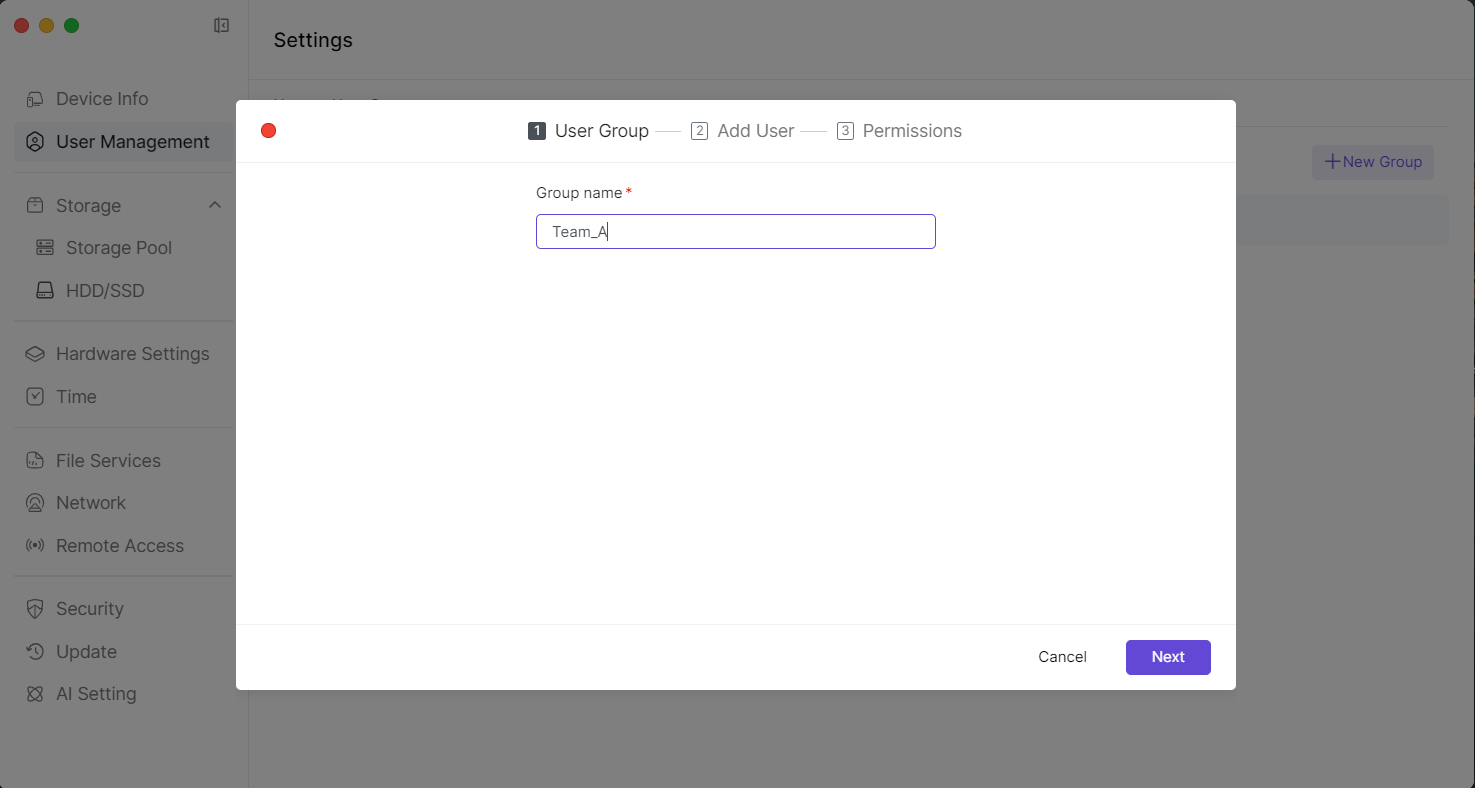
- After entering the "User Group" page, click [+New Group] in the upper right corner to create a new user group.
- First step, enter the User Group name, then click [Next] in the lower right.
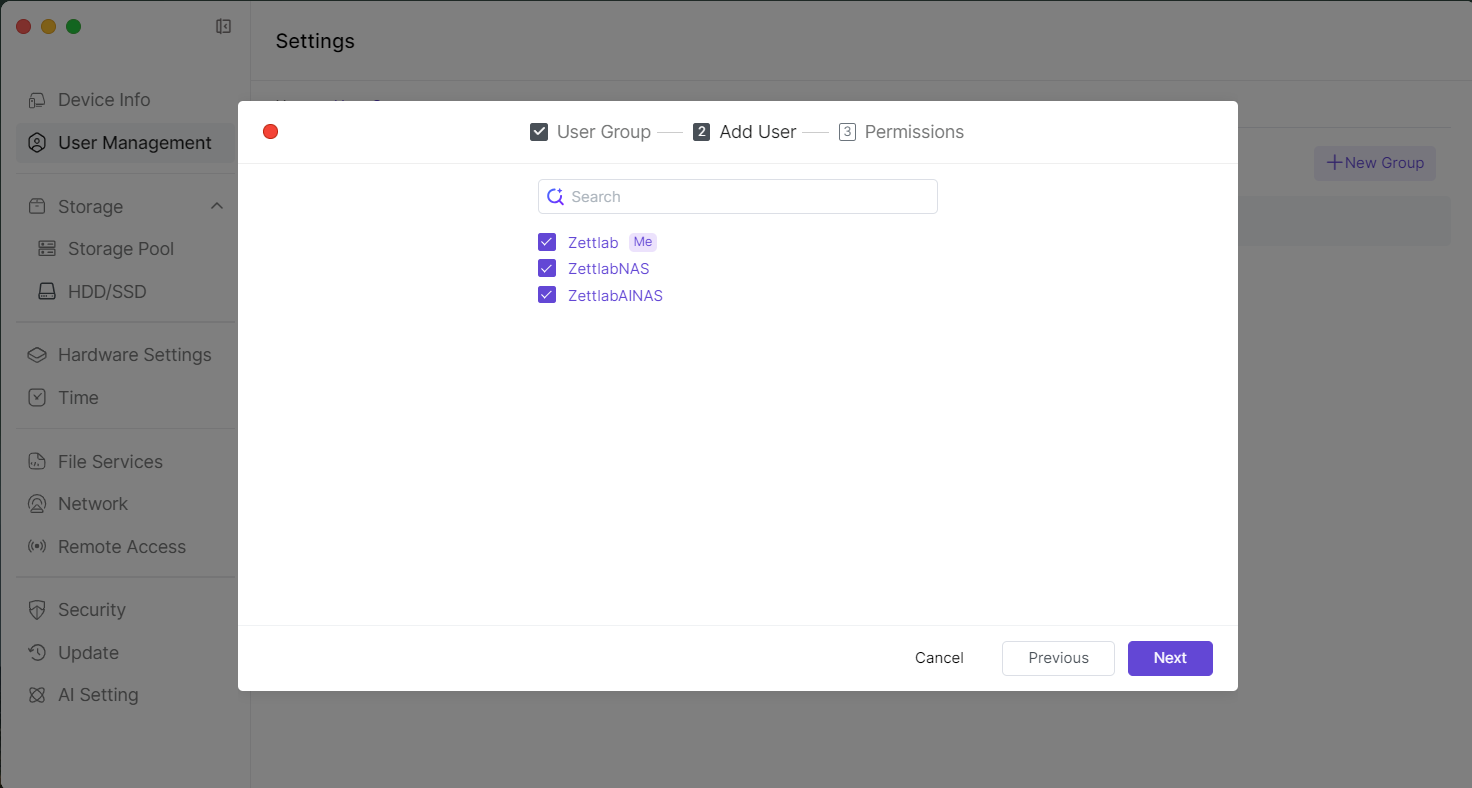
- Add relevant users to the user group, then continue to click [Next] in the lower right.
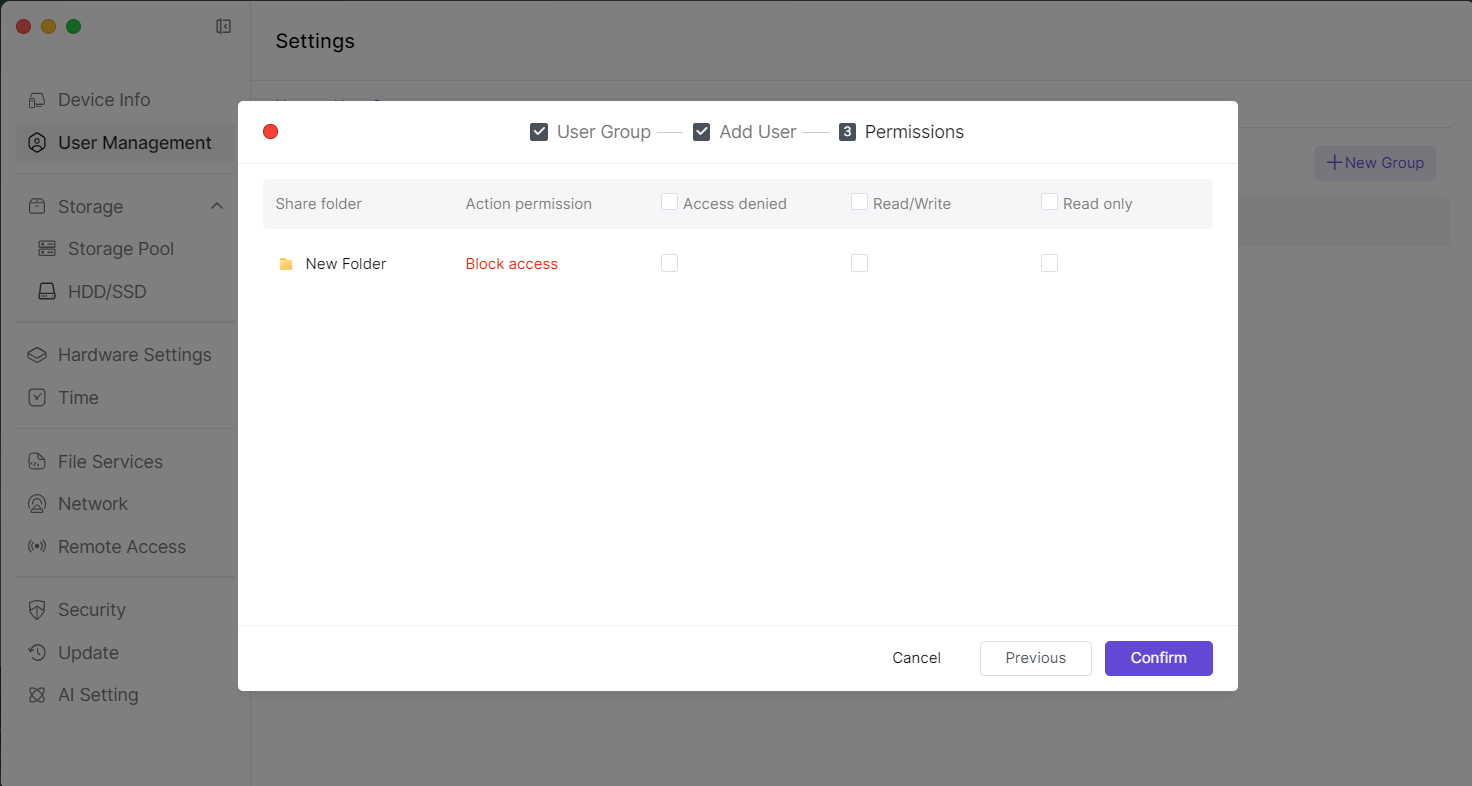
- Set the folder permissions for the user group, then click [Confirm] in the lower right to complete the settings.
3. File Services
SMB enables seamless integration with operating systems such as Windows, macOS, and Linux, achieving file sharing within a local area network (LAN). Users can directly access files and folders on the NAS through the SMB protocol, conveniently performing data storage, backup, and collaboration, making it suitable for home and small business use.
3.1 Use SMB Service
3.1.1 Open the Settings application from the main interface at the bottom.
3.1.2 After entering the "Settings" page, click File Services in the left sidebar to access the SMB settings page.
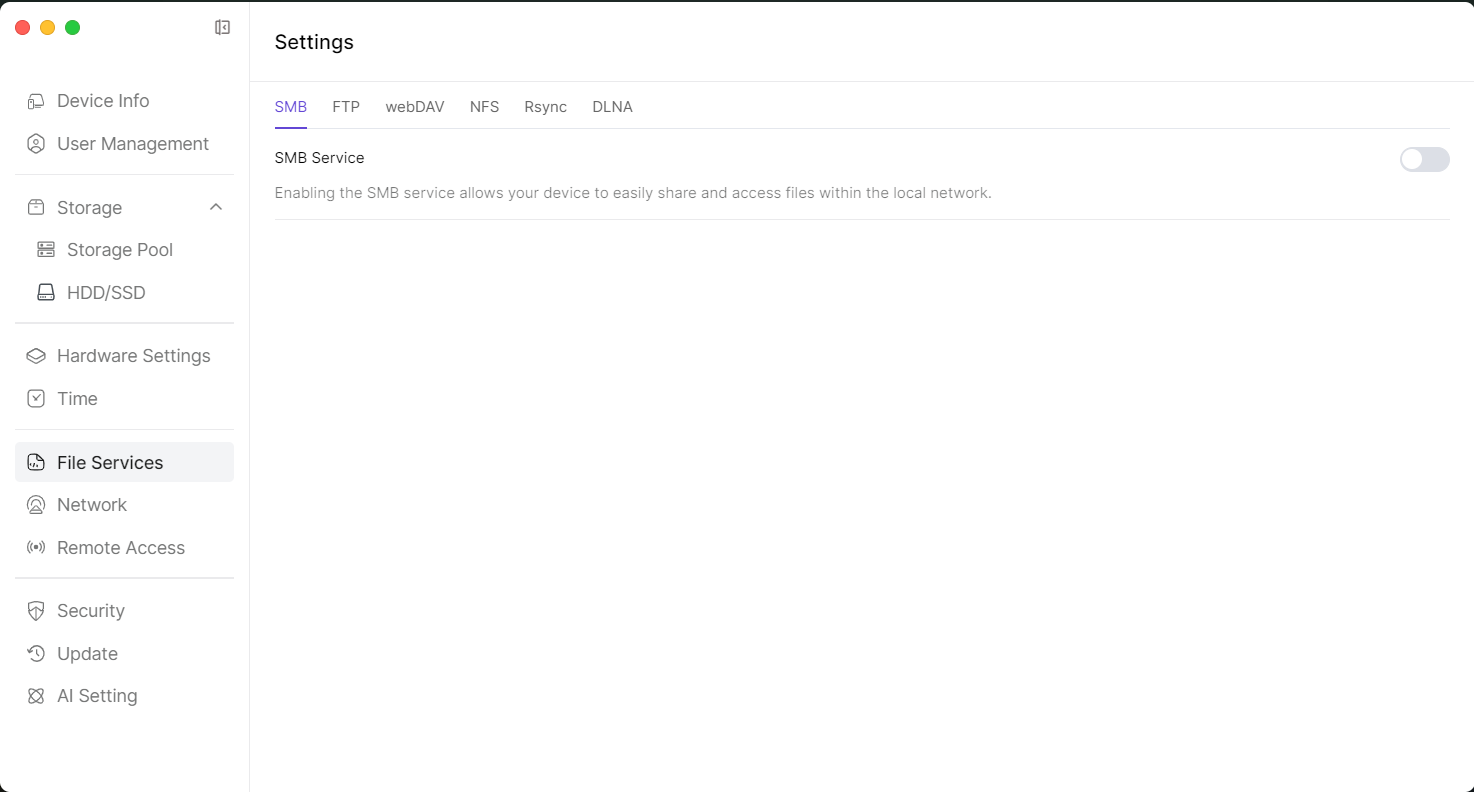 3.1.3 Click the button to enable SMB Service, and copy the device's IP address.
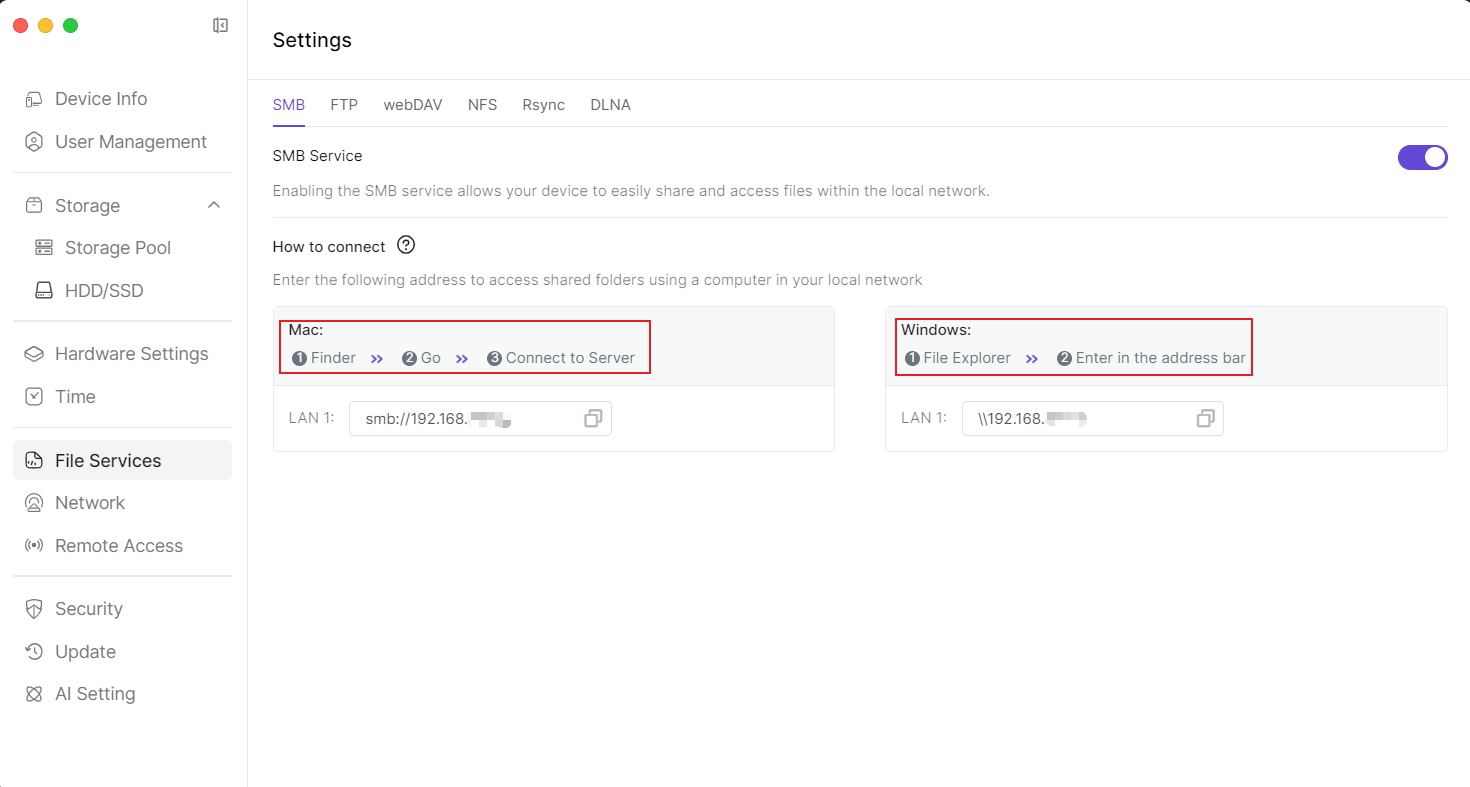
3.1.4 Open your PC's File Explorer, paste the SMB link in the address bar, and press Enter. 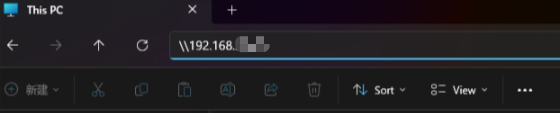 3.1.5 In the "Enter Network Credentials" popup window, enter your NAS username and password, then click OK.
 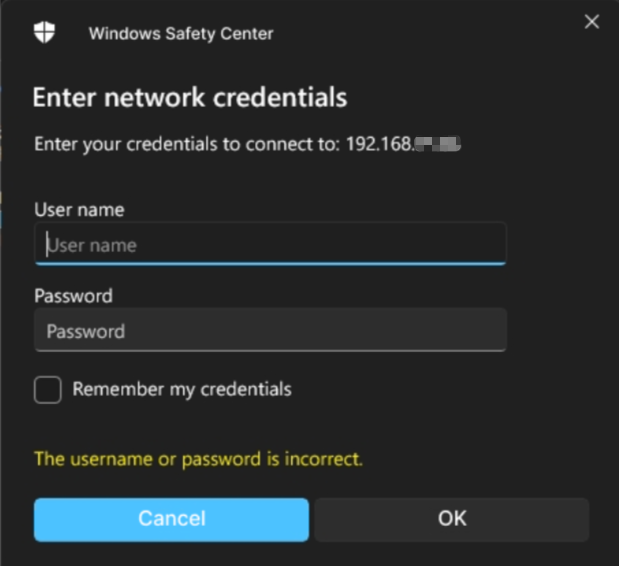 3.1.6 Access the SMB share.
3.1.7 Open your Mac's Finder, select Go > Connect to Server. 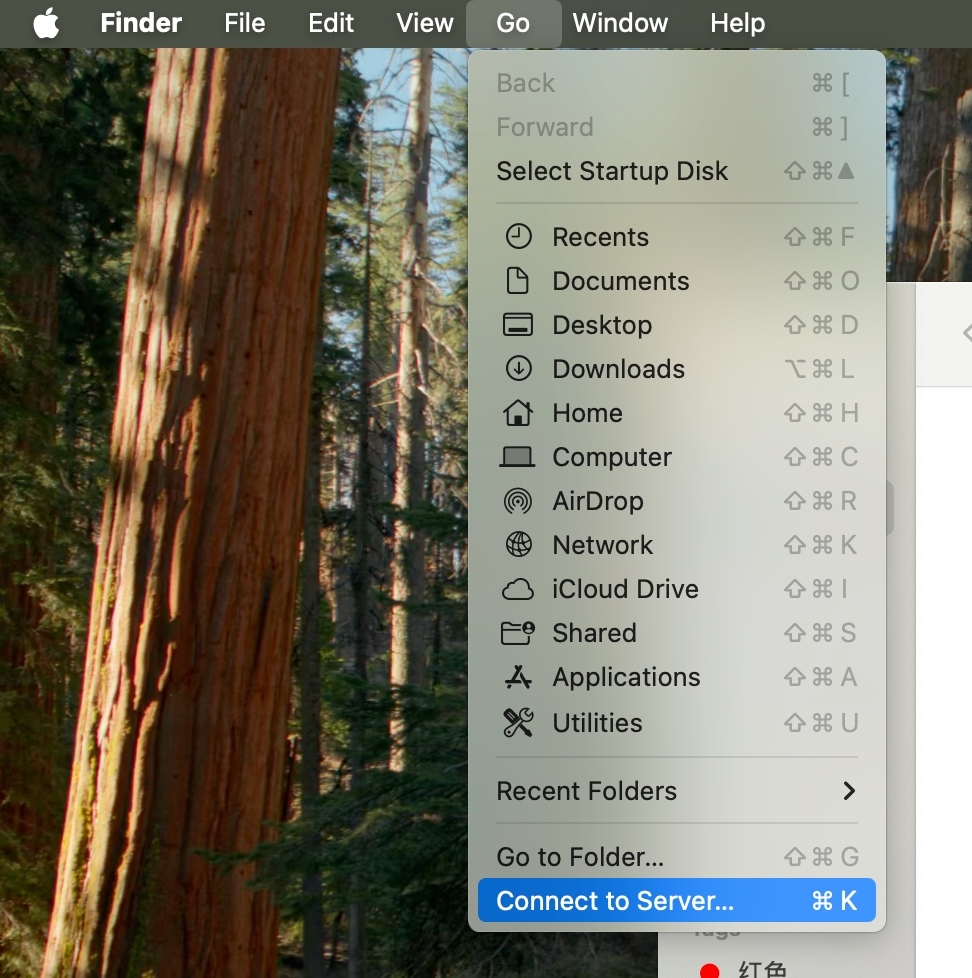 3.1.8 Paste the SMB link in the popup window and click Connect.
 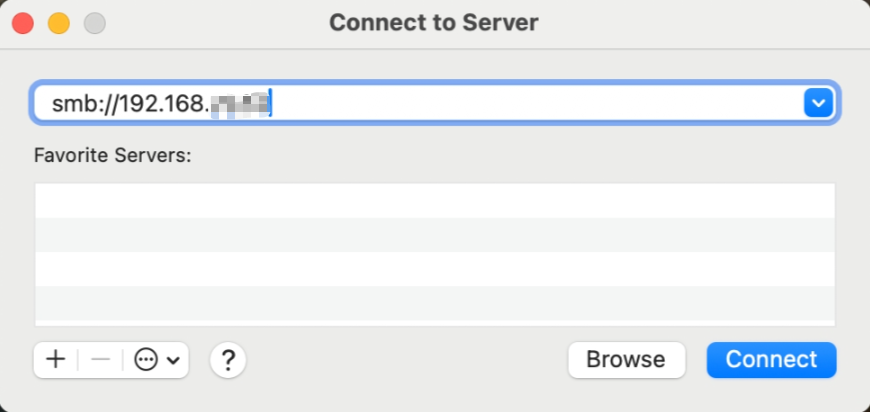 3.1.9 Enter your username and password, then click Connect.
  3.1.10 Select the user files you want to access and click OK.
 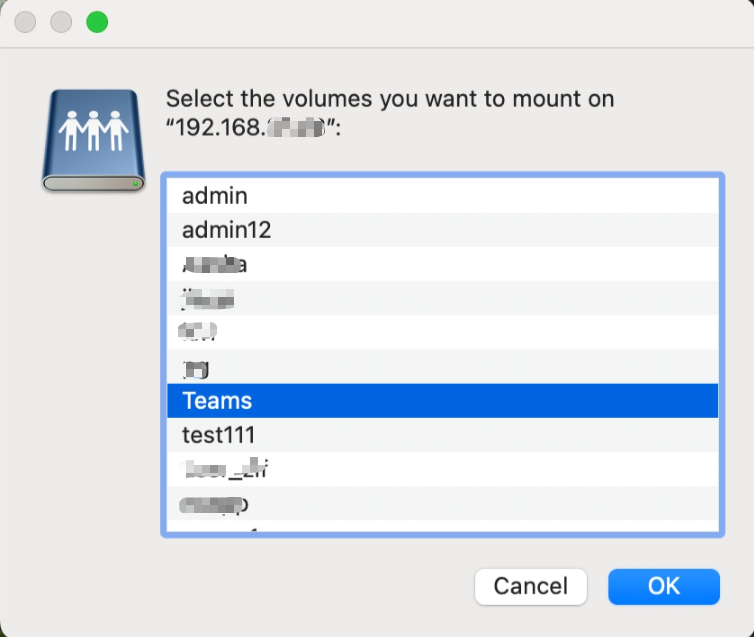 3.1.11 Successful login.
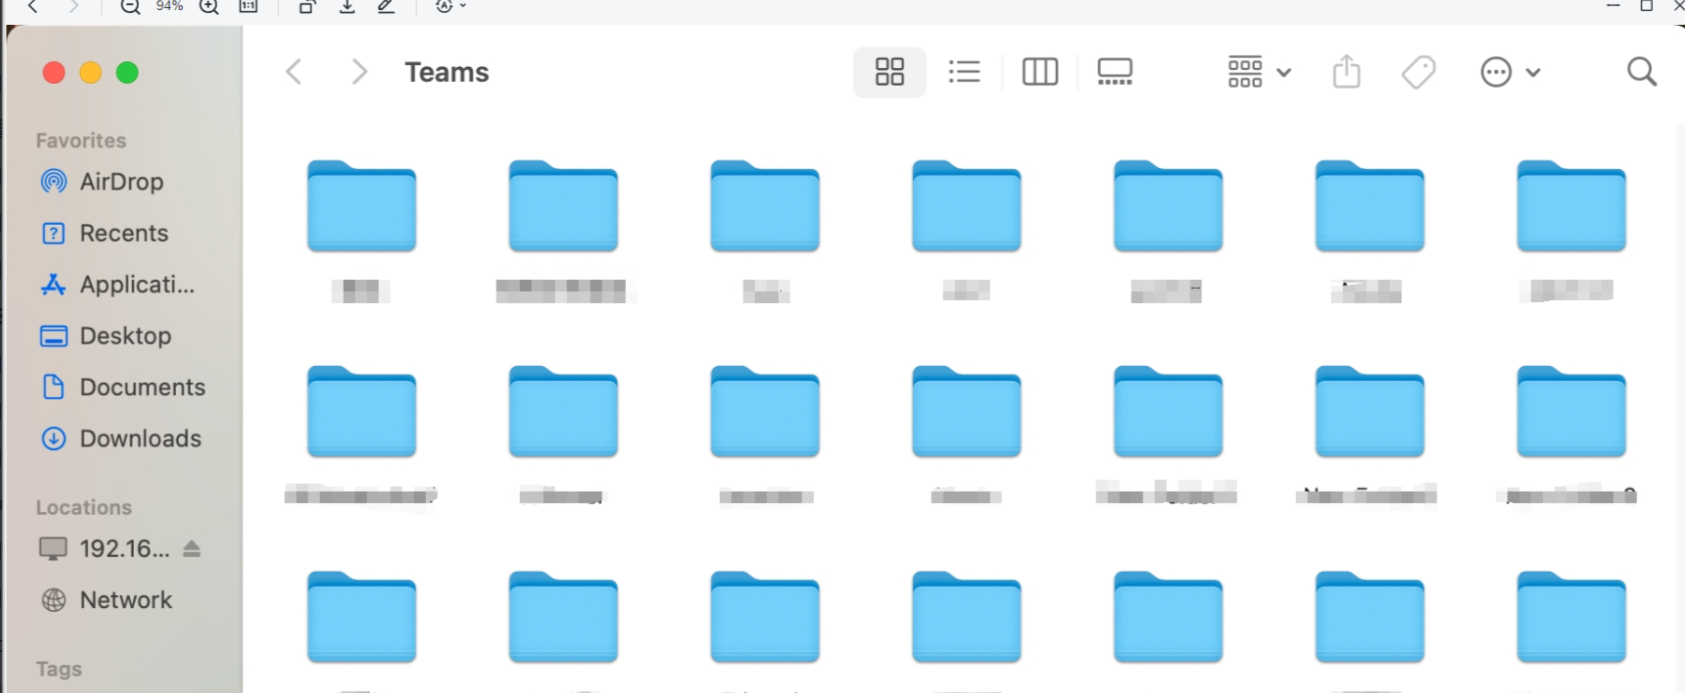
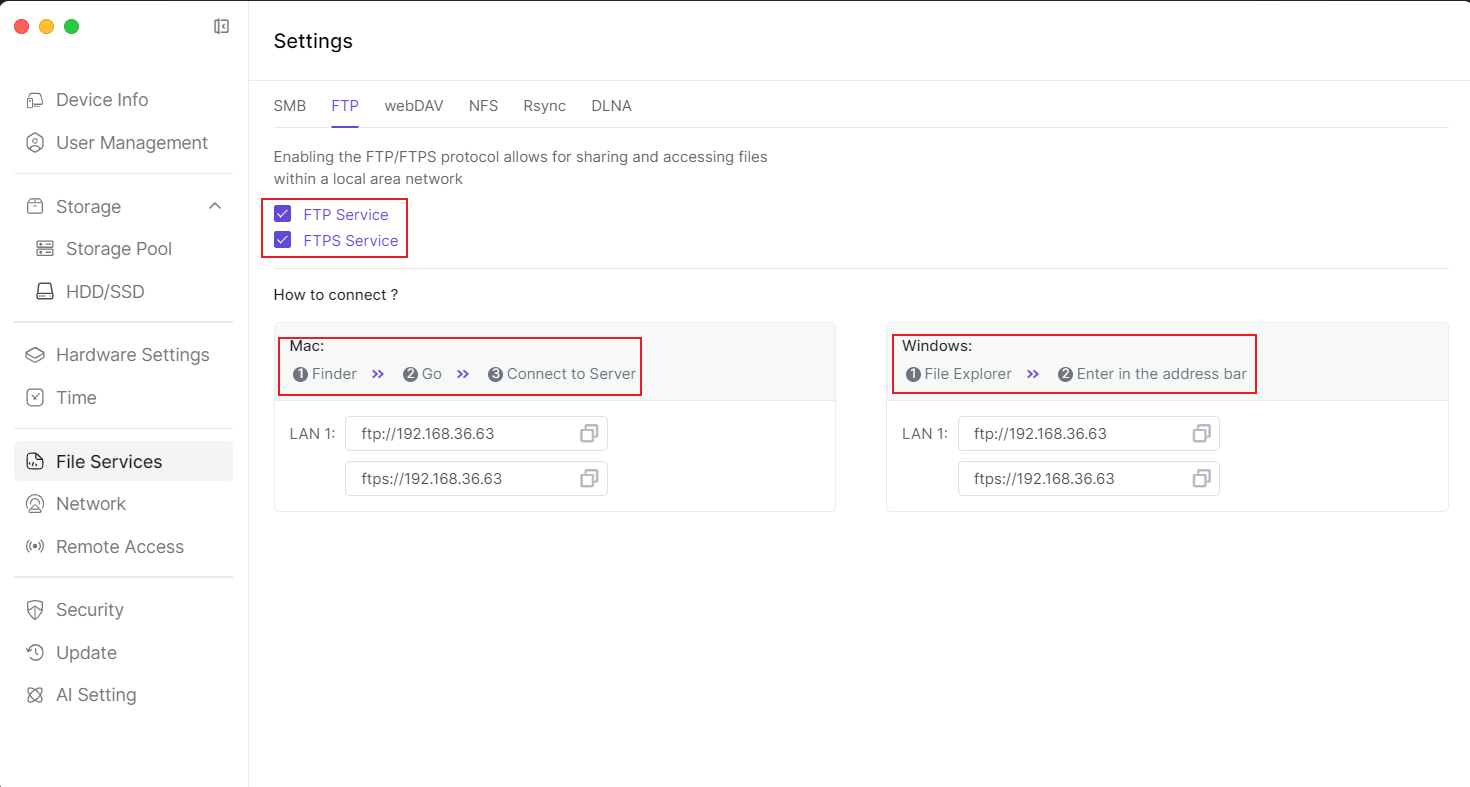
3.2 Using FTP/FTPS Services
NAS (Network Attached Storage) FTP/FTPS functionality allows users to remotely access and manage files on the storage device through standard File Transfer Protocol (FTP) or its encrypted version (FTPS). FTP provides simple file transfer capabilities, while FTPS ensures secure data transmission via SSL/TLS encryption, making it suitable for scenarios requiring remote file sharing and data backup.
3.2.1 Open the Settings application from the main interface at the bottom.
3.2.2 After entering the "Settings" page, click File Services in the left sidebar to access the FTP settings page. Enable either FTP Service or FTPS Service and copy the link under "LAN".
3.2.3 Open your PC's File Explorer.
3.2.4 Paste the FTP link in the address bar and press Enter.  3.2.5 The "Log In" dialog will appear. Enter your NAS username and password, then click Log On.
 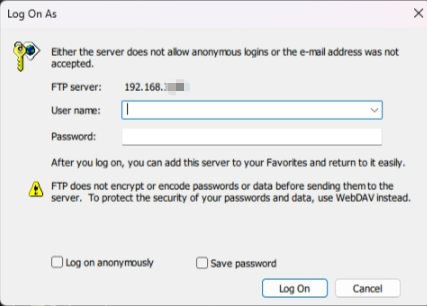 3.2.6 Login successful.
  3.2.7 Open your Mac's Finder.
3.2.8 Select Go > Connect to Server. 3.2.9 Paste the FTP link in the dialog box and click Connect. 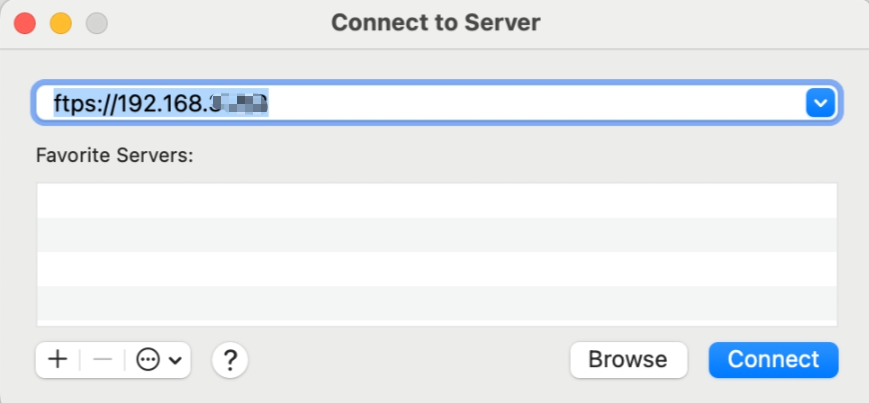 3.2.10 Enter your username and password, then click Connect.
  3.2.11 Successful login.
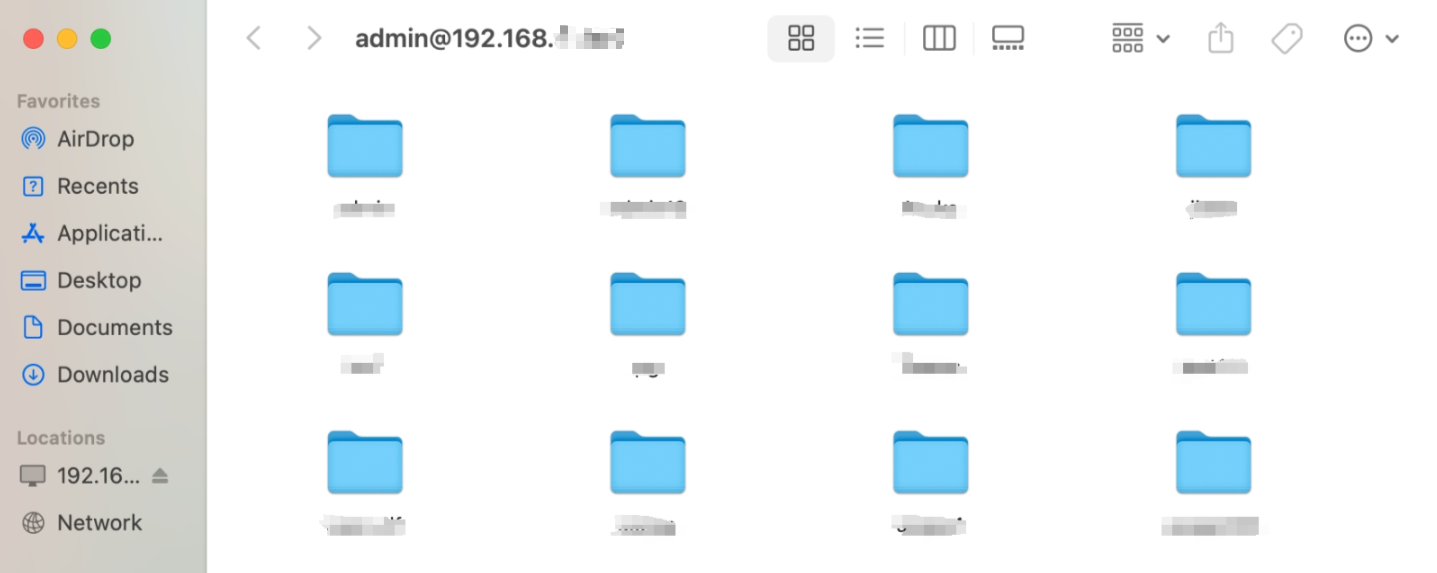
3.3 Using WebDAV Service
NAS supports WebDAV functionality which allows users to remotely access and manage files on the storage device through HTTP/HTTPS protocols. WebDAV provides a local file system-like operation experience, supporting file upload, download, editing, and deletion, suitable for cross-platform, remote collaboration, and file synchronization scenarios, while ensuring data transmission security through HTTPS encryption.
3.3.1 Open the [Settings] application from below the main interface.
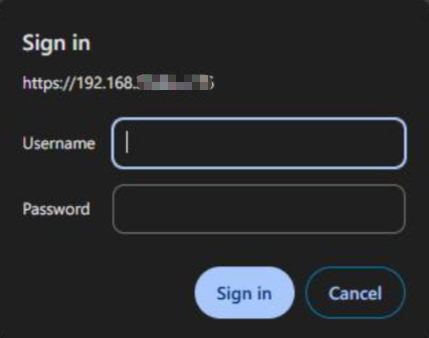
3.3.2 After entering the "Settings" page, click [File Services] in the left sidebar, enter the "webDAV" settings page, click to enable "webDAV Service", and copy the IP in "LAN". 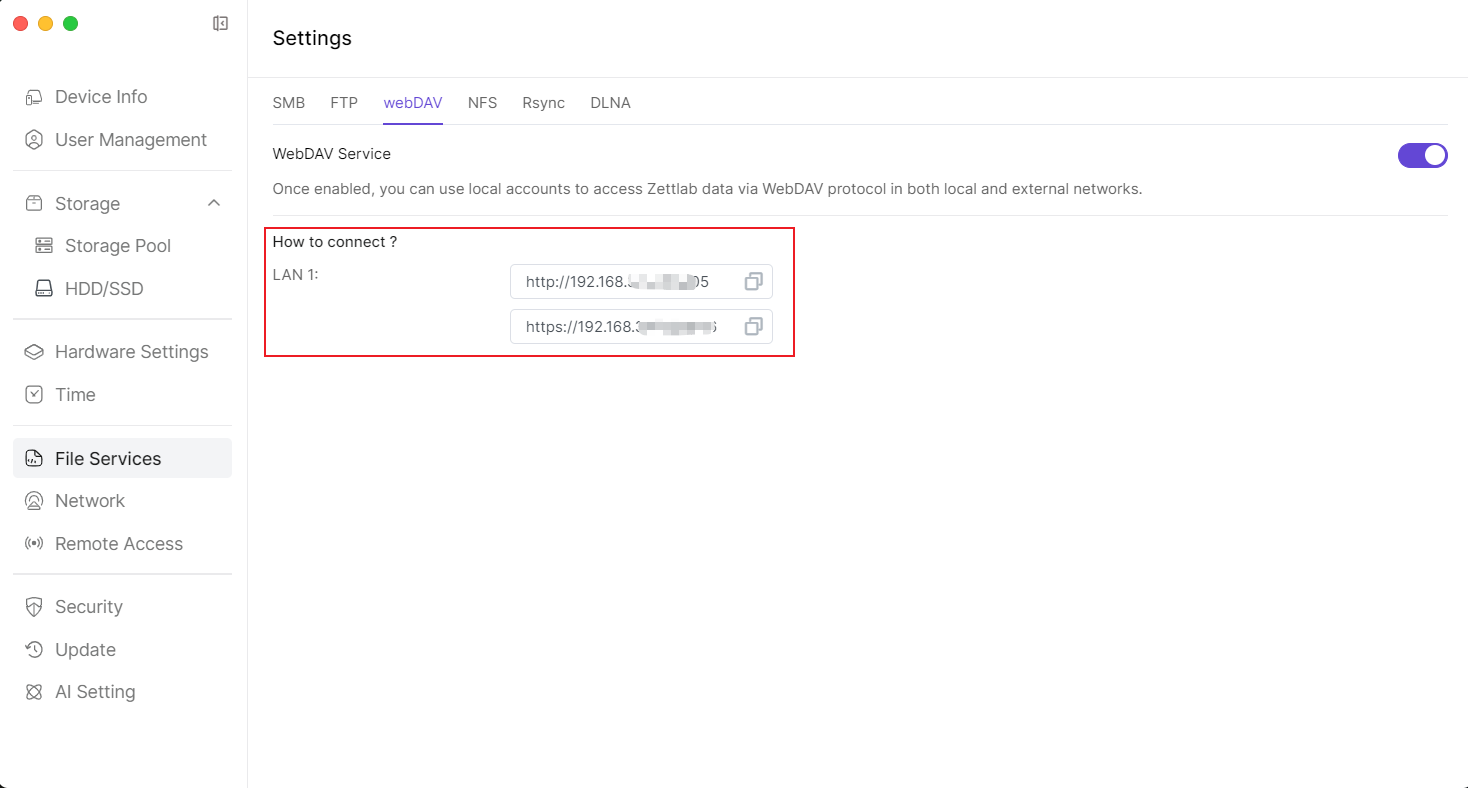 3.3.3 Open a browser, paste it in the link input box, and click "Enter".
  3.3.4 A "Login" popup will appear, enter the username and password, then click [Login] below.
3.3.5 Complete the login. 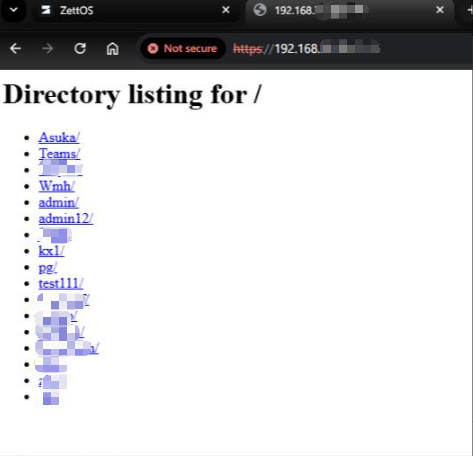
3.4 Using NFS
NAS supports NFS functionality, allowing users to remotely access and manage files on the storage device through the NFS protocol. It features easy configuration, high performance, security, compatibility, and flexibility, meeting the needs of different users.
3.4.1 Open the [Settings] application from below the main interface. 3.4.2 After entering the "Settings" page, click [File Services] in the left sidebar, enter the "NFS" settings page, click to enable "NFS", add a folder, and copy the IP in "LAN". 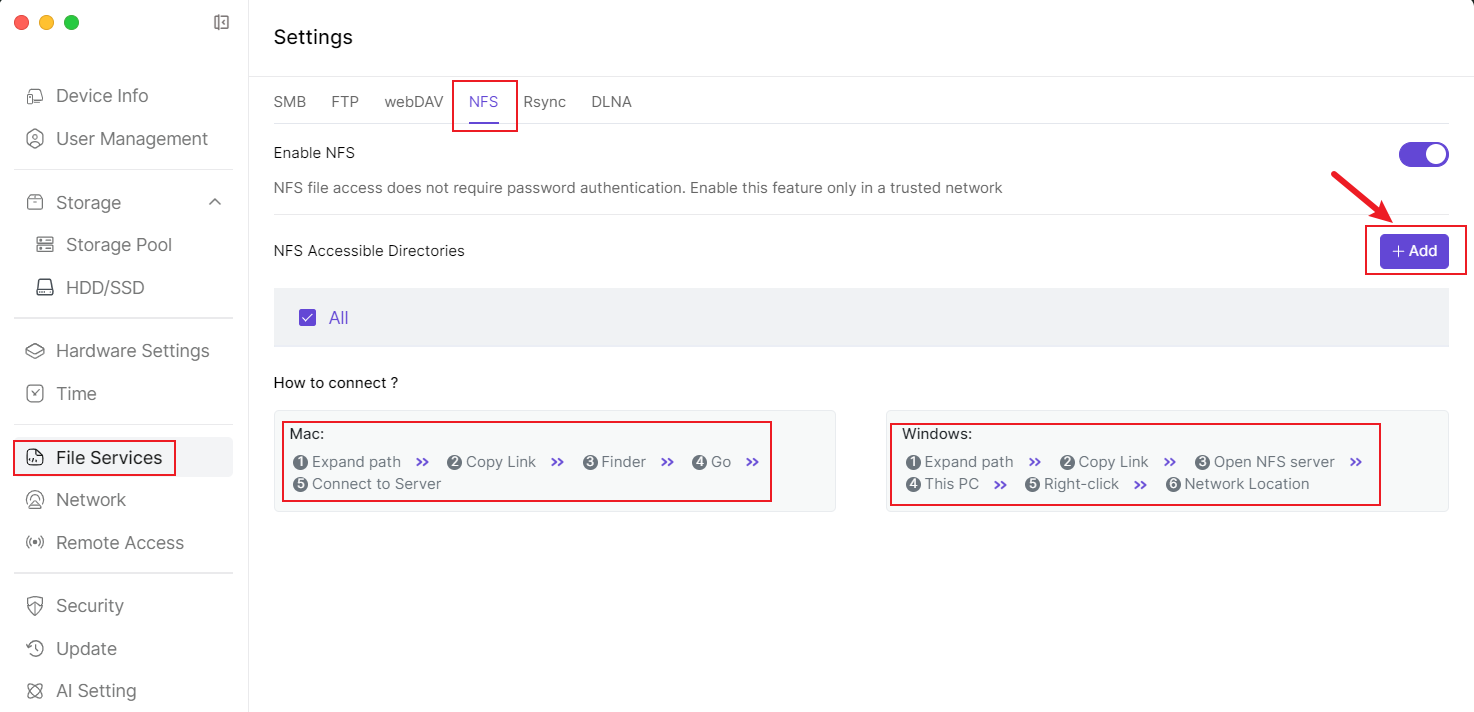
3.5 Using Rsync
Rsync is an efficient data transfer protocol, widely used for local and remote data synchronization and backup.
3.5.1 Open the [Settings] application from below the main interface. 3.5.2 After entering the "Settings" page, click [File Services] in the left sidebar, enter the "Rsync" settings page, click to enable "Rsync", fill in user information, and click [apply]. 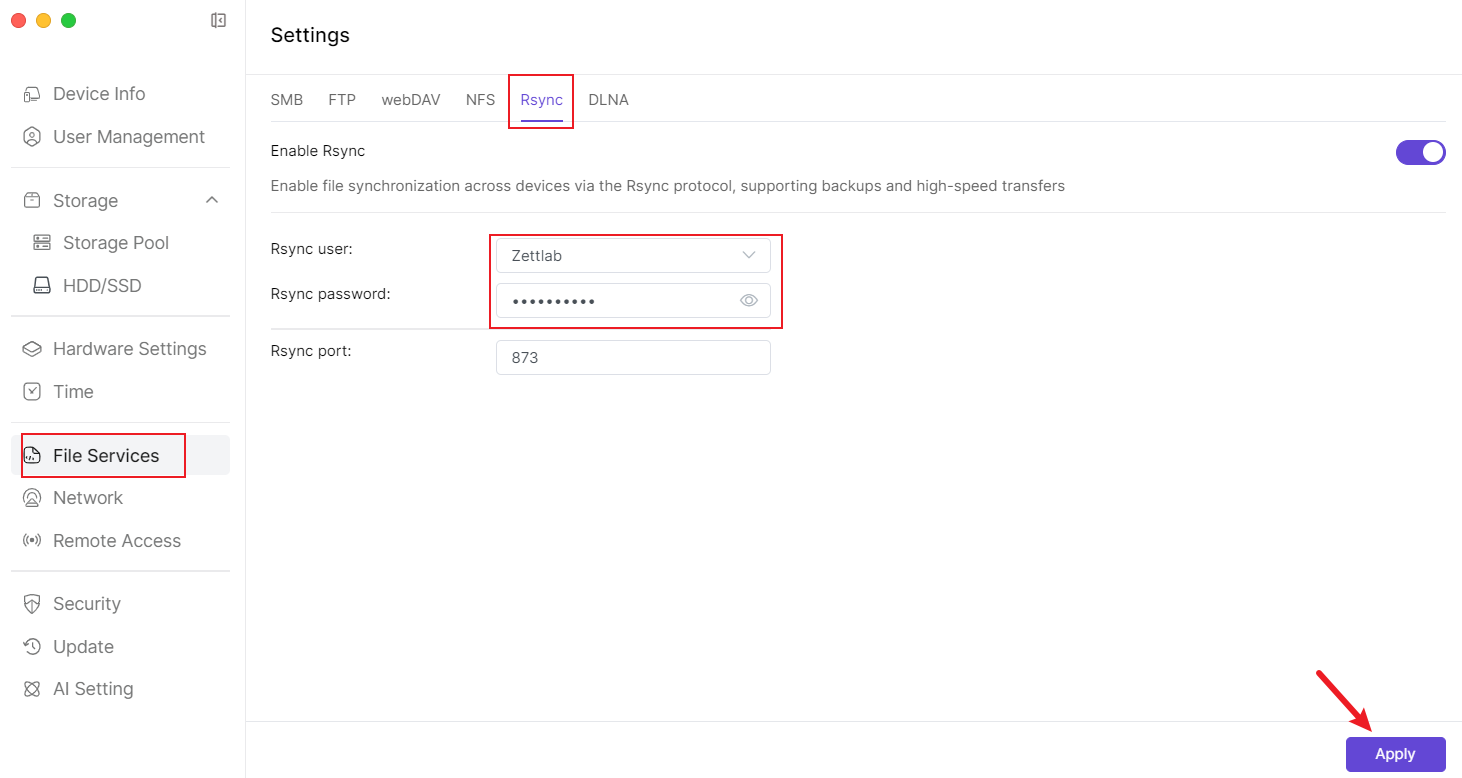
3.6 Using DLNA
DLNA (Digital Living Network Alliance) is a standardized technical protocol used for sharing digital media and content services in a digital home network. NAS devices typically provide DLNA services, allowing you to access and play media files stored on the NAS through DLNA-compatible devices (such as smart TVs, audio devices, computers, etc.) on the local area network. 3.6.1 Open the [Settings] application from below the main interface.
3.6.2. After entering the "Settings" page, click [File Services] in the left sidebar, enter the "DLNA" settings page, click to enable "DLNA", and add folders. 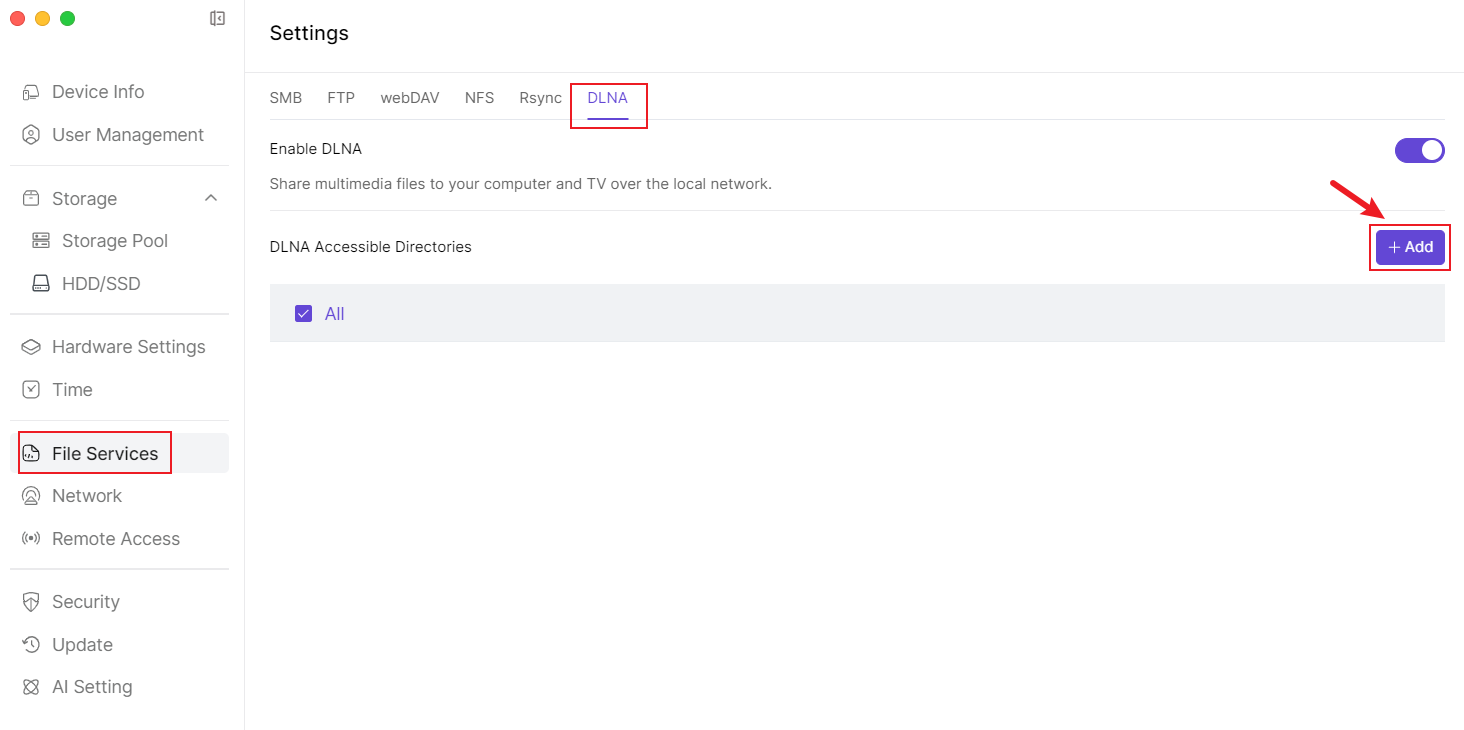
4. Remote Access
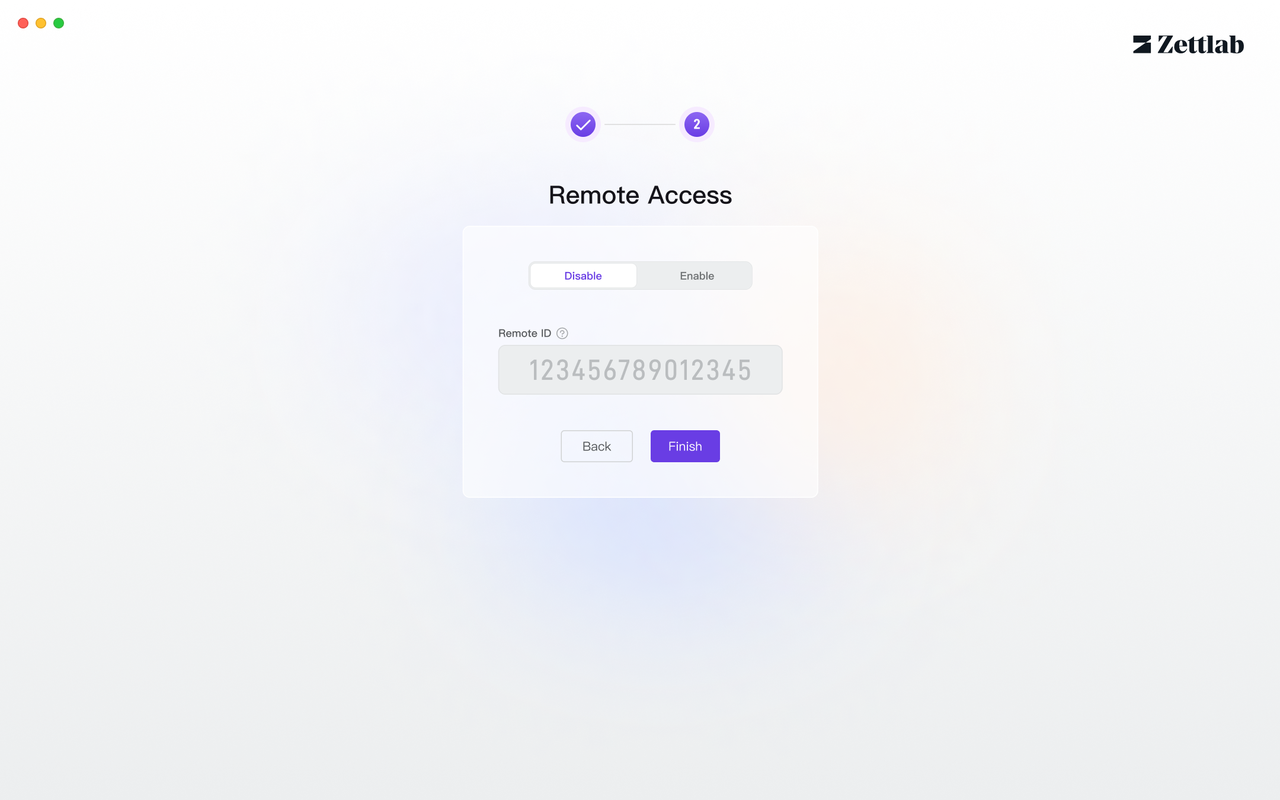
4.1 How to use Remote ID to access NAS in an external network
Open the Zettlab client and go to the login page.Enter the Remote ID in the "Login IP/ID" line, continue to enter the username and password, and then click [Login] below to complete the remote login.
PS: When you first log in to the system and register an administrator account, in the option to set whether to enable remote connection, you will see the default Remote ID.
4.2 Modify Remote ID
4.2.1 Open the [Settings] application from below the main interface. 4.2.2 After entering the "Settings" page, click [Remote Access] in the left sidebar. 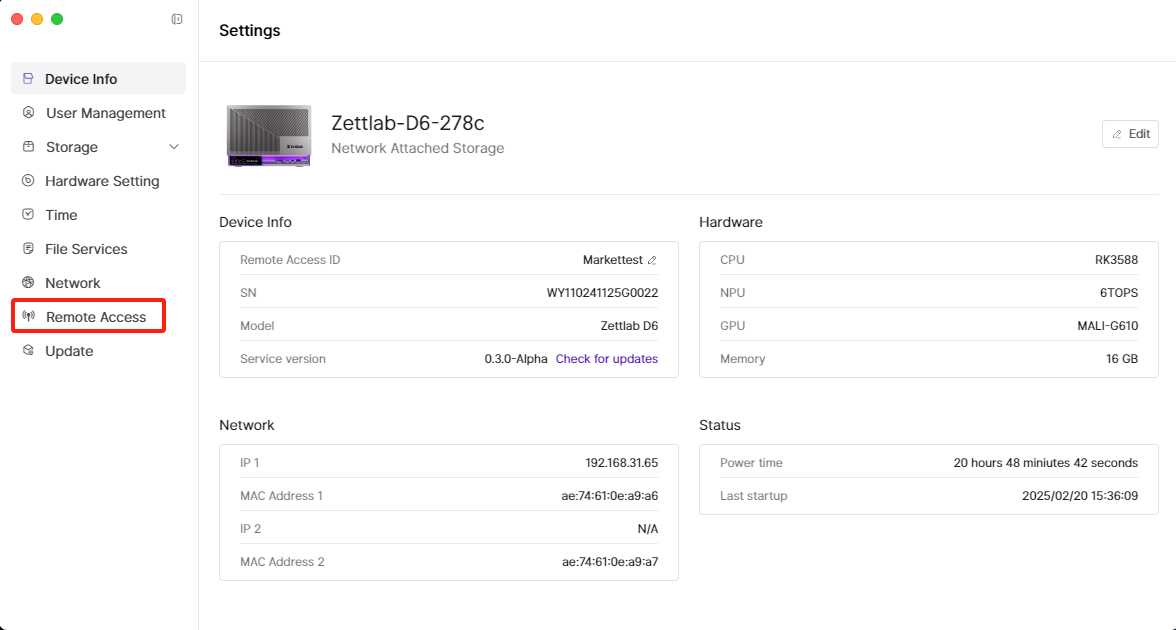 4.2.3 You can enable "Zettlab Remote Access", modify "Zettlab Remote ID" (referred to as "Remote ID" elsewhere), and click [Save] in the bottom right to complete the modification.
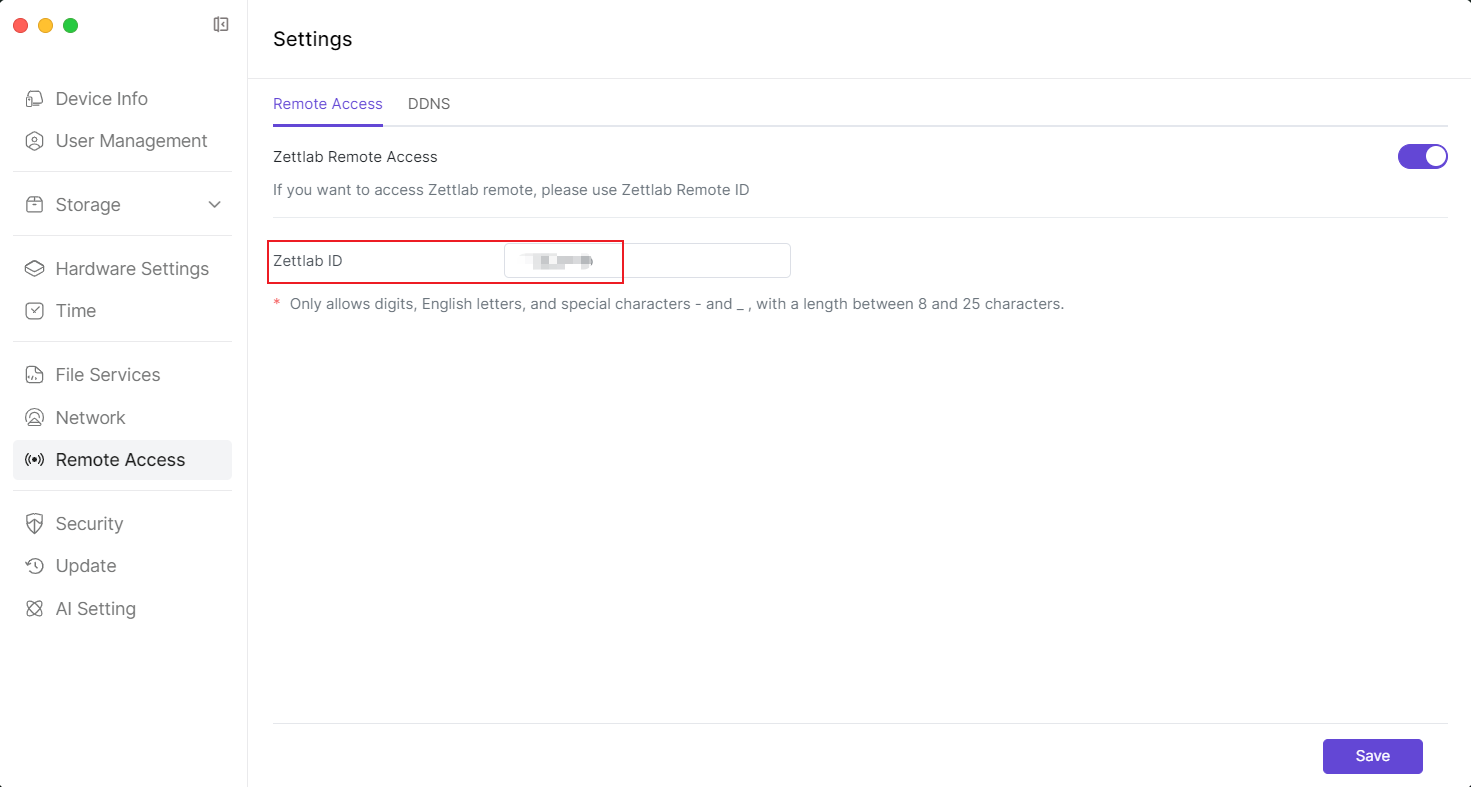
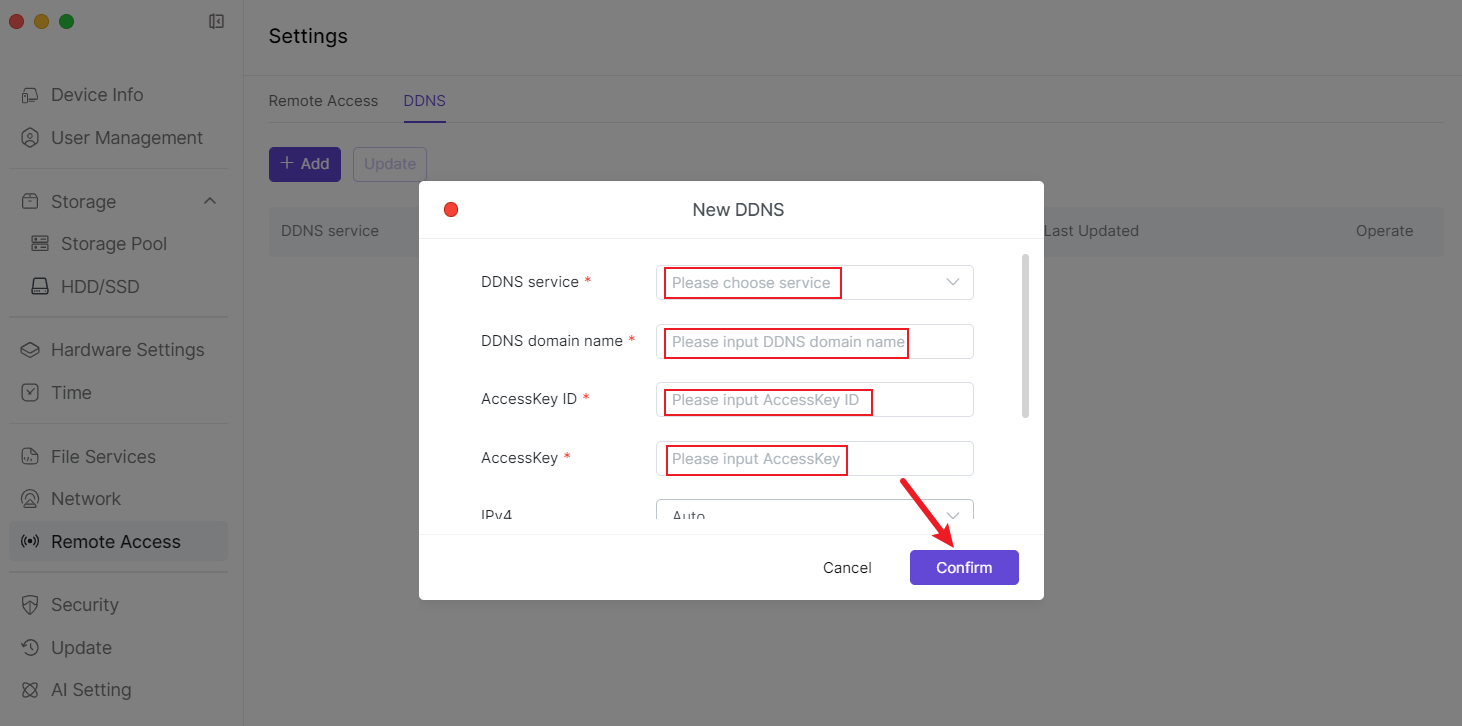
4.3 DDNS
4.3.1 Open the [Settings] application from below the main interface. 4.3.2 After entering the "Settings" page, click [Remote Access] in the left sidebar. 4.3.3 Add DDNS configuration information, and click [Confirm] after confirmation. 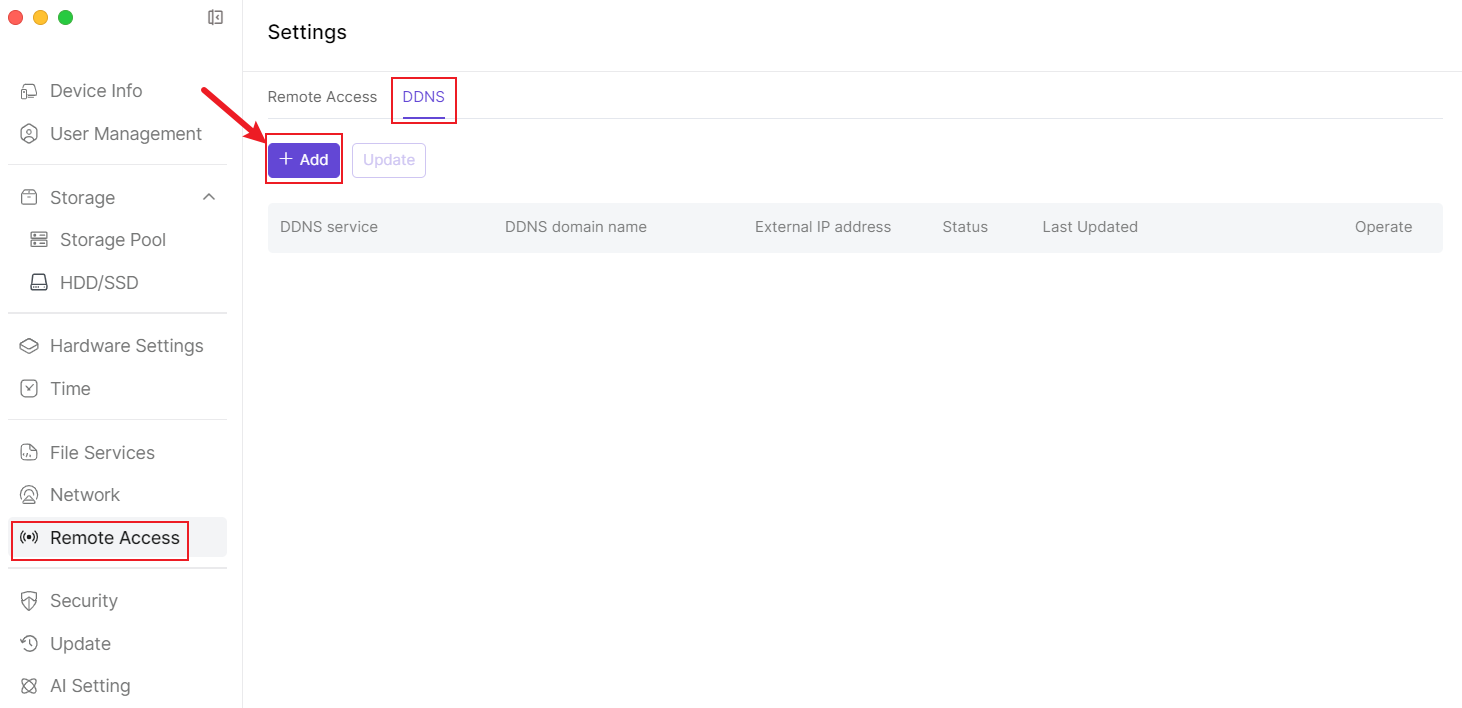
5. Hardware Setting
5.1 Setting Fan Mode
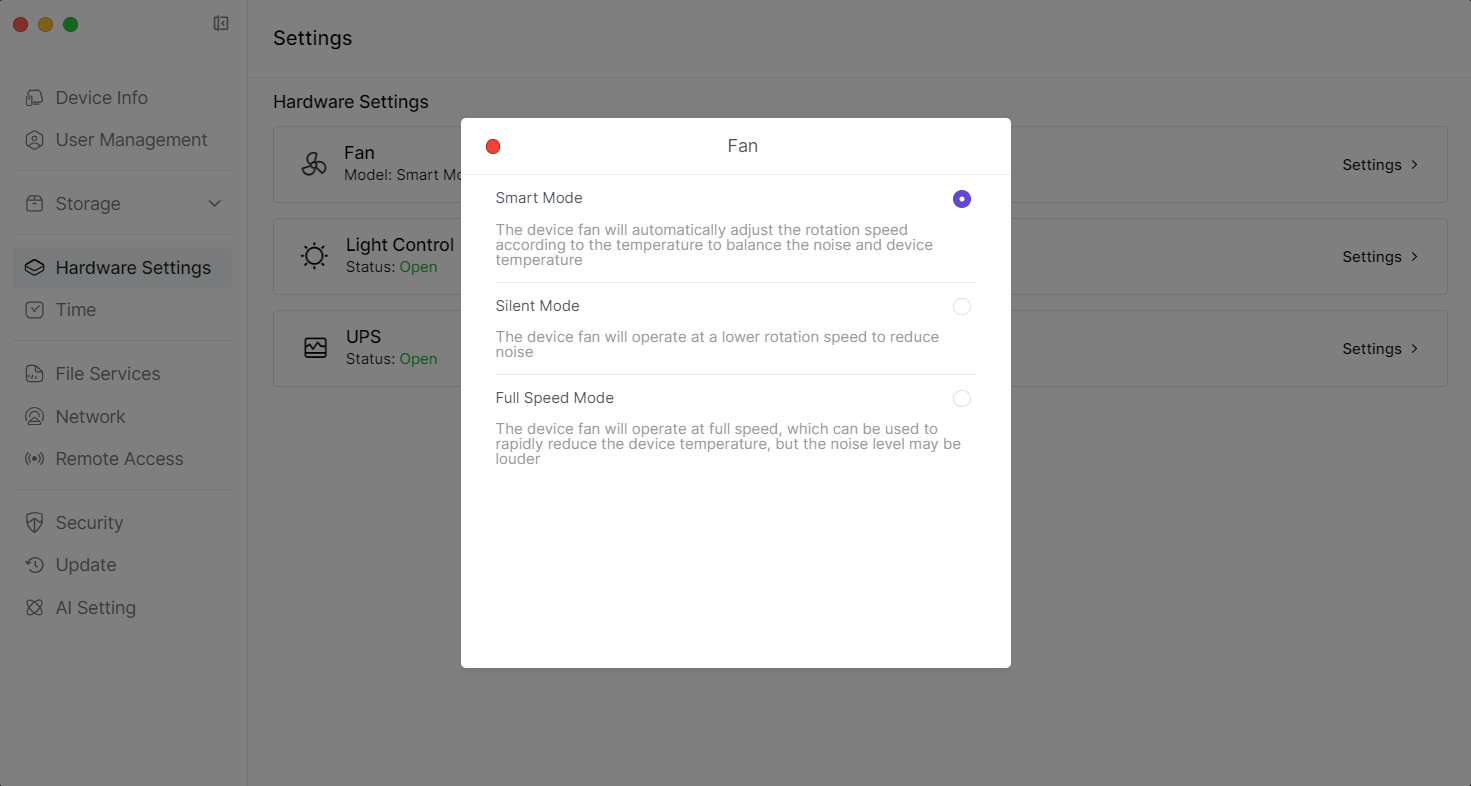
5.1.1 Open the [Settings] application from below the main interface. 5.1.2 After entering the "Settings" page, click [Hardware Setting] in the left sidebar. 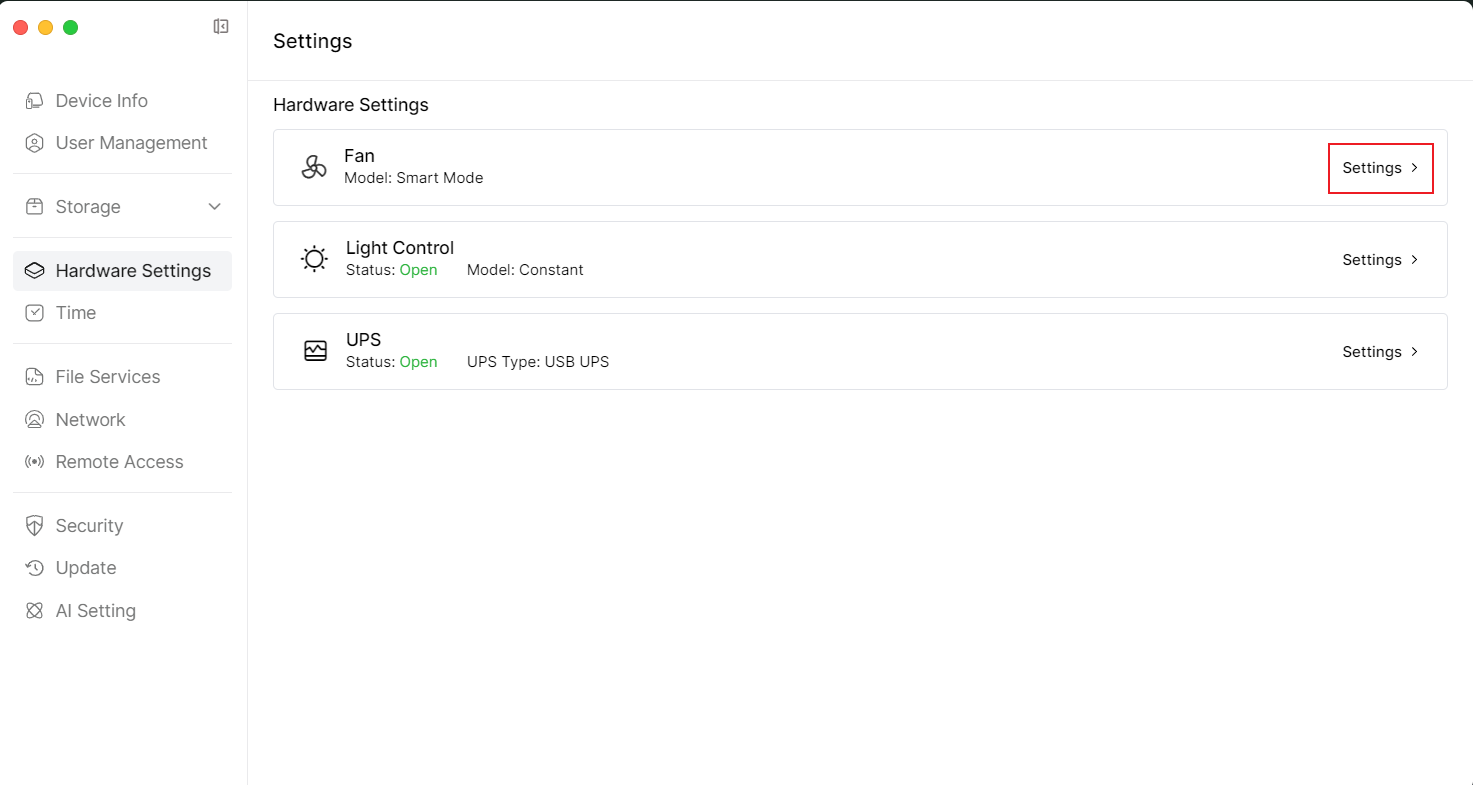 5.1.3 Continue to select and click "Fan" [Settings] on the right side, you can choose [Smart Mode], [Silent Mode], [Full Speed Mode]
- Smart Mode - The device fan will automatically adjust the speed according to the temperature to balance noise and device temperature.
- Silent Mode - The device fan will run at a lower speed to reduce noise.
- Full Speed Mode - The device fan will run at full speed, which can quickly reduce the device temperature, but the noise is relatively large.
5.2 Control Lights
5.2.1 Open the [Settings] application from below the main interface. 5.2.2 After entering the "Settings" page, click [Hardware Setting] in the left sidebar, continue to select and click "Light Control" [Settings] on the right side. 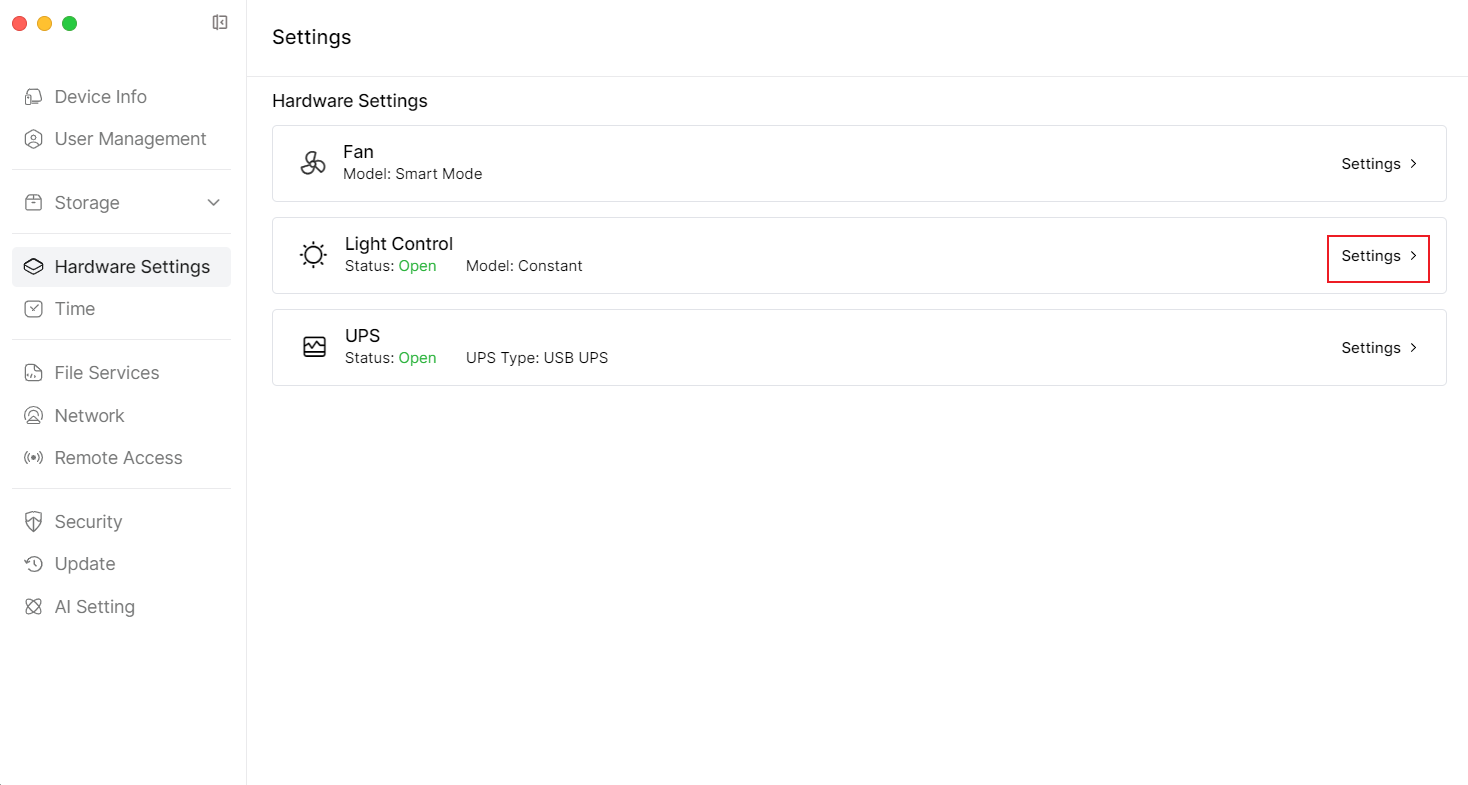
 5.2.3 You can turn on/off the lights, or select mode and color.
 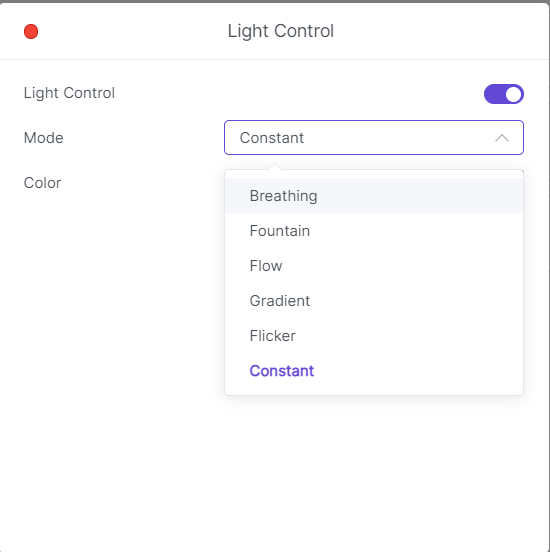 model
model 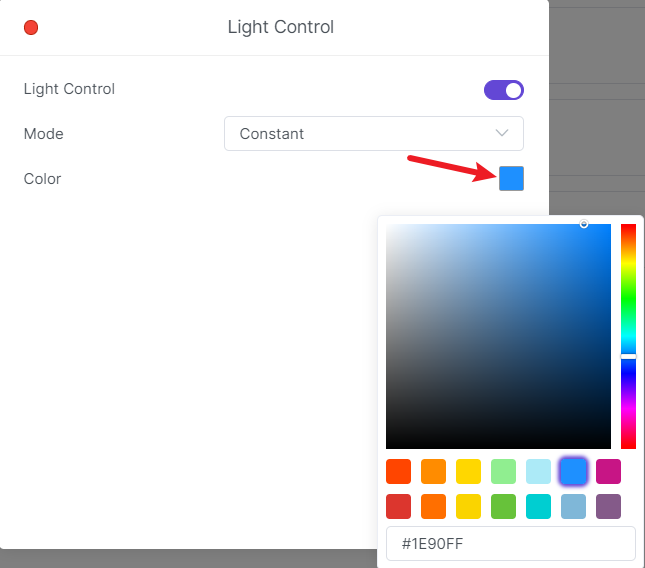 Color
Color
5.3 Setting UPS
5.3.1 Open the [Settings] application from below the main interface. 5.3.2 After entering the "Settings" page, click [Hardware Setting] in the left sidebar. 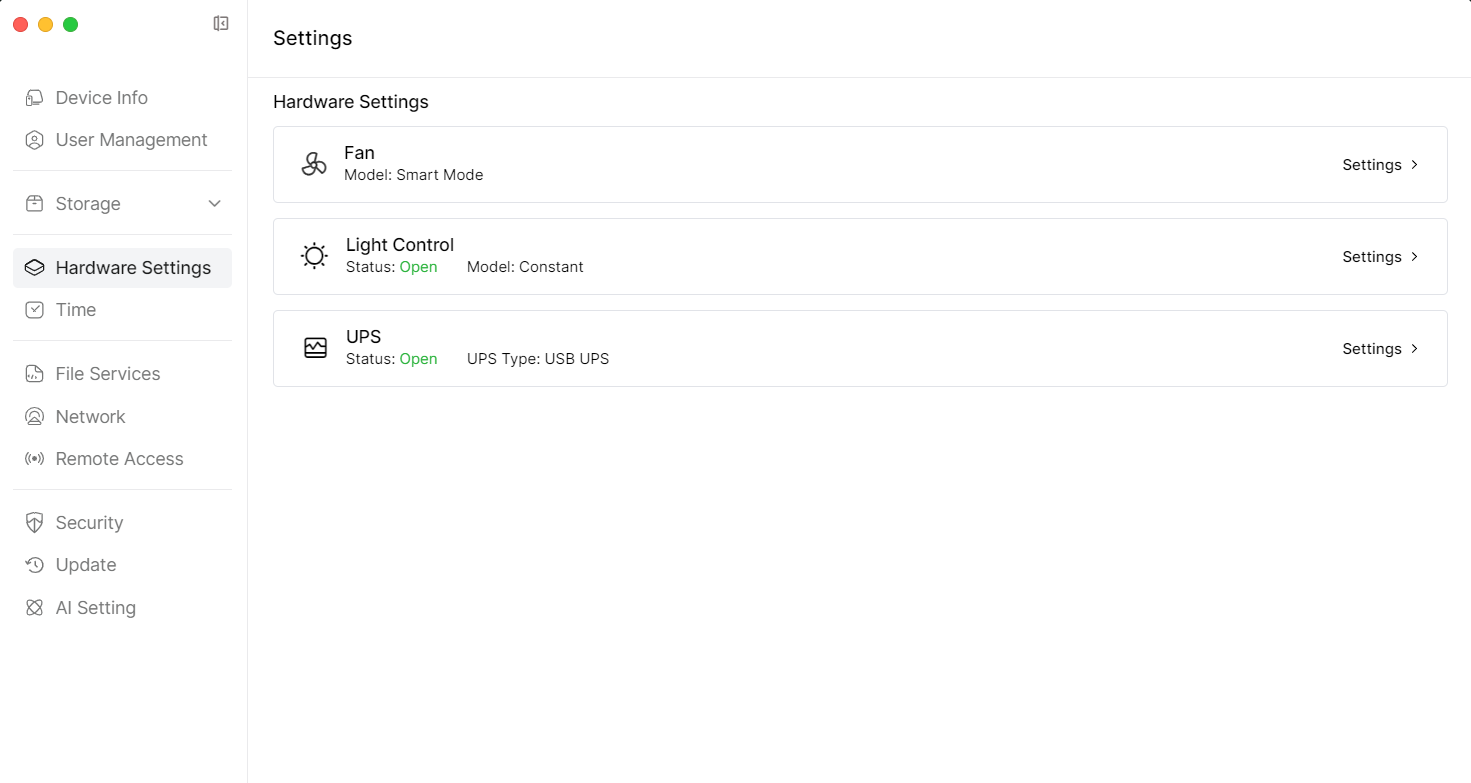 5.3.3 Continue to select and click "UPS" [Settings] on the right side.
 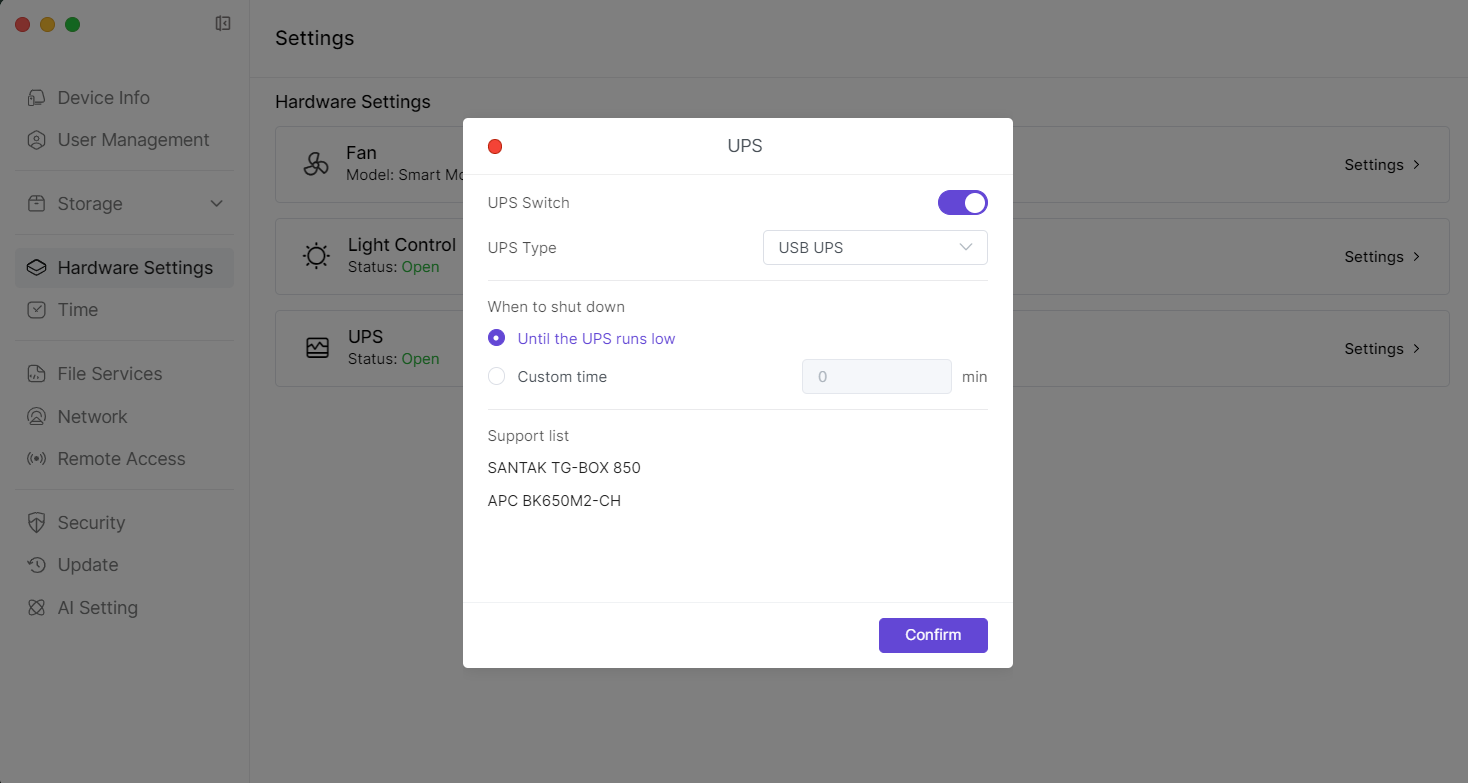 5.3.4 You can enable or disable UPS, and select and set "When to enter standby mode". Finally, click [Confirm] in the bottom right to complete the setting.
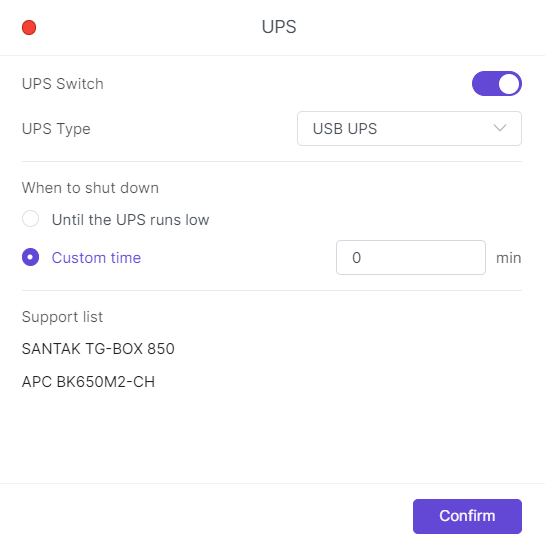
6. Modifying Device Time Zone and Time
6.1 Open the [Settings] application from below the main interface. 6.2 After entering the "Settings" page, click [Time] in the left sidebar. 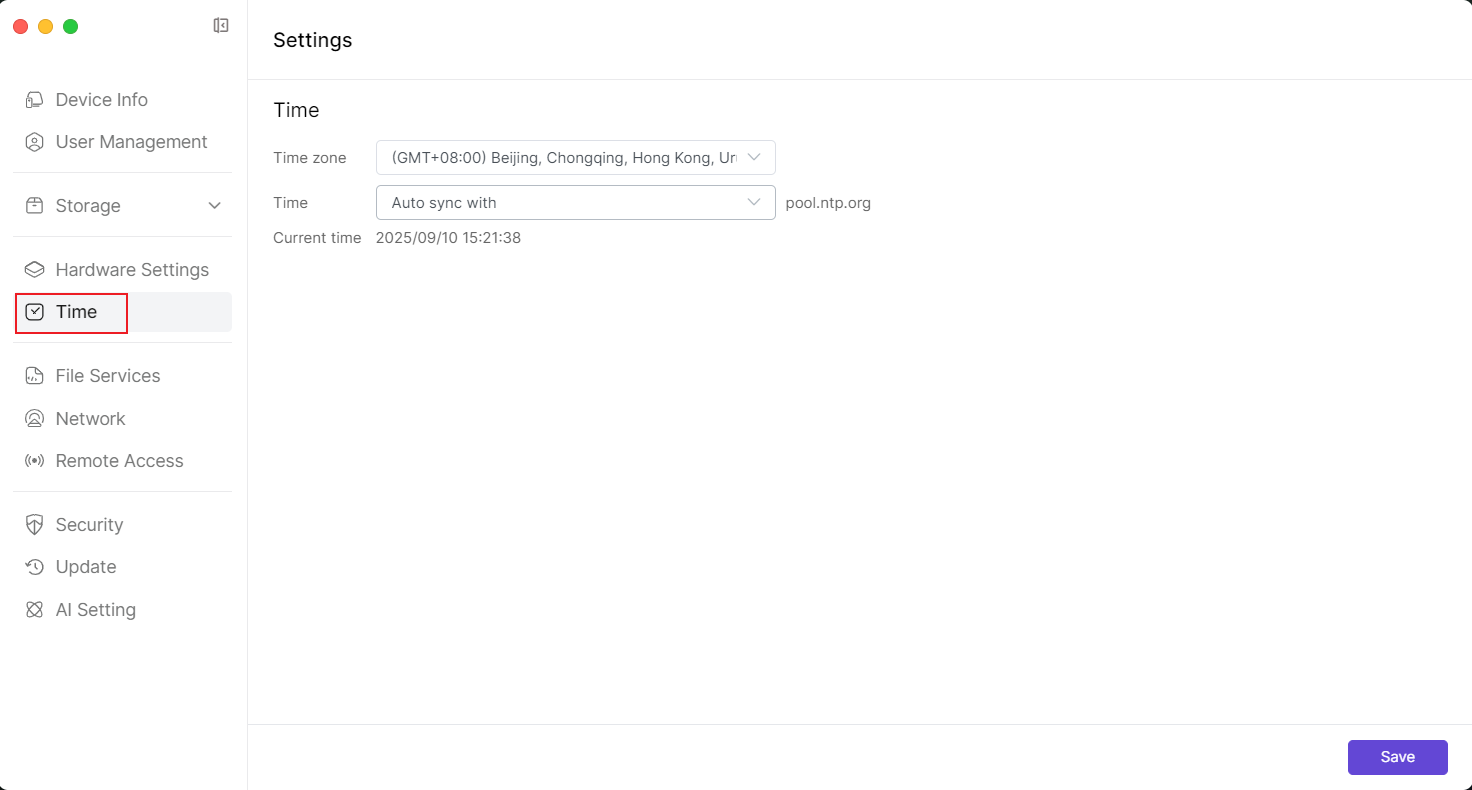 6.3 Enter the "Time" settings page, you can select "Time zone" and then click [Save] in the bottom right to save the settings.
7. Network Settings
7.1 Open the [Settings] application from below the main interface. 7.2 After entering the "Settings" page, click [Network] in the left sidebar to enter the network settings page. 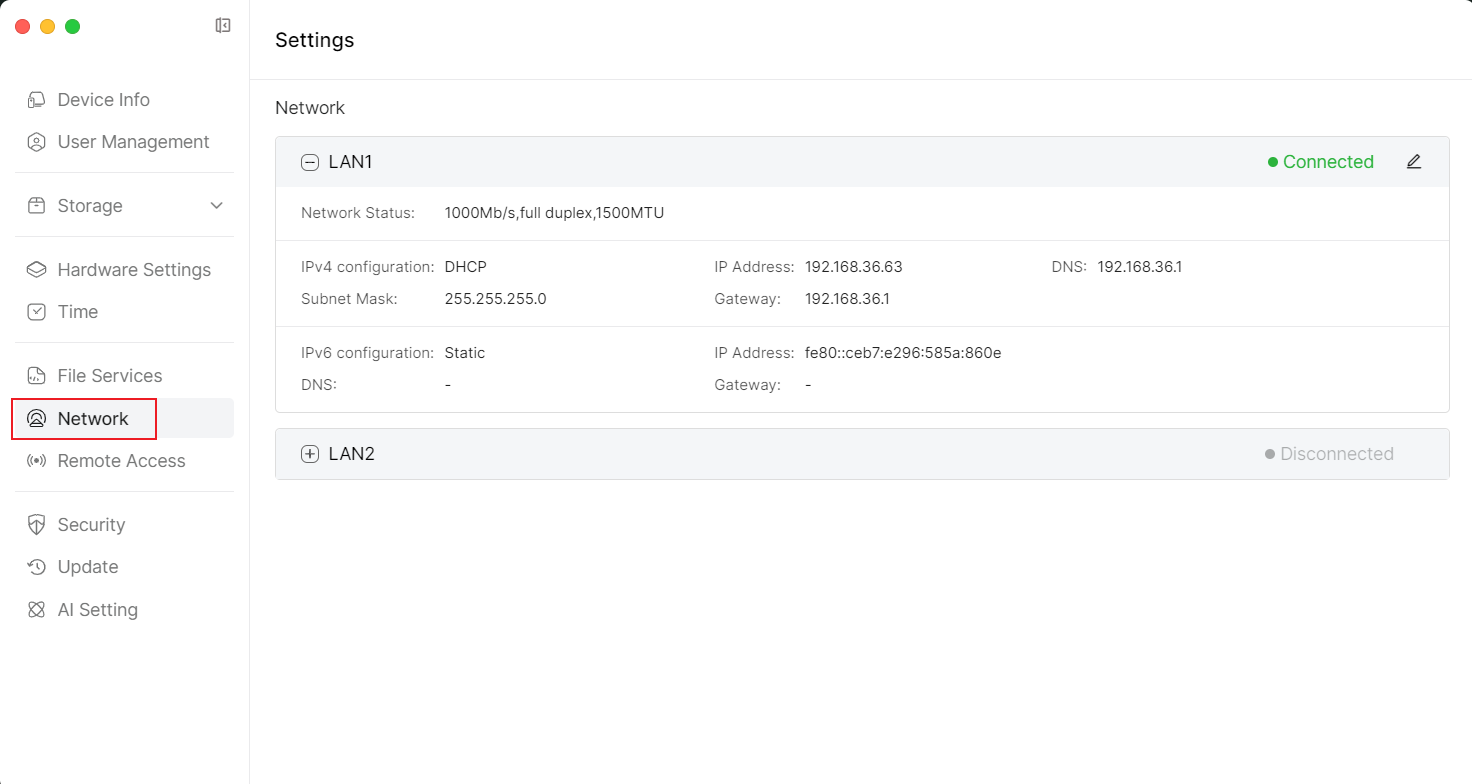
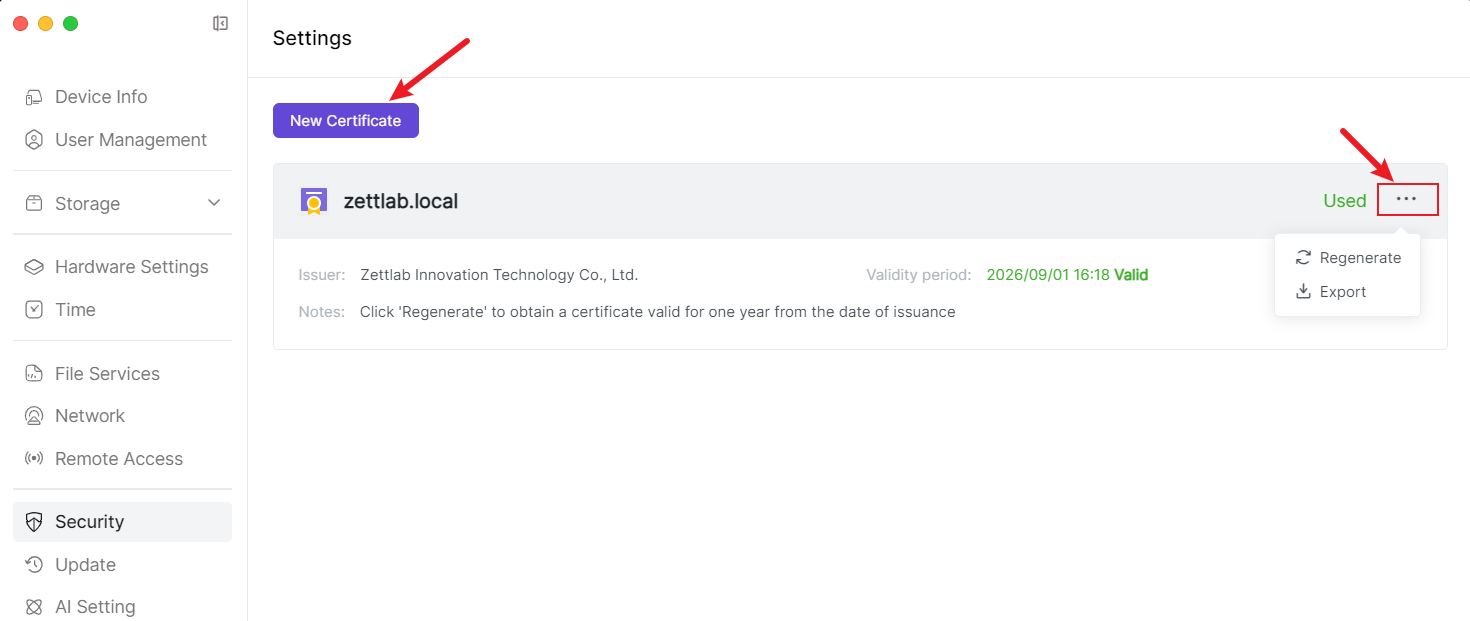
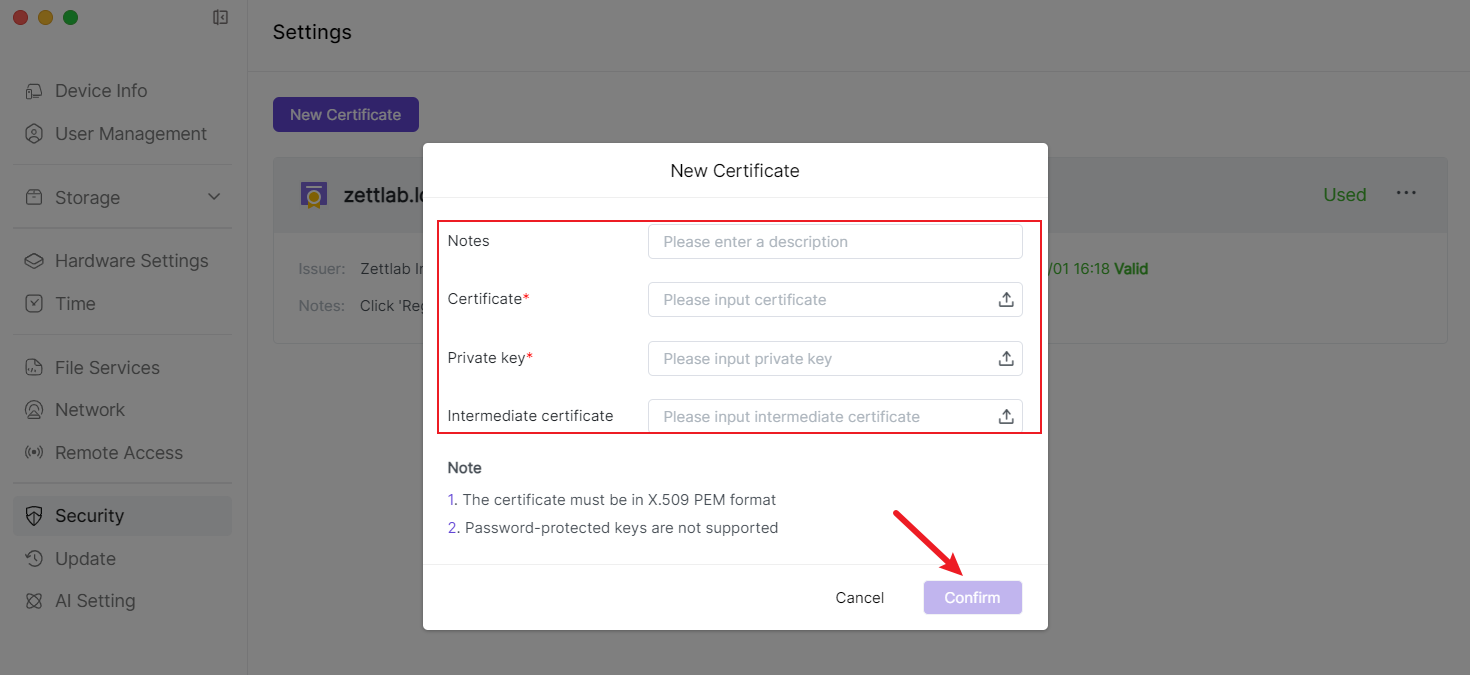
8. Security
In the [Security] section, you can manage certificates, such as adding certificates, exporting certificates, and regenerating certificates.
9. Update
Friendly reminder:
You need to create a storage pool first before performing the update. 
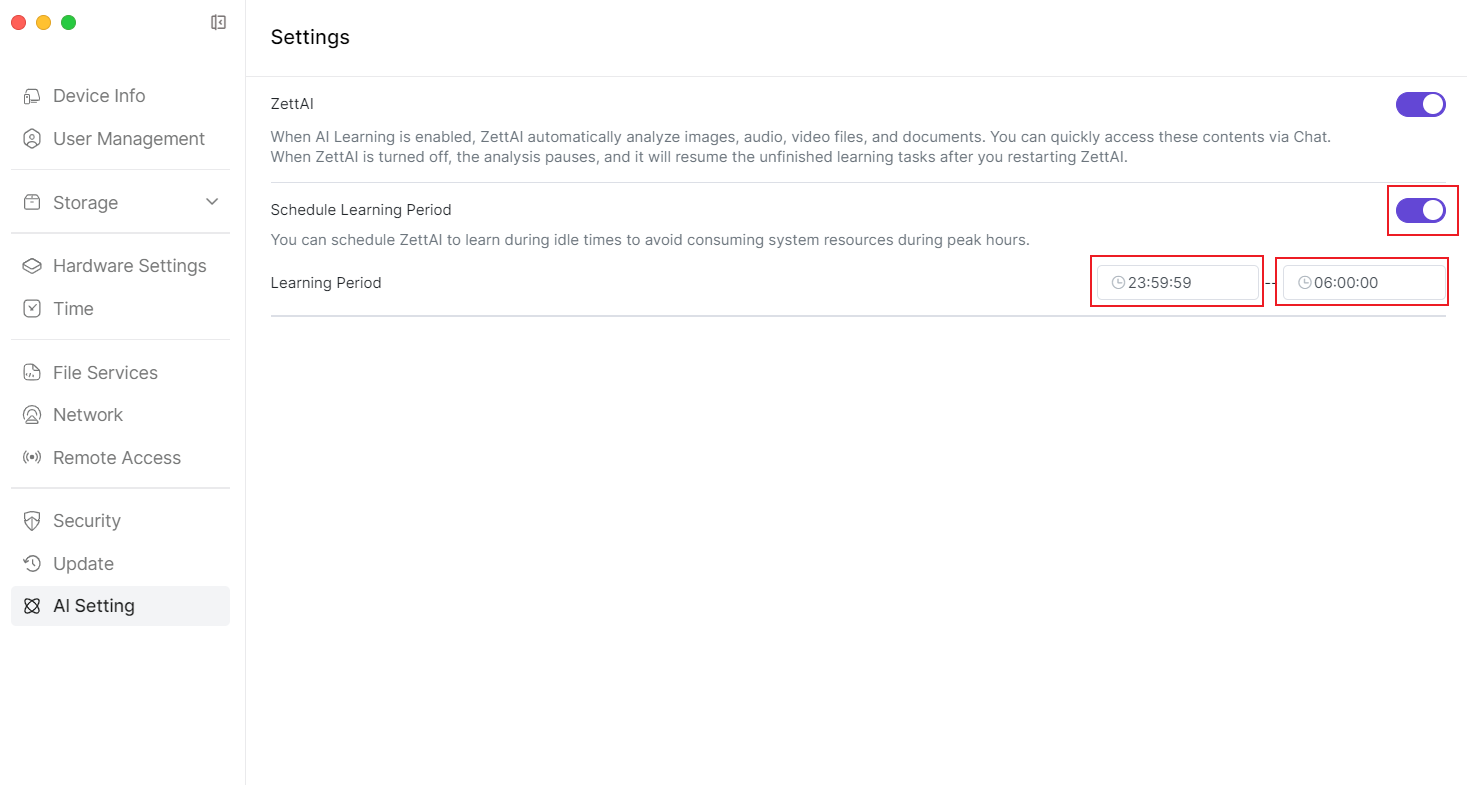
10. AI Setting
10.1 After enabling AI learning, ZettAI will automatically analyze images, audio, video files, and documents. You can quickly access these content through chat. After turning off ZettAI, the analysis will pause, and after restarting, it will continue the unfinished learning tasks.
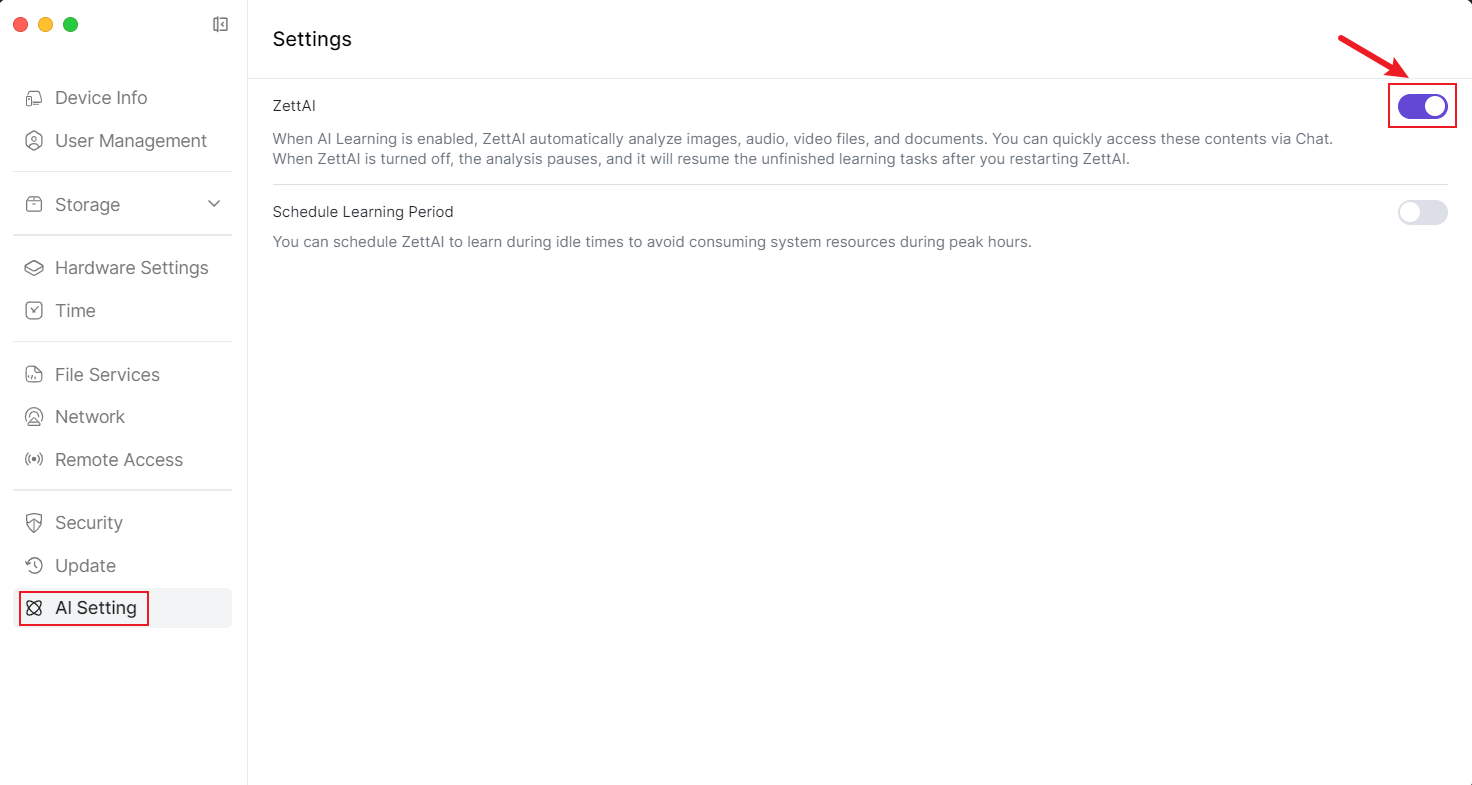
10.2 After enabling AI learning, you can schedule ZettAI to learn during idle time to avoid occupying system resources during peak hours.