Storage Management
Creating Storage Pool Space
After completing the installation of hard drives and first entering the NAS system, Zettlab AI NAS will remind you to create a storage pool with various RAID modes (RAID mode can recover data using a new hard drive when part of the hard drive is damaged, better protecting your data security).
Special Note: The process of creating a storage pool will format the disk. If the disk contains important files, please back up the hard drive files first and confirm that there is no risky data in the hard drive before installing it in the NAS.
After logging in to Zettlab AI NAS, open the Settings application at the bottom of the main interface.

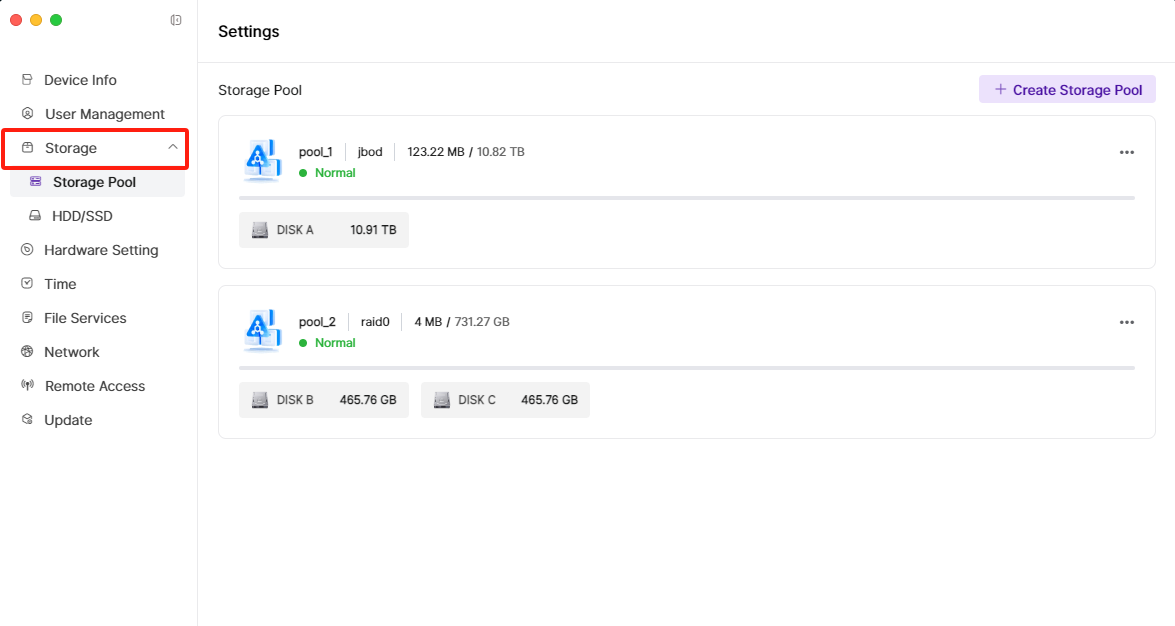
After entering the page, click Storage > Storage Pool > and then click +Create Storage Pool in the top right corner.
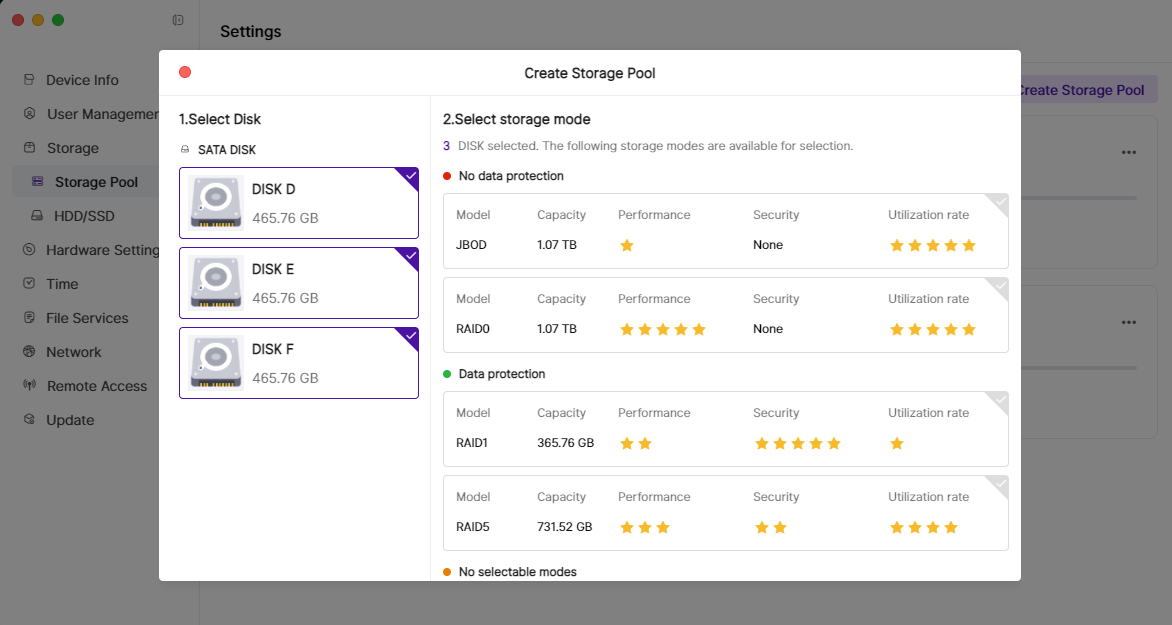
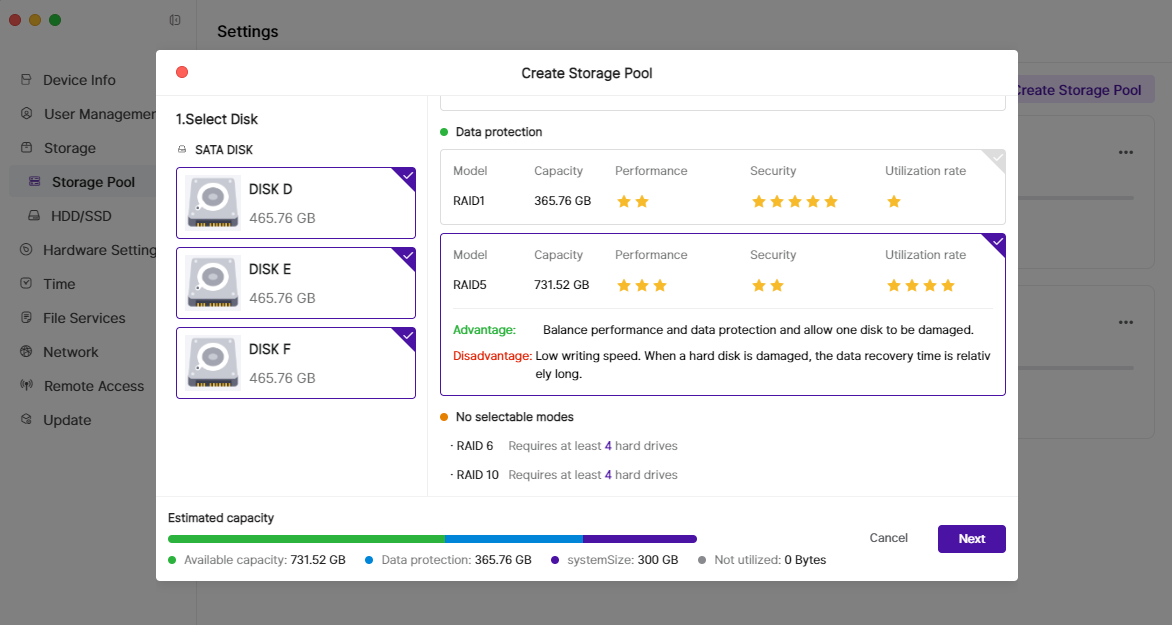
First, select the disks to form the Storage Pool on the left side. The right side will display the storage pool modes available based on the number of selected disks. You can choose a suitable mode based on data protection, performance priority, or storage space priority (how to choose RAID mode). After selecting the storage mode, click Next in the bottom right corner.
Note: SSDs only support Basic mode and JBOD mode.
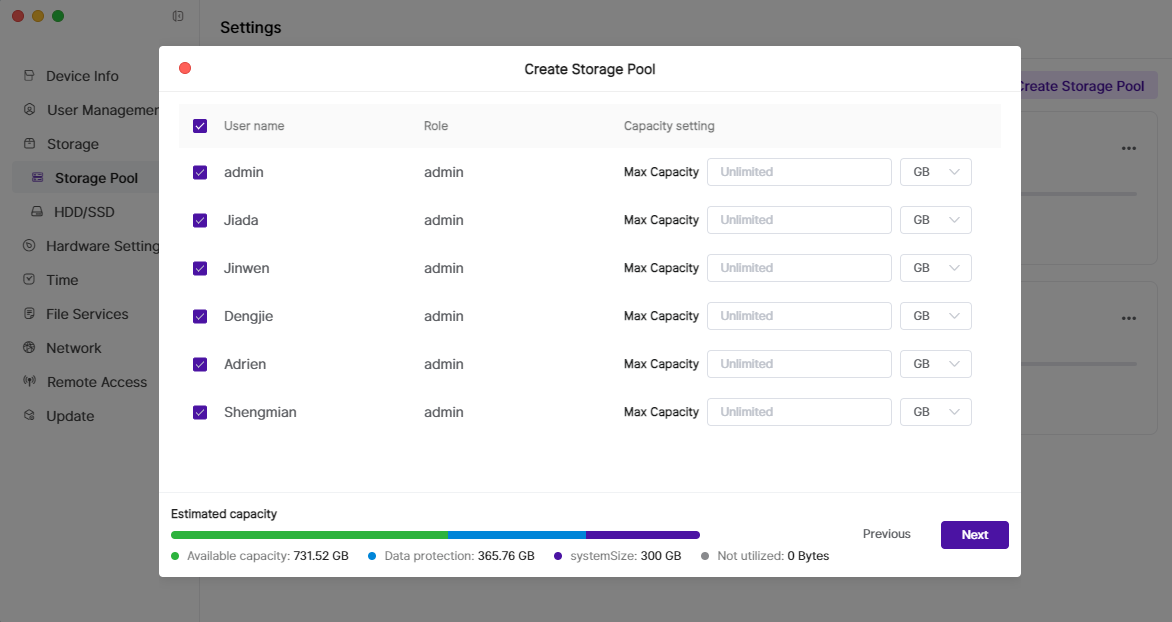
You can set the capacity for the user and continue by clicking Next in the bottom right corner.
- If the admin user does not set the capacity, it will default to maximum capacity.
- If a regular user does not set the capacity, it will default to no usage capacity.
Ensure the disks do not contain important files, then click Format > enter the password > and click Format again.
Special Note: The process of creating a storage pool will format the disk. If the disk contains important files, please back them up first and install the disk in the NAS only after confirming there is no risky data.
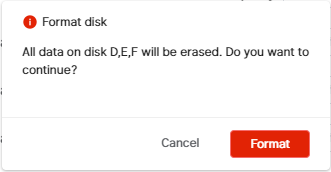
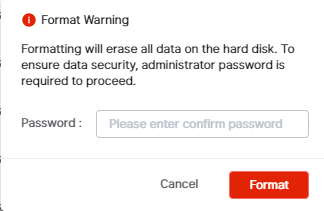
Wait for 2-5 minutes until the creation is complete.
Creating
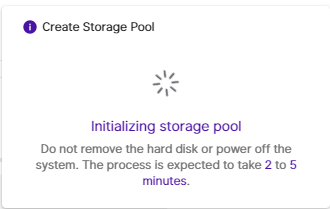

Creation Complete

Choosing RAID Mode
Select a suitable storage mode based on specific needs to balance performance, capacity, and data security.
| Mode | Redundancy | Performance | Capacity Utilization | Minimum Number of Disks | Applicable Scenarios |
|---|---|---|---|---|---|
| Basic | None | Low | 100% | 1 | Personal users, small storage |
| JBOD | None | Low | 100% | 2 | Large capacity storage needs |
| RAID 0 | None | High | 100% | 2 | High performance needs, temporary data storage |
| RAID 1 | High | Read high, write medium | 50% | 2 | High data security needs |
| RAID 5 | Medium (1 disk failure) | Read high, write medium | (N-1)/N | 3 | Scenarios that balance performance and security |
| RAID 6 | High (2 disk failures) | Read high, write low | (N-2)/N | 4 | High data security needs |
| RAID 10 | High (1 disk/group) | High | 50% | 4 | High performance and high security needs |
Below is a detailed introduction to Basic, JBOD, and RAID 0, 1, 5, 6, 10 storage modes:
1. Basic (Single-Disk Mode)
- Principle: Uses a single hard drive to store data without redundancy or striping.
- Advantages:
- Simple and easy to use, no complex configuration required.
- Low cost, suitable for small-scale storage needs.
- Disadvantages:
- No redundancy; a hard drive failure will result in data loss.
- Performance is limited; unable to utilize parallel read/write across multiple disks.
- Applicable Scenarios: Individual users, small storage needs, or scenarios where data security is not a high priority.
2. JBOD (Just a Bunch of Disks)
- Principle: Combines multiple hard drives into a single logical volume, storing data sequentially without redundancy or striping.
- Advantages:
- Fully utilizes all hard drive capacities.
- Simple configuration, suitable for expanding storage space.
- Disadvantages:
- No redundancy; a failure of any hard drive will result in partial data loss.
- No performance improvement; unable to utilize parallel read/write across multiple disks.
- Applicable Scenarios: Scenarios requiring large storage capacity with no requirements for performance or data redundancy.
3. RAID 0 (Striping)
- Principle: Data is divided into blocks and alternately stored across multiple hard drives.
- Advantages:
- Significantly improves read/write performance (parallel operations across multiple disks).
- High storage space utilization (no redundant data).
- Disadvantages:
- No redundancy; a failure of any hard drive will result in total data loss.
- Applicable Scenarios: High-performance requirements with low data security needs, such as video editing or temporary caching.
4. RAID 1 (Mirroring)
- Principle: Data is completely duplicated across multiple hard drives, with each hard drive storing identical data.
- Advantages:
- High data security (data can still be recovered from other hard drives if one fails).
- Improved read performance (data can be read simultaneously from multiple hard drives).
- Disadvantages:
- Low storage space utilization (e.g., two hard drives can only use half the capacity).
- No improvement in write performance (data must be written to multiple hard drives).
- Applicable Scenarios: High data security requirements, such as financial systems or databases.
5. RAID 5 (Striping with Parity Check)
- Principle: Data is divided into blocks and stored across multiple hard drives, with parity information also stored for data recovery.
- Advantages:
- Balances performance and data security (allows failure of one hard drive).
- High storage space utilization (only one hard drive capacity is used for parity).
- Disadvantages:
- Lower write performance (parity calculation required).
- Significant performance degradation during data reconstruction.
- Applicable Scenarios: Moderate performance and security requirements, such as file servers or small to medium databases.
6. RAID 6 (Striping with Dual Parity Check)
- Principle: Similar to RAID 5 but uses two sets of parity information, allowing for the failure of two hard drives.
- Advantages:
- Higher data security (allows failure of two hard drives).
- Storage space utilization remains high (only two hard drive capacities are used for parity).
- Disadvantages:
- Even lower write performance (two sets of parity calculations required).
- More significant performance degradation during data reconstruction.
- Applicable Scenarios: Very high data security requirements, such as large databases or critical business systems.
7. RAID 10 (Mirroring + Striping)
- Principle: Combines RAID 1 (mirroring) and RAID 0 (striping), first mirroring the hard drives and then striping across the mirrored groups.
- Advantages:
- High performance (striping improves read/write speeds).
- High data security (allows failure of one hard drive in a mirrored group).
- Disadvantages:
- Low storage space utilization (only half of the total capacity is usable).
- Higher cost (requires at least 4 hard drives).
- Applicable Scenarios: High performance and data security requirements, such as databases or virtualization platforms.
User Management
Adding New Users and Setting Permissions
Open the Settings application at the bottom of the main interface.

After entering the "Settings" page, click User Management in the left sidebar to enter the user management page, then click +New User in the top right corner to display the user creation window.
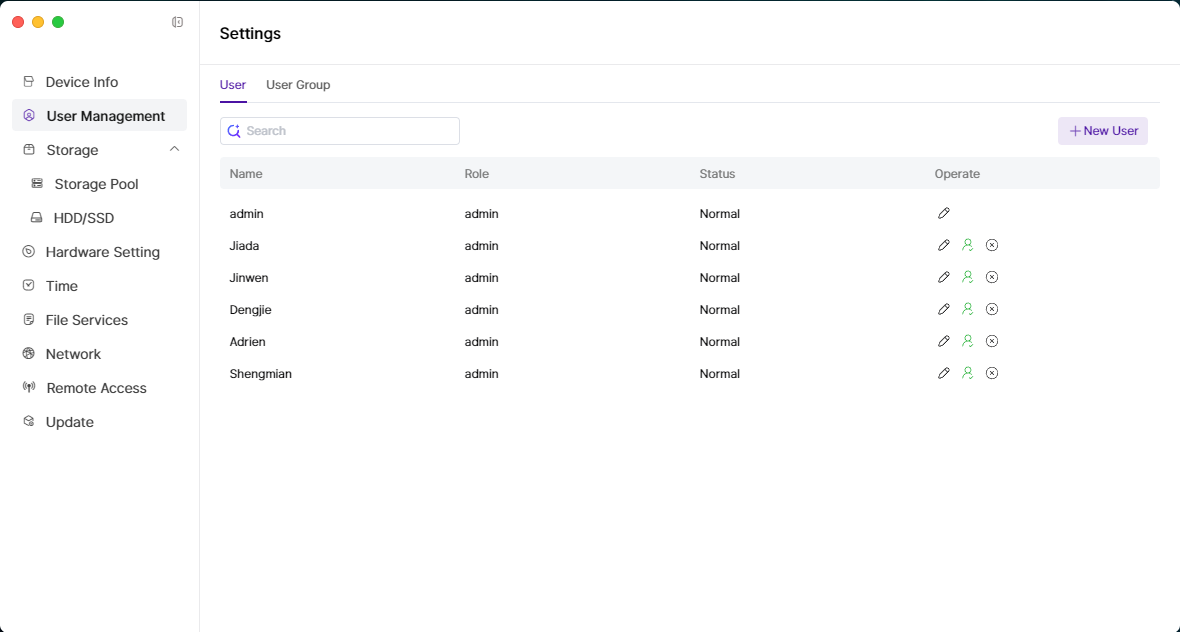
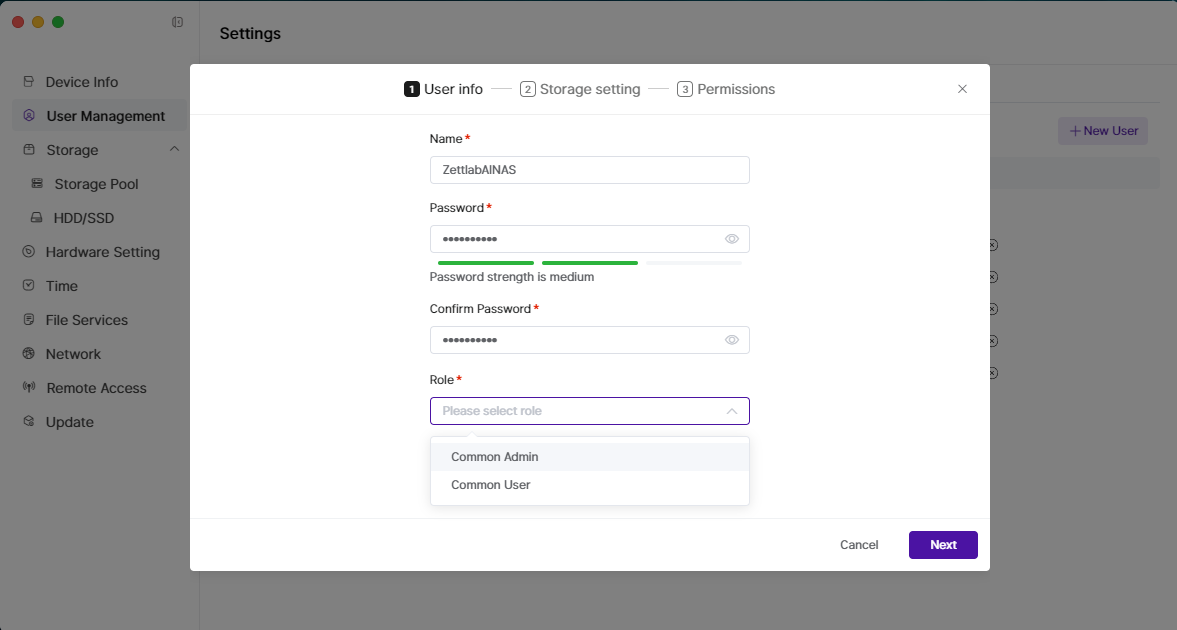
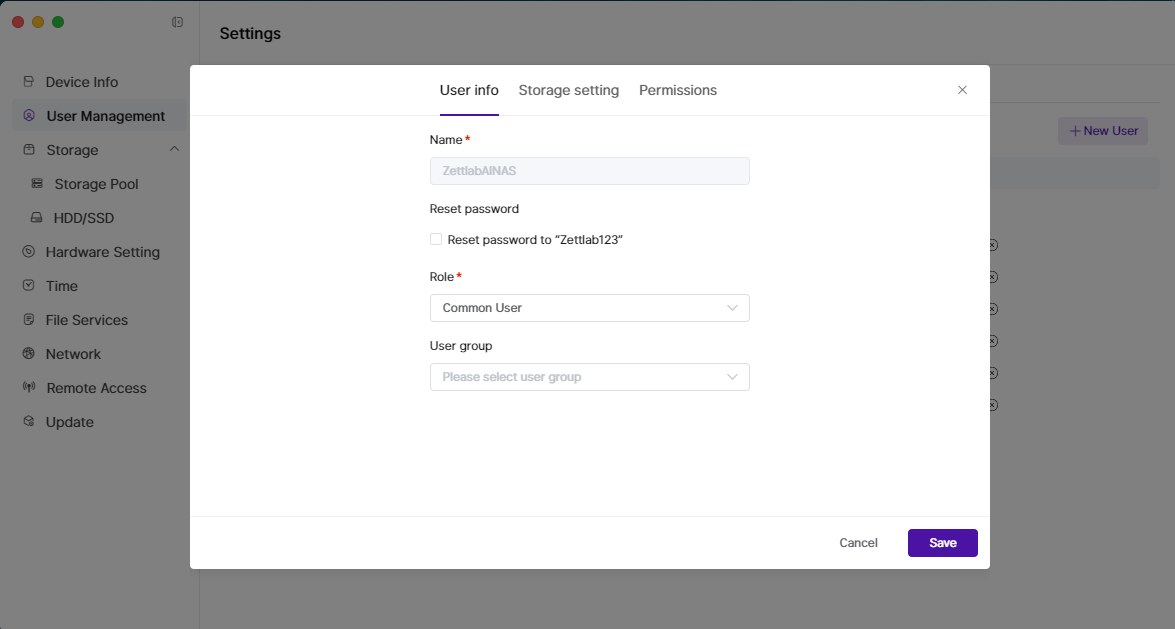
In the "User Info" window for creating a user, enter "name," "Password," and "Confirm Password" in order. The "Role" can be selected as "Common Admin" or "Common User," and "User Group" is optional.
After filling in the user information, click Next in the bottom right corner to proceed to "Storage Setting."
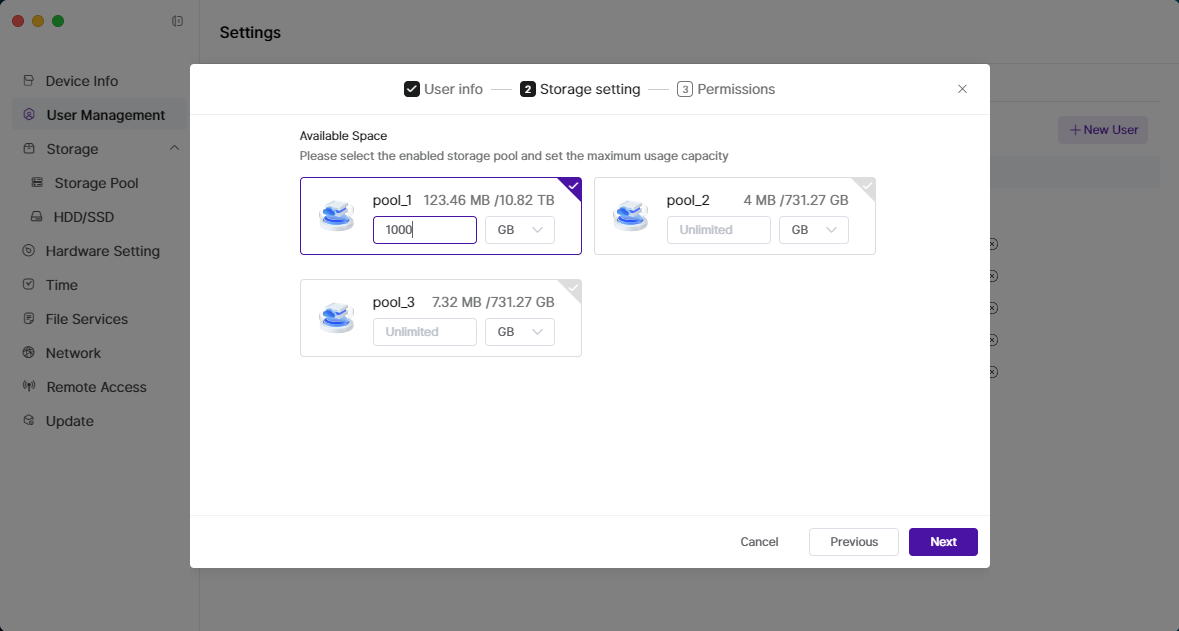
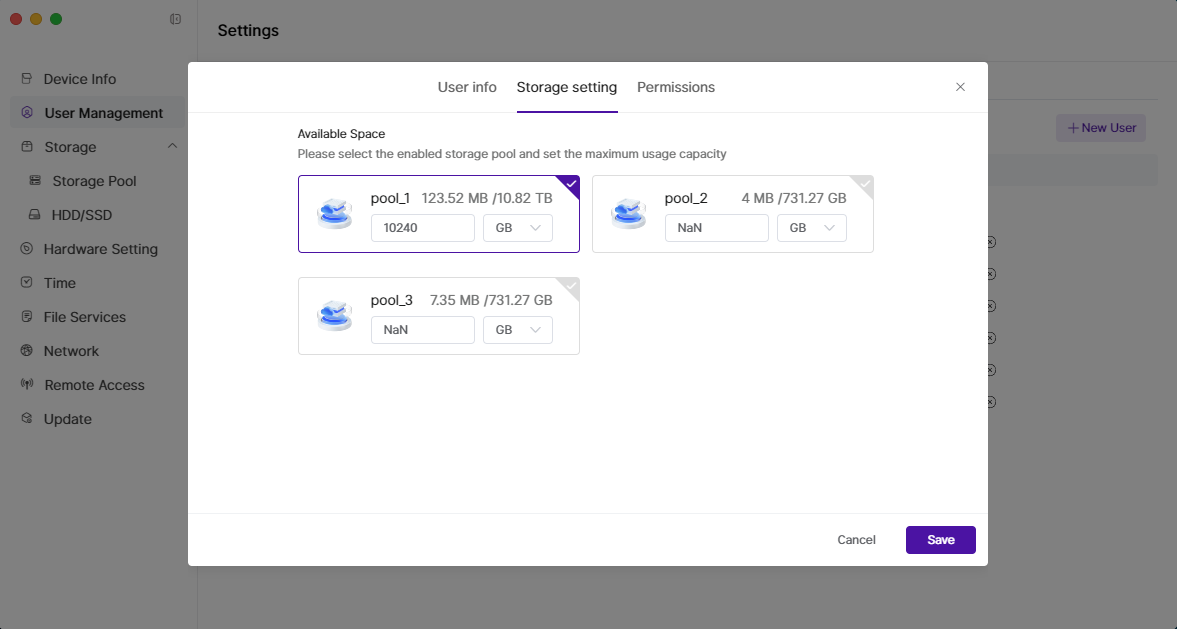
In the "Storage Setting" page, select the storage pool available for the new user and set the available capacity for that pool, then click Next in the bottom right corner to proceed to "Permissions."
- Note: Common Admin defaults to all pools selected and cannot be modified.
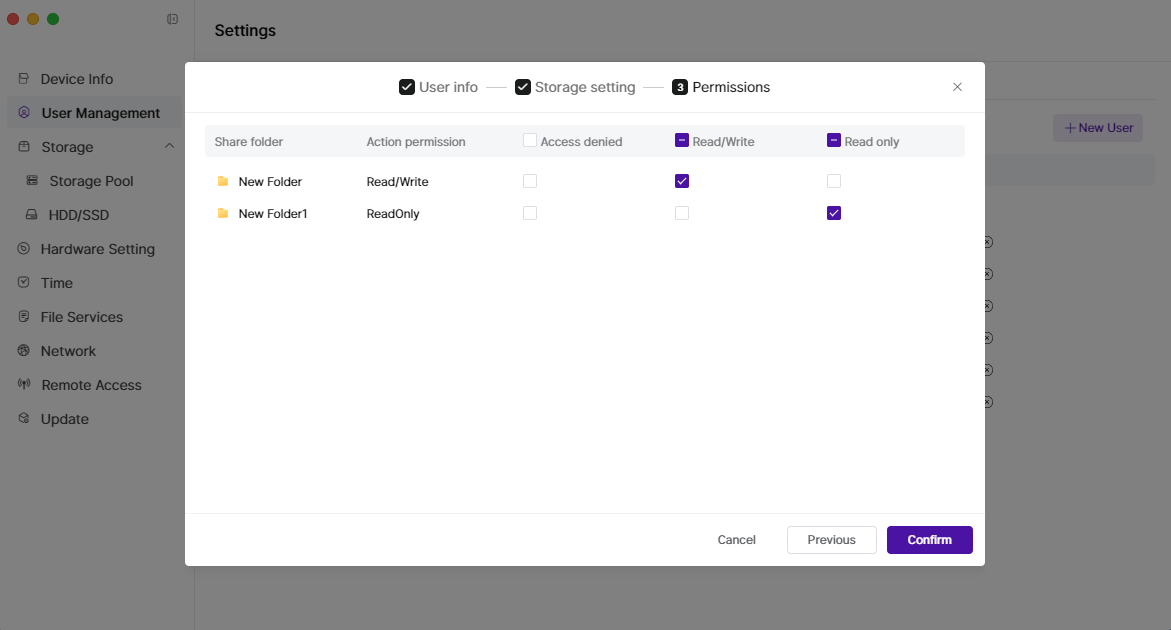
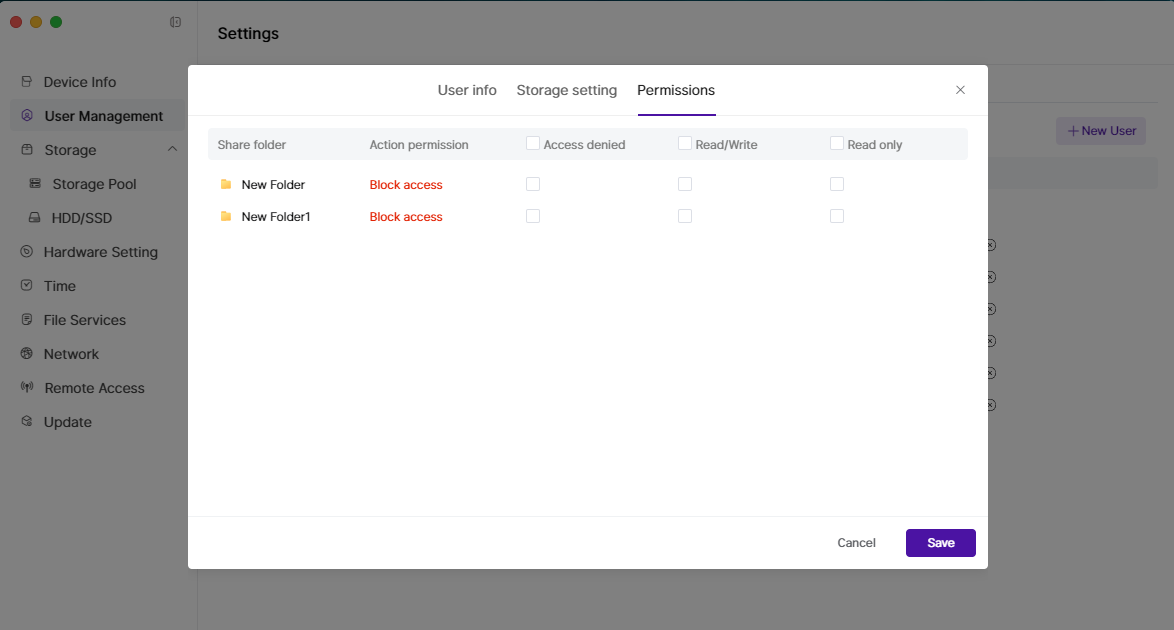
In the "Permissions" page, you can set folder permissions for the new user, then click Confirm in the bottom right corner to complete user creation. You can choose not to set permissions now and modify them later in the "User Management" page.
Note: In the user management interface, you can create a "User Group" and add users to that group, then uniformly manage and set permissions for users in the group, including default permissions for file storage and read/write access.
Modifying User Permissions
Open the Settings application at the bottom of the main interface.

After entering the "Settings" page, click User Management in the left sidebar to enter the user management page, then click the Modify button (in the red frame) to enter the user permission modification window.
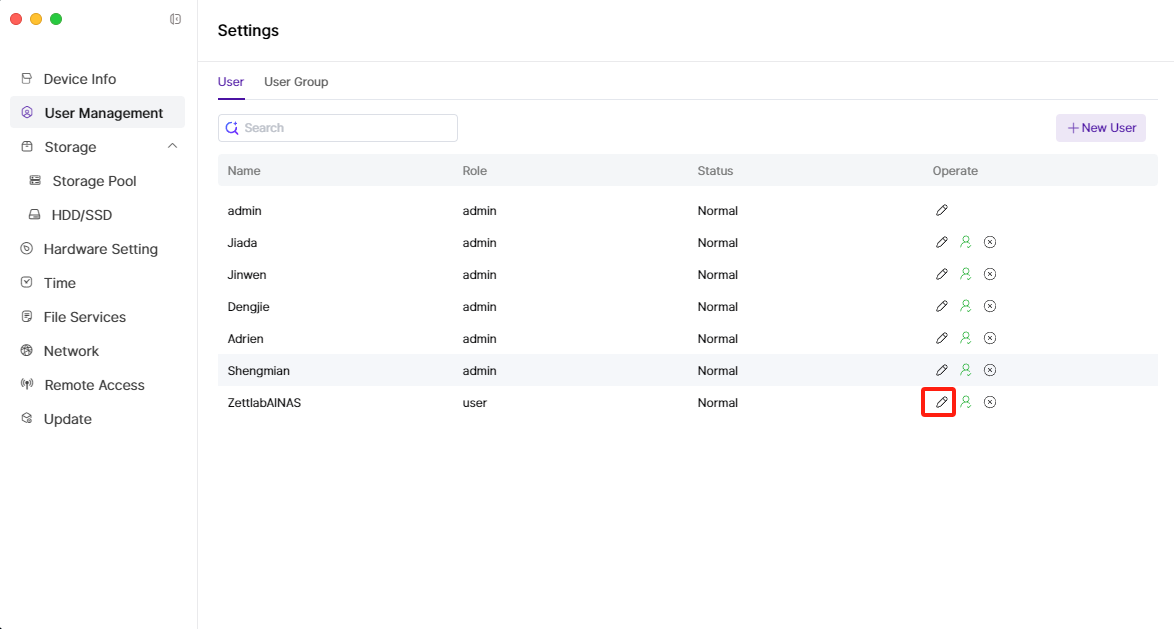
The user permission modification window includes "User Info," "Storage Setting," and "Permissions" at the top. After modifying each item, click Save in the bottom right corner to complete the changes.
User Info Modification Page
Storage Setting Modification Page
Permissions Modification Page
Using User Groups for Management
Open the Settings application at the bottom of the main interface.

User Management
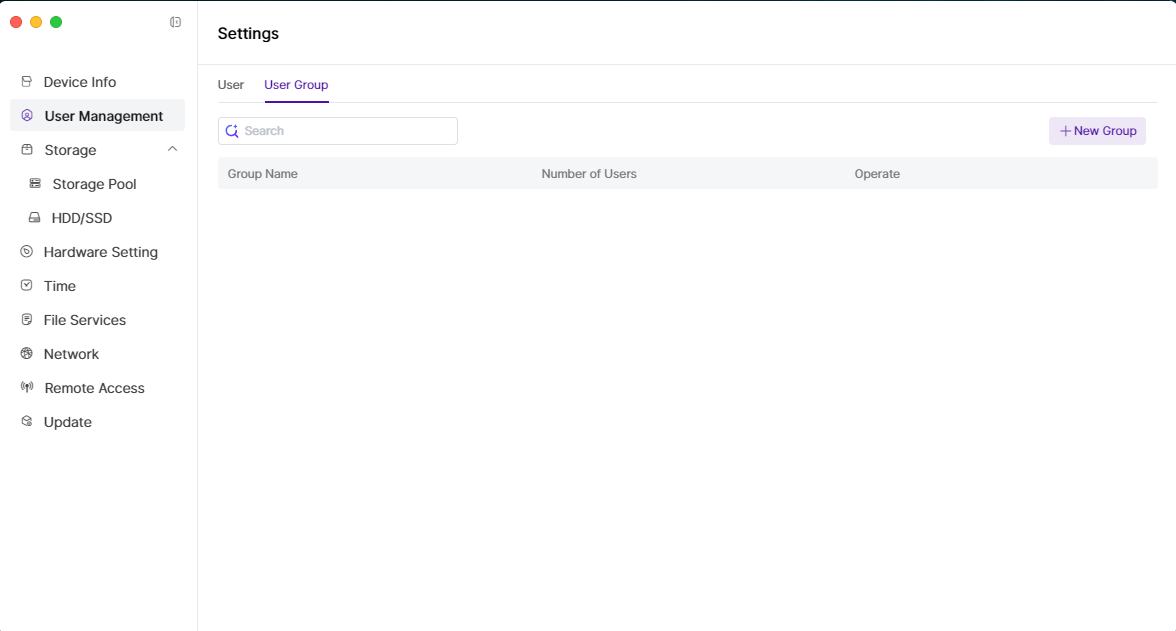
After entering the "Settings" page, click on User Management in the left sidebar and then click on User Group (the button in the red box).
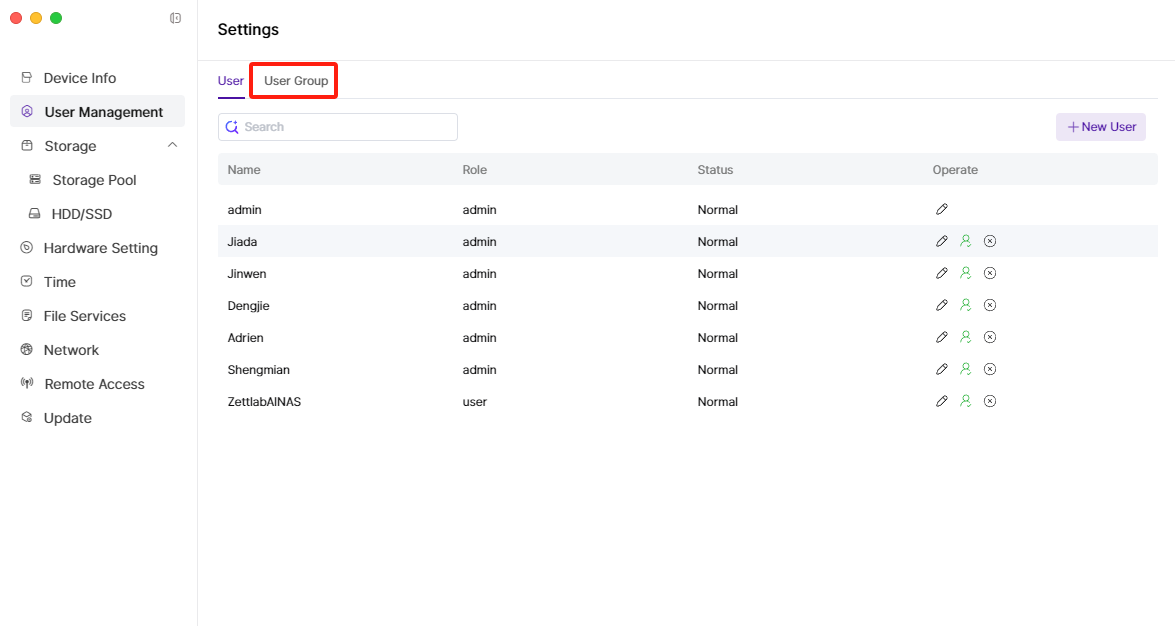
On the "User Group" page, click on +New Group in the top right corner to create a new user group.
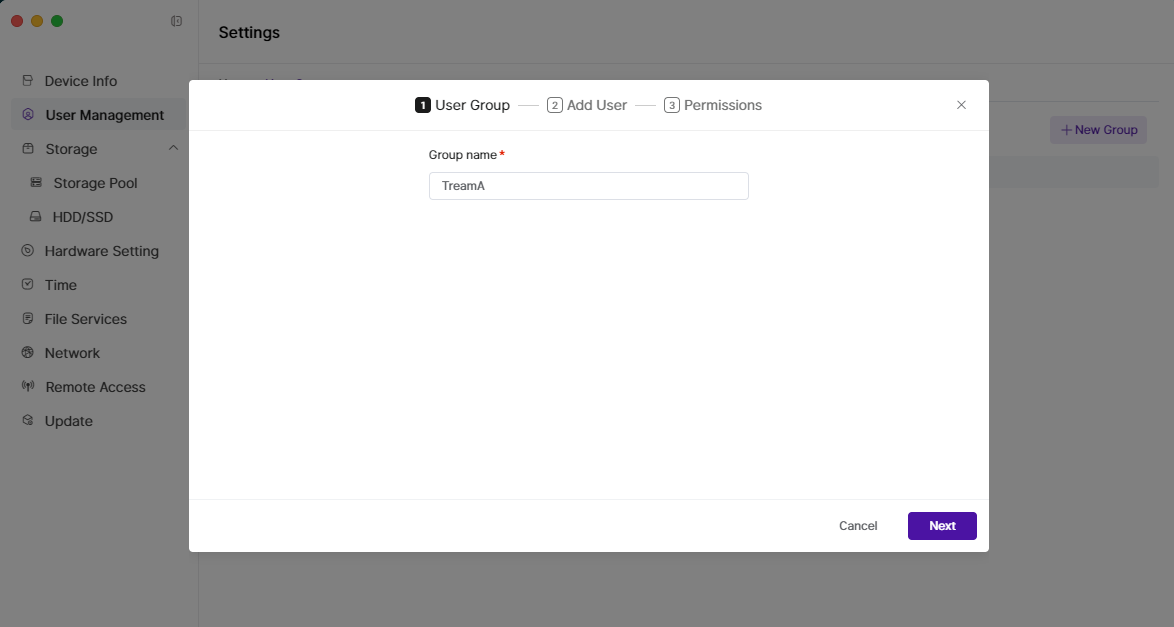
Enter the User Group name in the first step, then click Next at the bottom right.
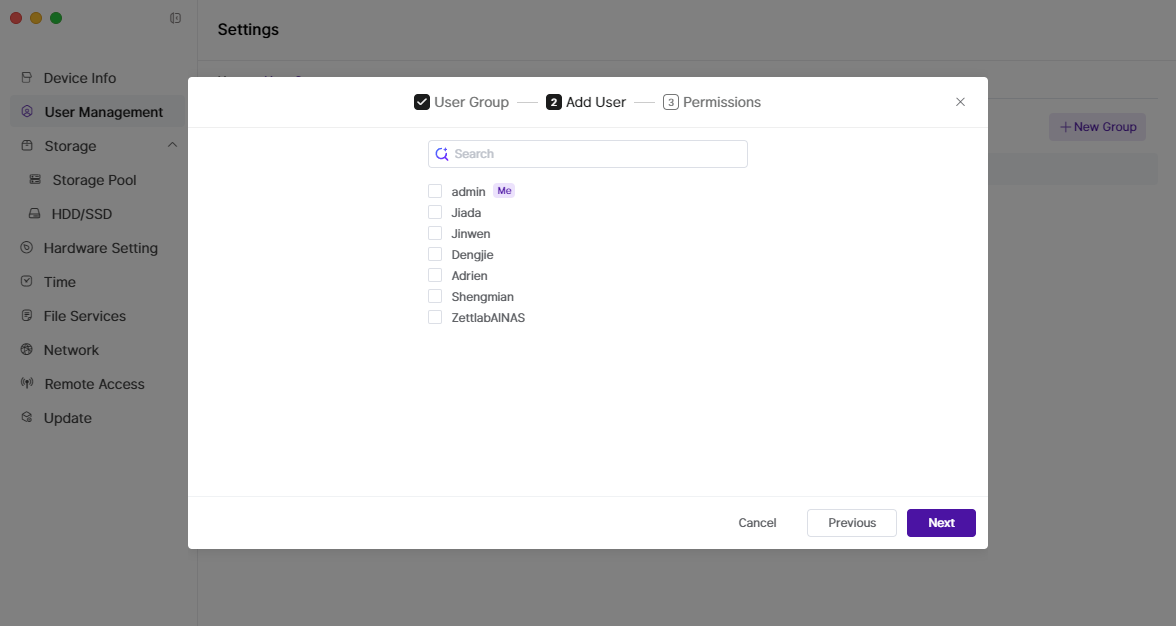
Add the relevant users to the user group and continue by clicking Next at the bottom right.
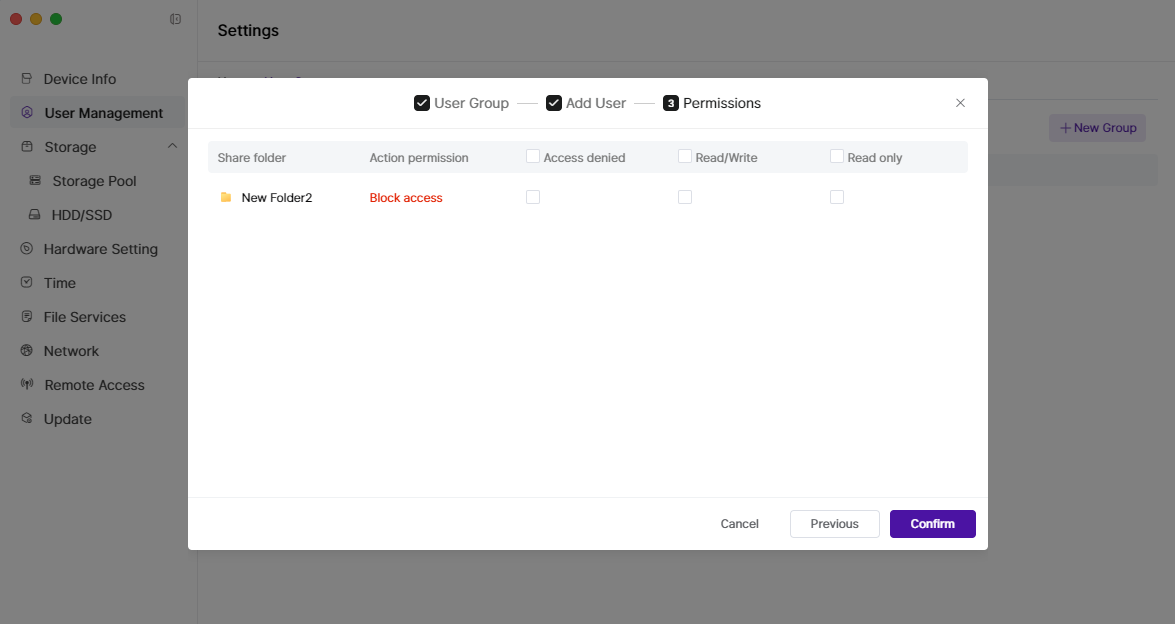
Set the folder permissions for the user group and click Confirm at the bottom right to complete the setup.
File Services
SMB Service
About SMB Service
The SMB Service on your NAS allows seamless integration with operating systems like Windows, macOS, and Linux, enabling file and printer sharing within a local network. Users can access files and folders on the NAS directly via the SMB protocol for convenient data storage, backup, and collaboration, making it ideal for home and small business use.
Using SMB Service
- Open the Settings app at the bottom of the main interface.

After entering the "Settings" page, click on File Services in the left sidebar to access the "SMB" settings page.
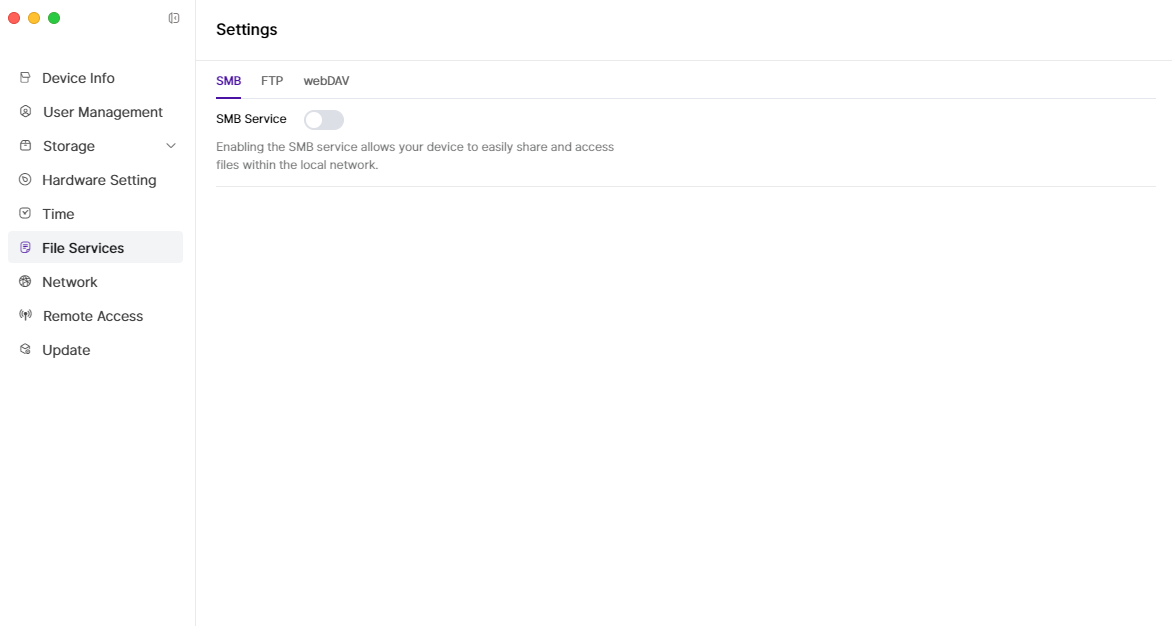
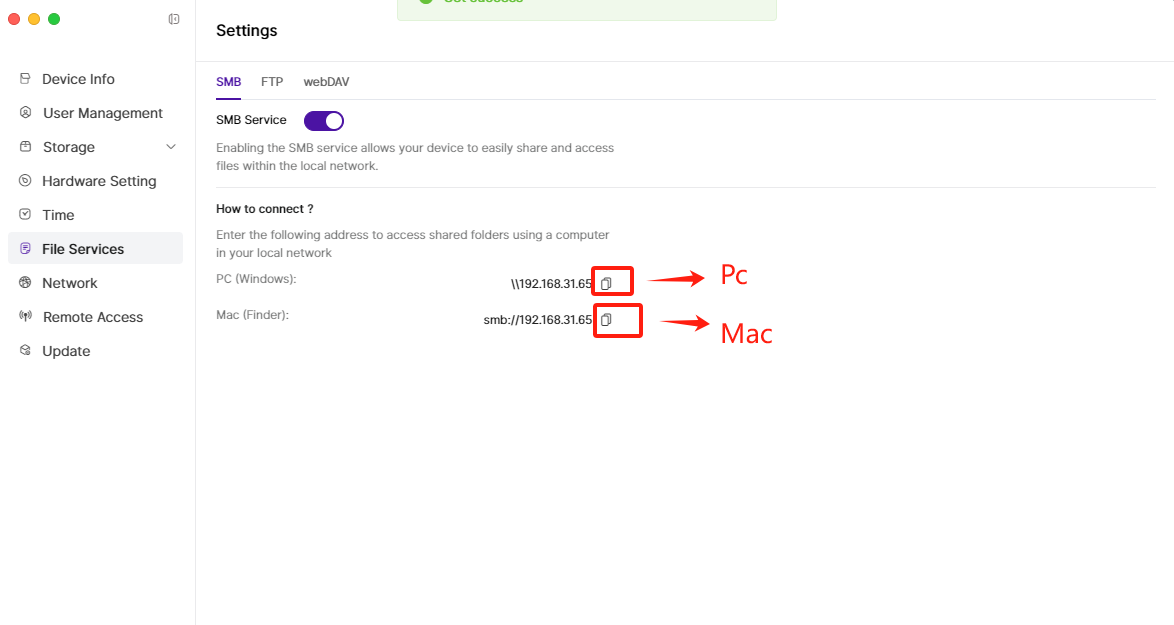
Click the button to enable SMB Service and copy the device's IP address.
- If you are a PC user, refer to step 4.
- If you are a Mac user, go directly to step 5.
Open File Explorer on your PC:
- Paste the SMB link in the address bar and press Enter on your keyboard.

- In the "Enter Network Credentials" pop-up, enter your NAS username and password, then click OK at the bottom.
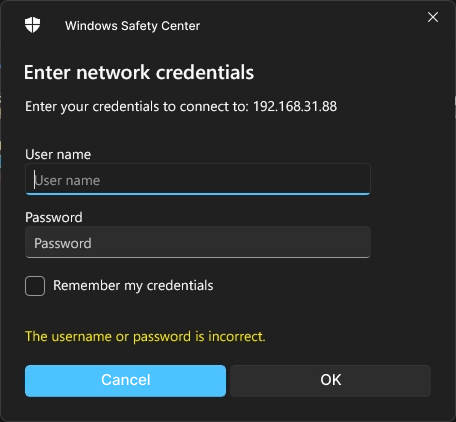
- Access the SMB share.

- Paste the SMB link in the address bar and press Enter on your keyboard.
Open Finder on your Mac:
- Select Go > Connect to Server.
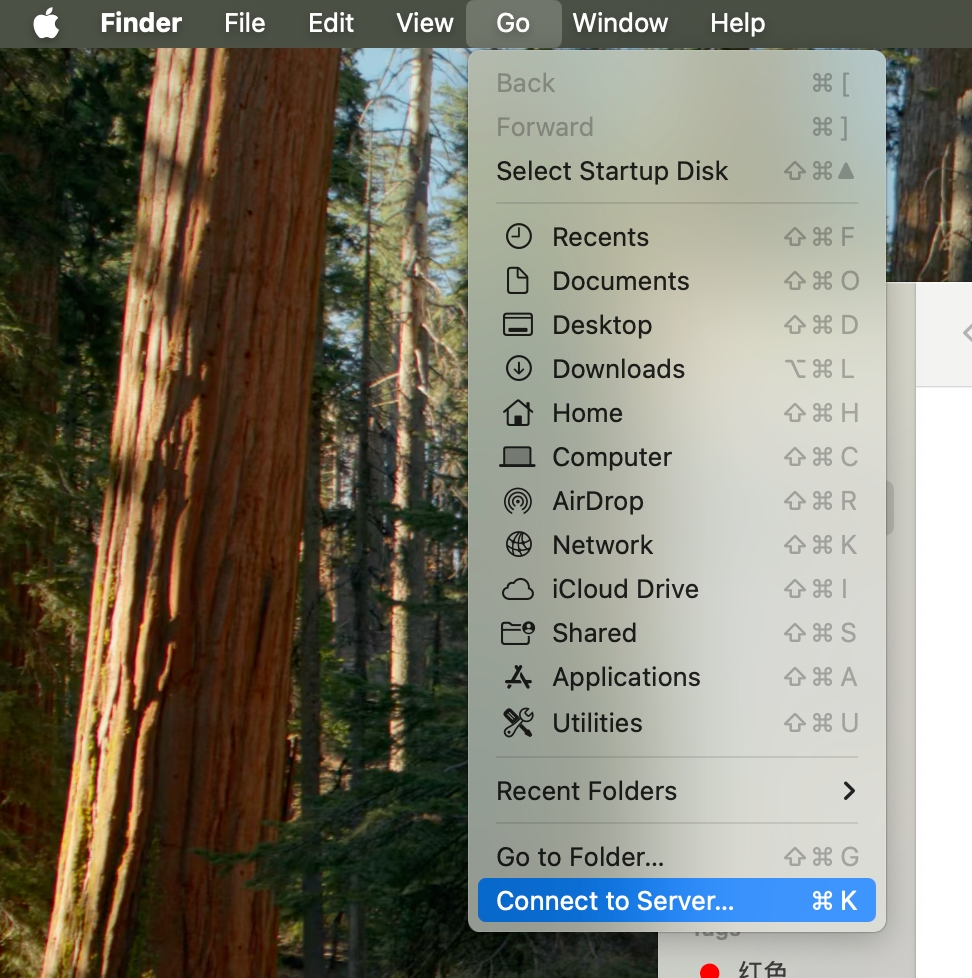
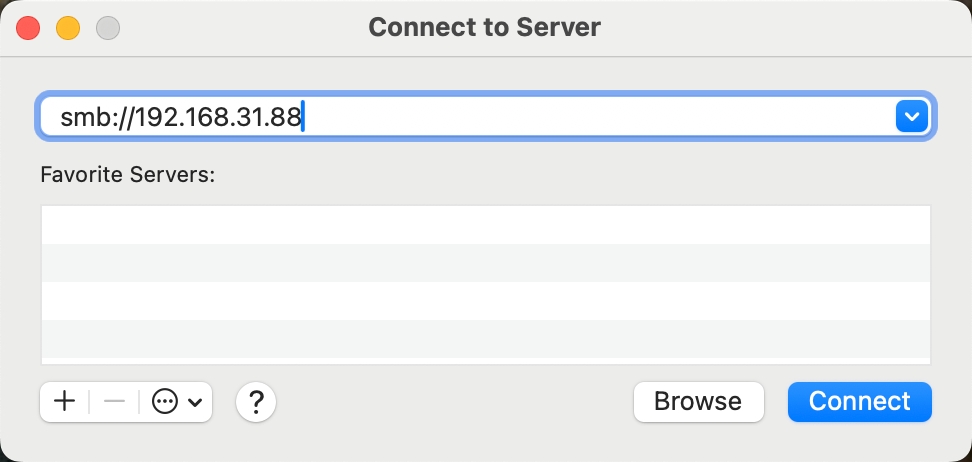
- Paste the SMB link in the pop-up window and click Connect at the bottom.
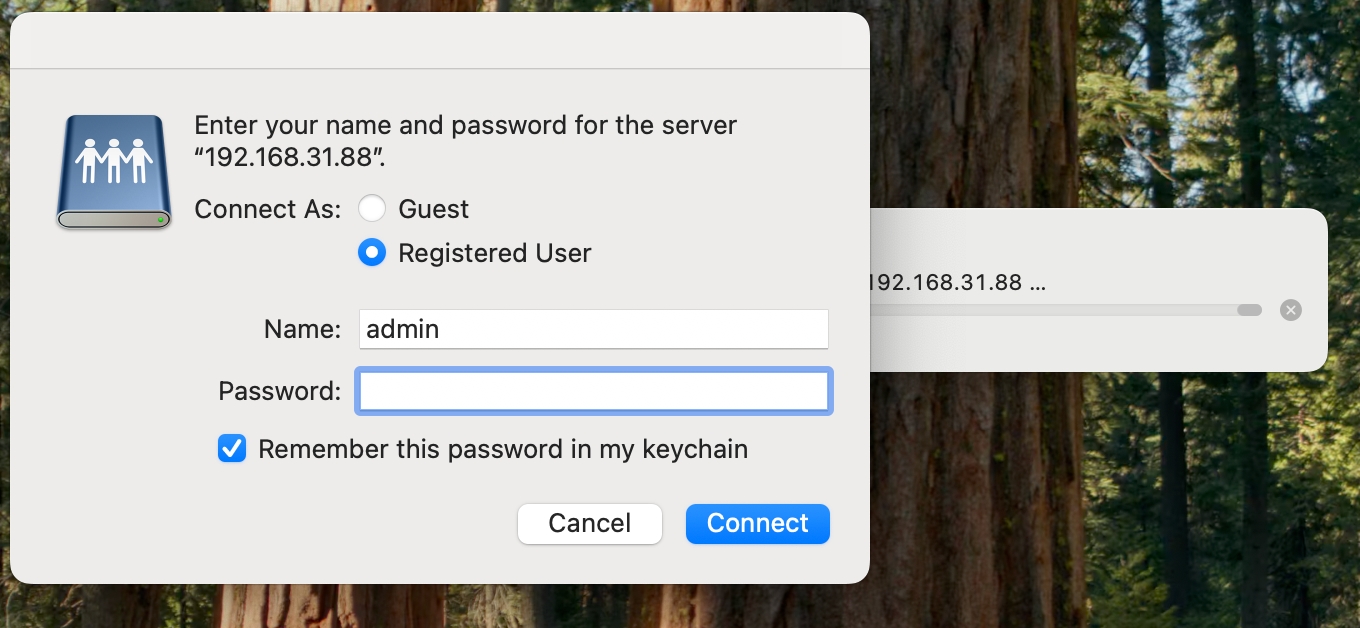
- Enter your username and password, then click Connect.
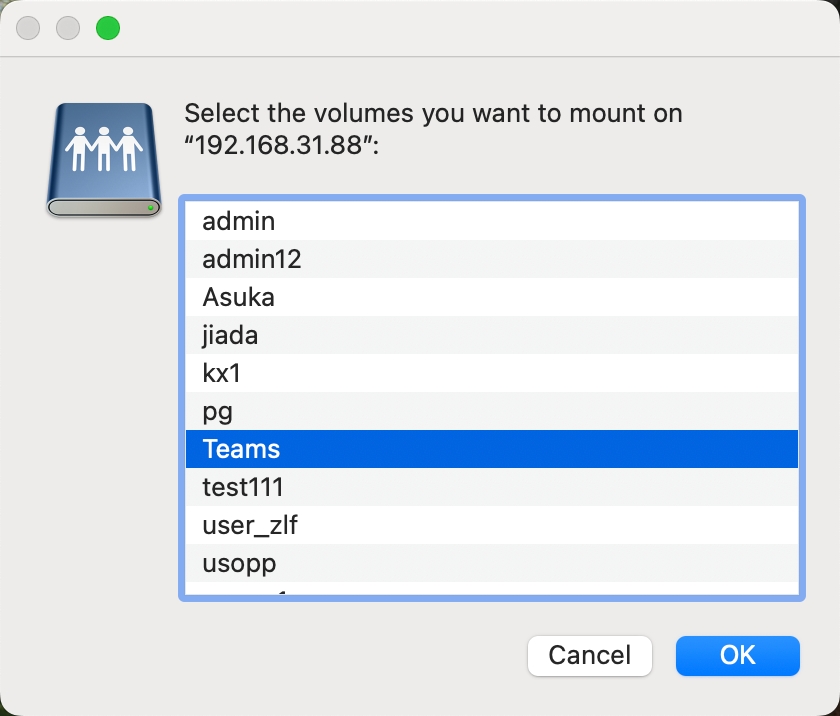
- Select the user file you want to access and click OK at the bottom.
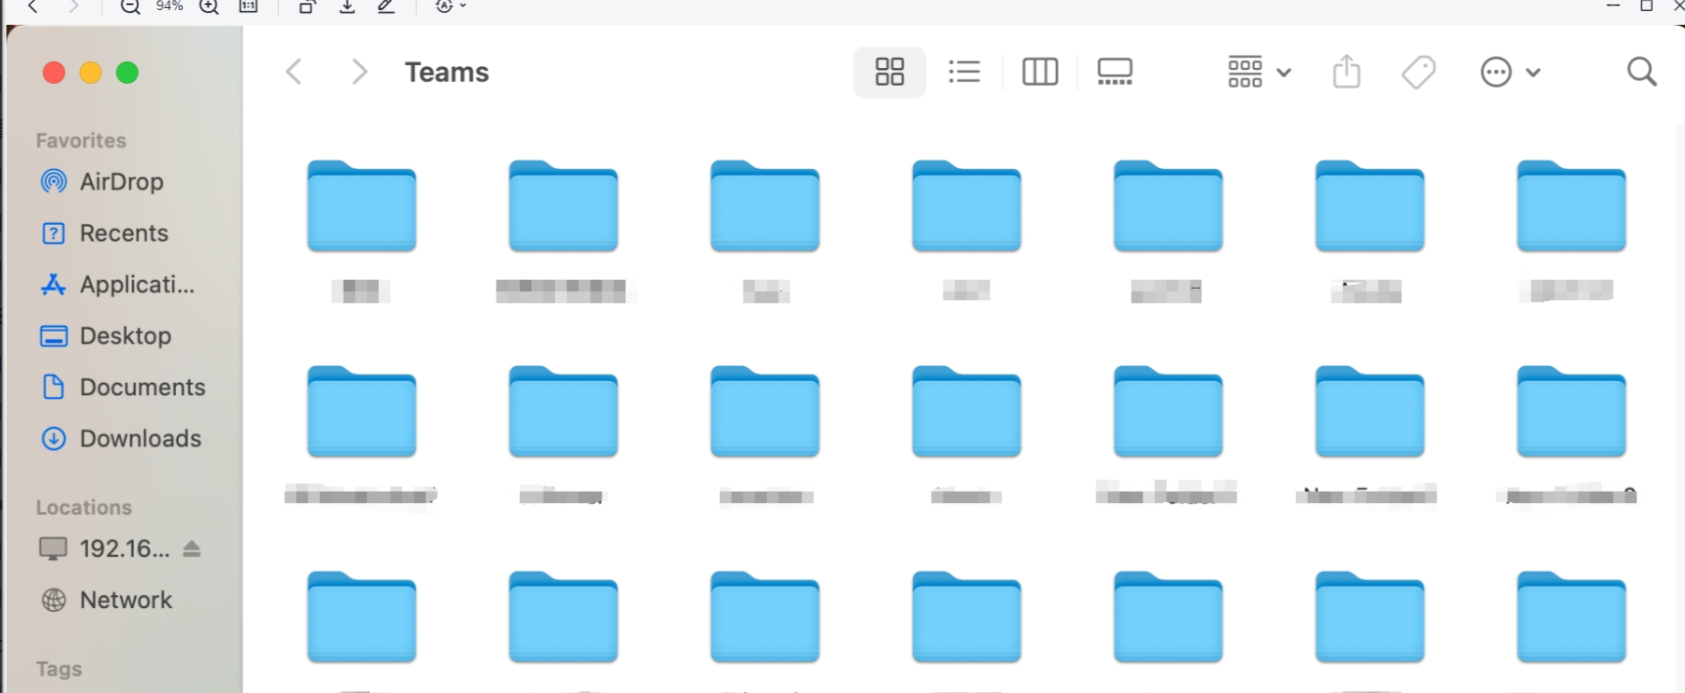
- Successfully logged in.
- Select Go > Connect to Server.
Using FTP/FTPS Services
NAS (Network-Attached Storage) supports FTP/FTPS functionality, allowing users to remotely access and manage files on the storage device using the standard File Transfer Protocol (FTP) or its encrypted version (FTPS). FTP provides simple file transfer capabilities, while FTPS ensures secure data transmission via SSL/TLS encryption, making it suitable for remote file sharing and data backup scenarios.
Open the Settings app at the bottom of the main interface.

After entering the "Settings" page, click on File Services in the left sidebar to access the "SMB" settings page, then click on FTP.
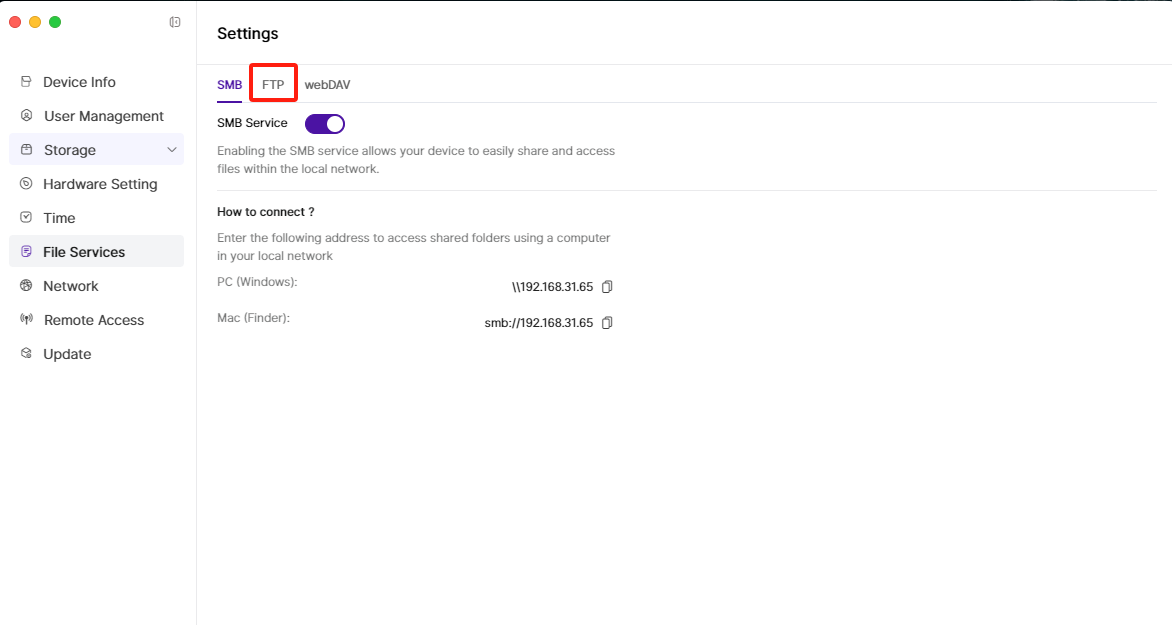
On the "FTP" settings page, enable FTP Service or FTPS Service, and copy the link from the "LAN" section.
- If you are a PC user, refer to step 4.
- If you are a Mac user, go directly to step 5.

Open File Explorer on your PC:
- Paste the FTP link in the address bar and press Enter on your keyboard.

- In the "Log On" window, enter your NAS username and password, then click Log On at the bottom.
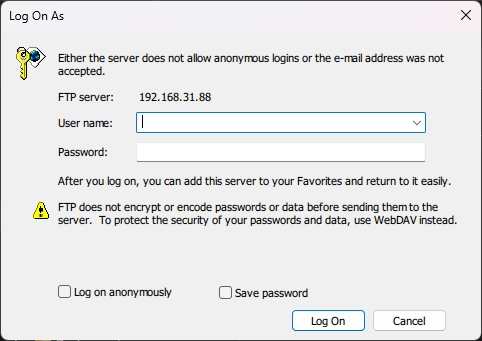
- Complete the login.

- Paste the FTP link in the address bar and press Enter on your keyboard.
Open Finder on your Mac:
- Select Go > Connect to Server.

- Paste the FTP link in the pop-up window and click Connect at the bottom.

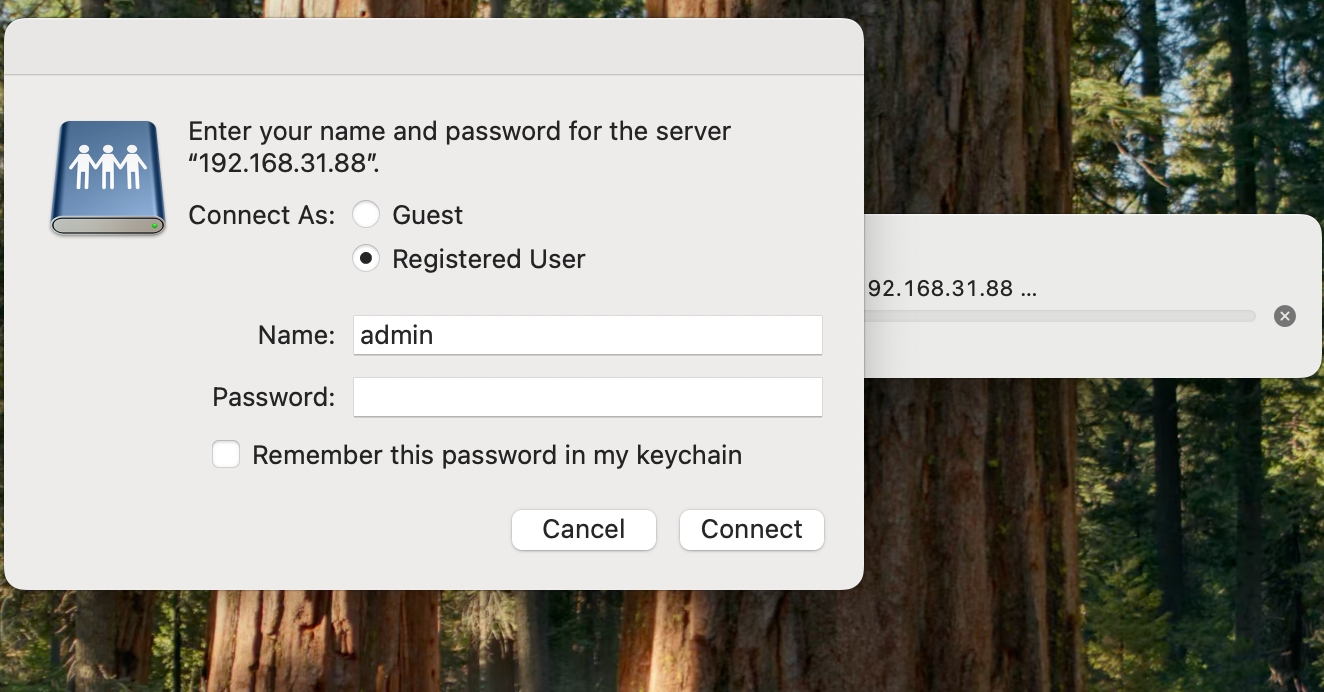
- Enter your username and password, then click Connect.
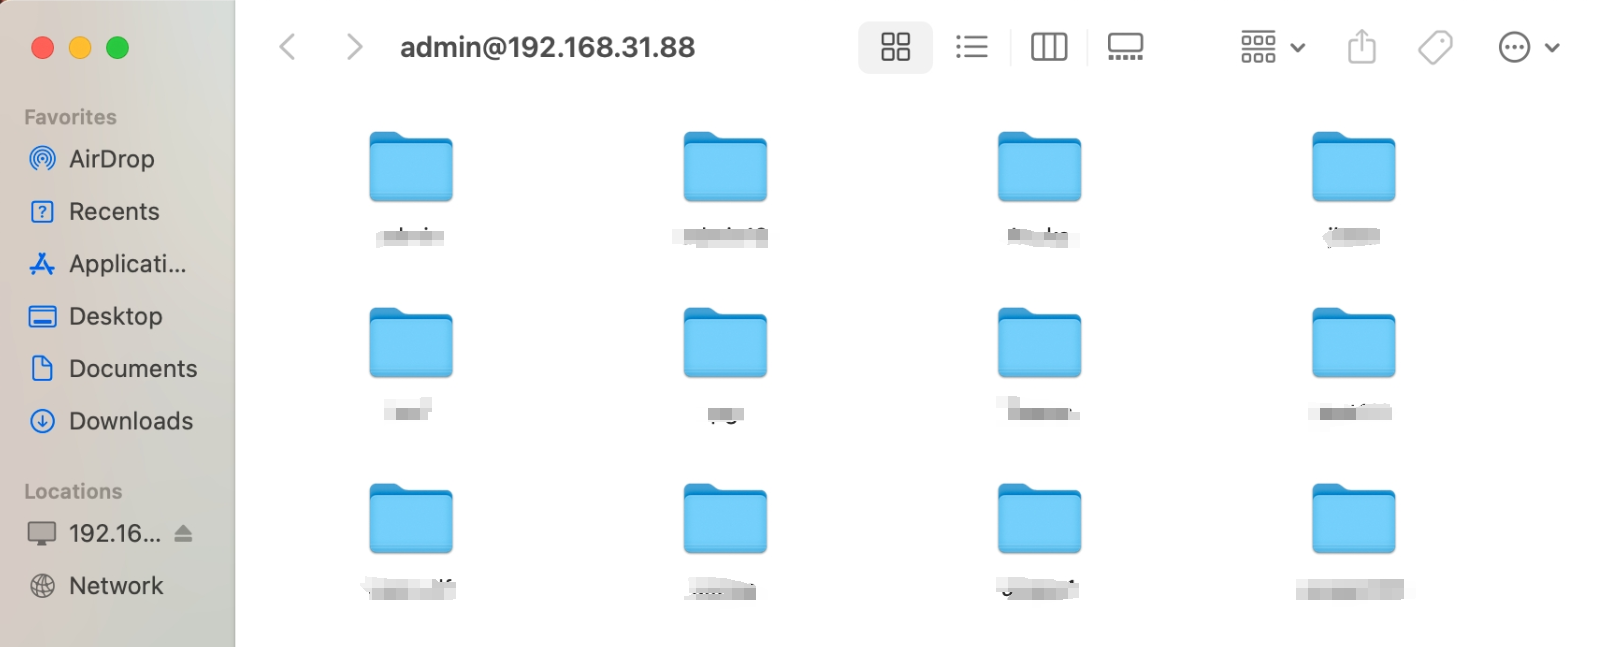
- Successfully logged in.
- Select Go > Connect to Server.
Using webDAV Service
NAS supports WebDAV functionality, allowing users to remotely access and manage files on the storage device via HTTP/HTTPS protocols. WebDAV provides a file system experience similar to local storage, supporting file uploads, downloads, editing, and deletion. It is ideal for cross-platform collaboration, remote work, and file synchronization, with HTTPS encryption ensuring secure data transmission.
Open the Settings app at the bottom of the main interface.

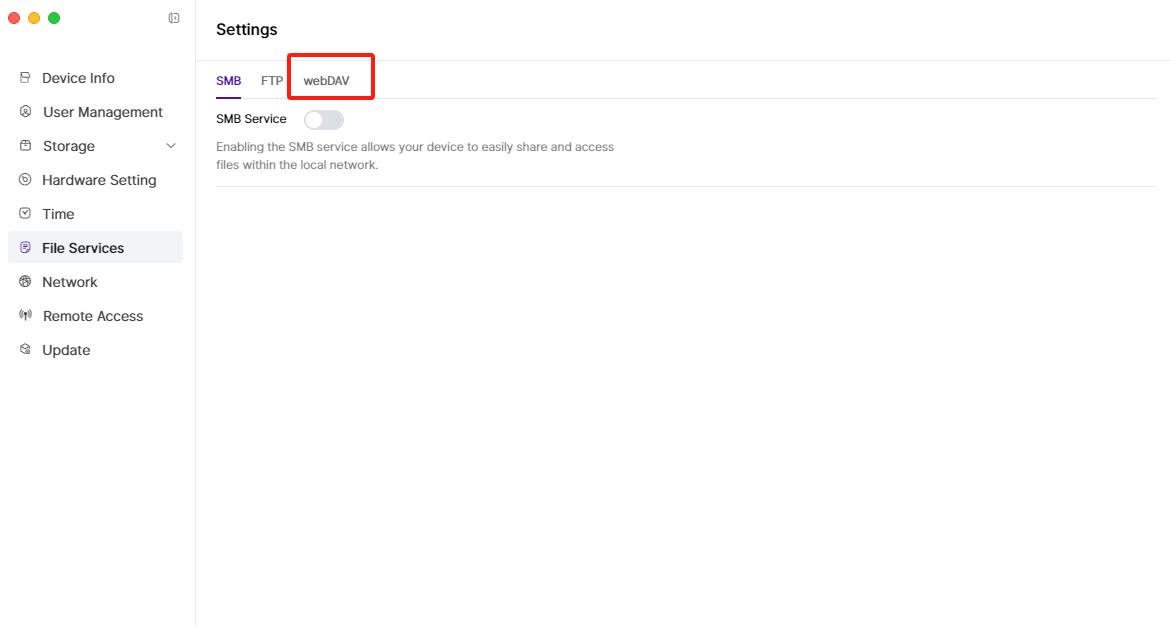
After entering the "Settings" page, click on File Services in the left sidebar to access the "SMB" settings page, then click on webDAV.
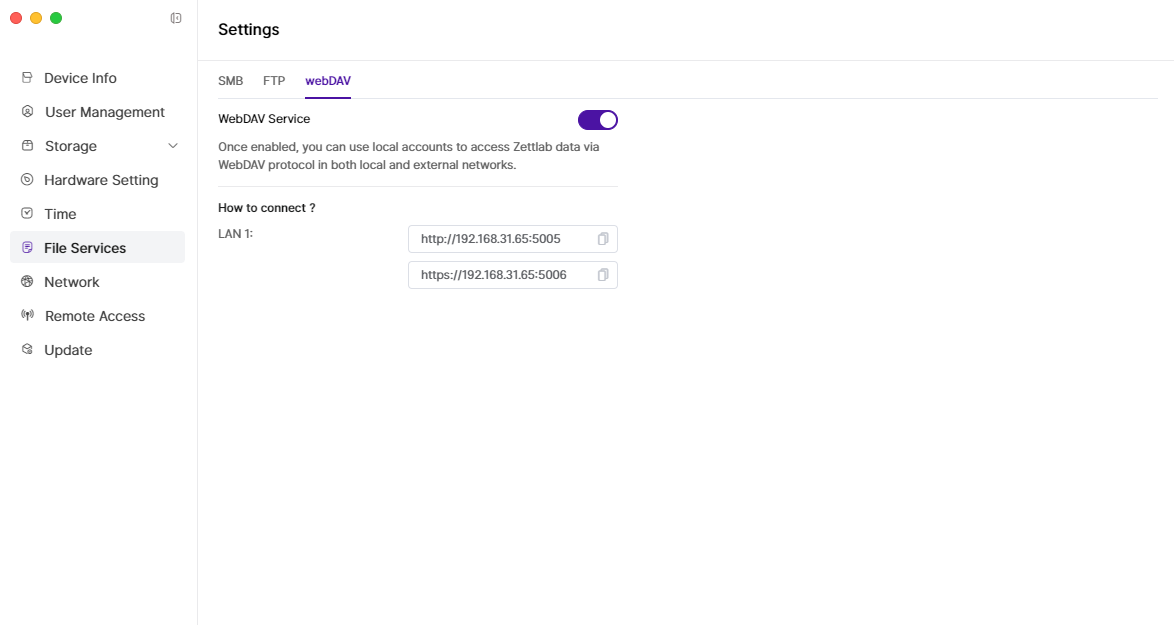
On the "webDAV" settings page, enable webDAV Service and copy the IP address from the "LAN" section.
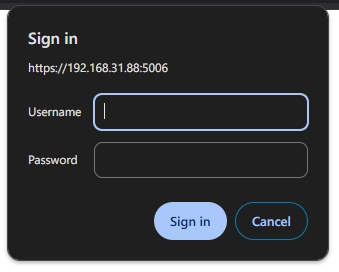
Open your browser, paste the link in the address bar, and press Enter.

In the "Login" pop-up, enter your username and password, then click Login at the bottom.
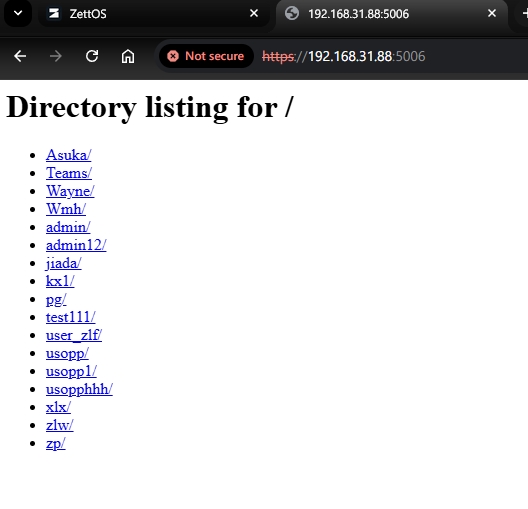
Complete the login.
Remote Access
Accessing NAS via Remote ID in an External Network
- Open the Zettlab client and go to the login page:
- Enter the Remote ID in the "Login IP/ID" field, then enter your username and password. Click Login at the bottom to complete remote login.
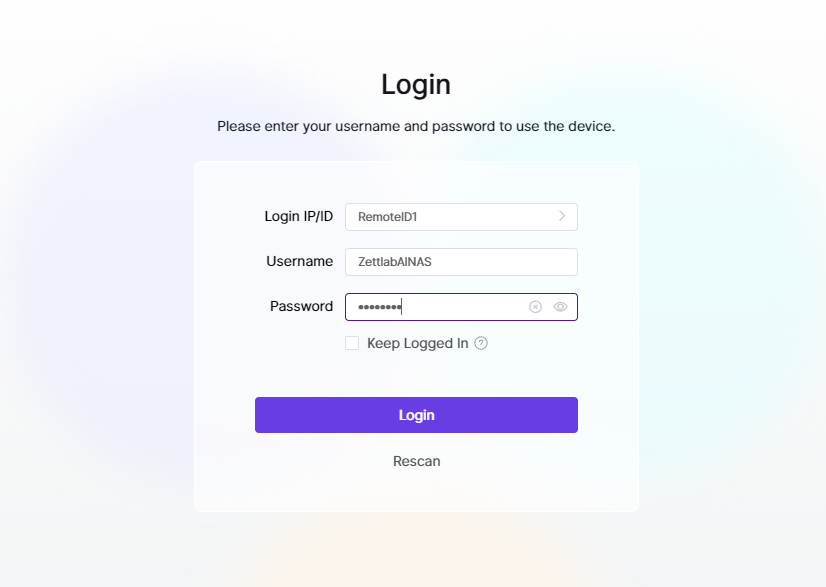
- Enter the Remote ID in the "Login IP/ID" field, then enter your username and password. Click Login at the bottom to complete remote login.
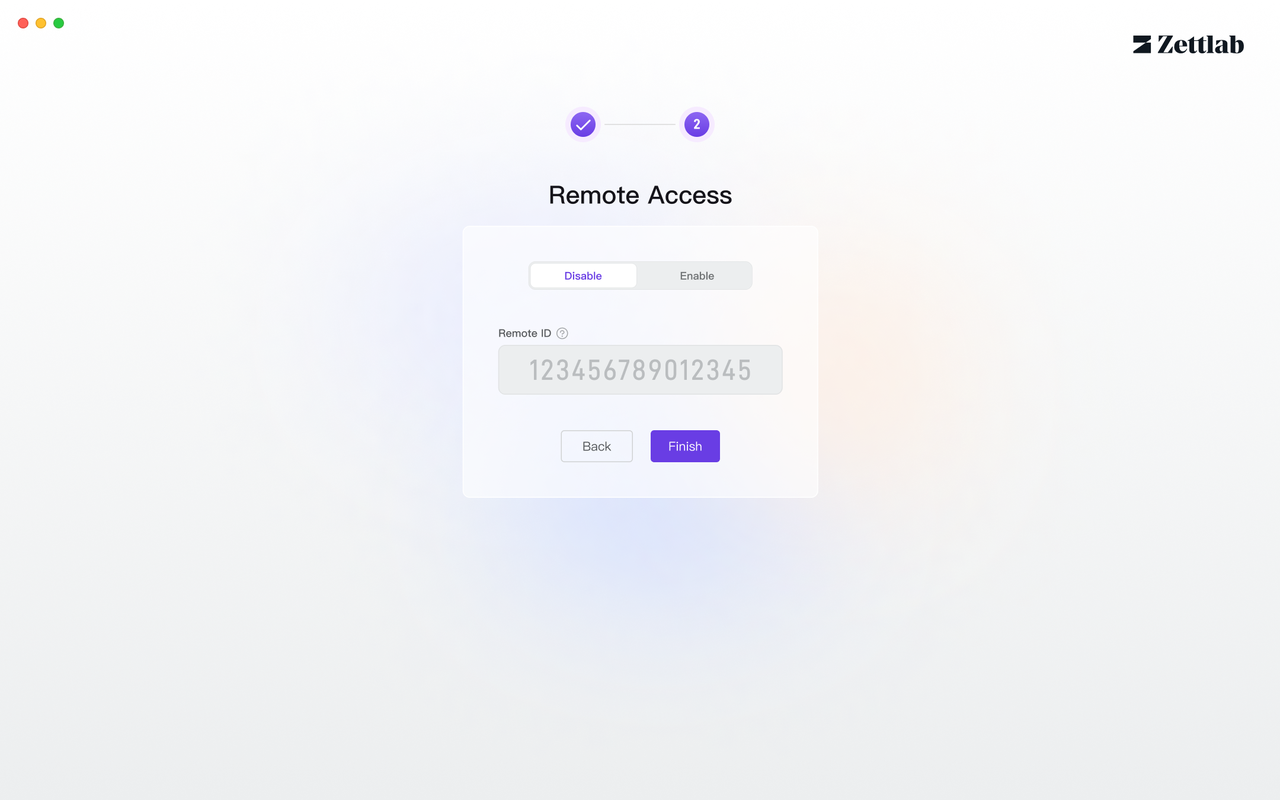
Note: When you log in to the system for the first time and register an administrator account, you will see the default Remote ID in the option for enabling remote connections.
Modifying Remote ID
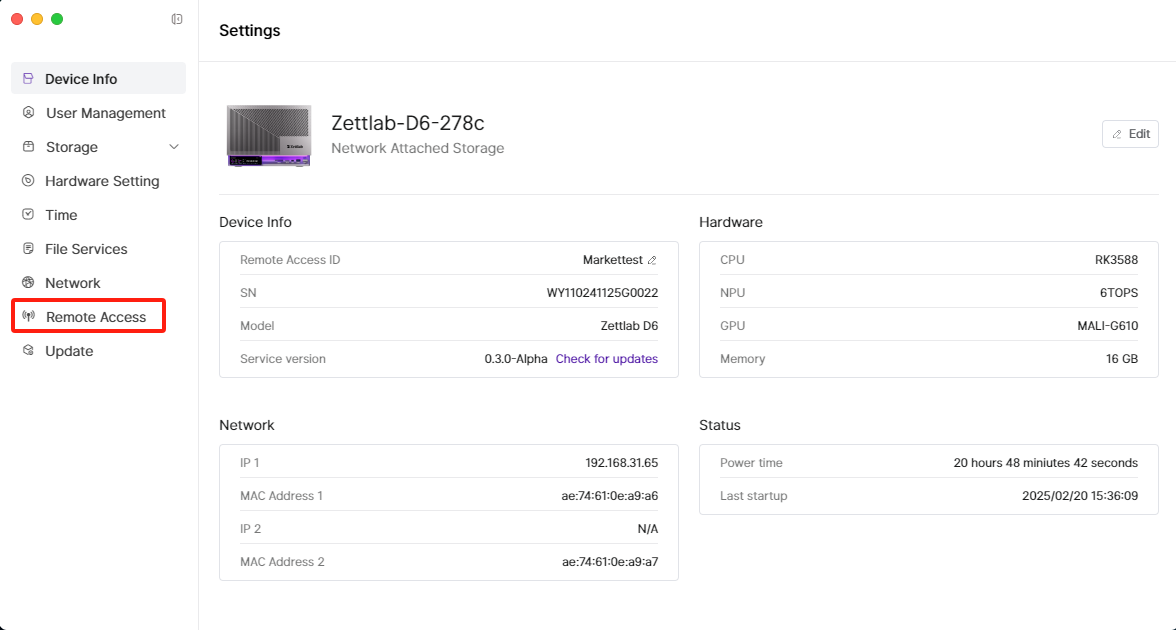
Open the Settings app at the bottom of the main interface.

After entering the "Settings" page, click on Remote Access in the left sidebar.
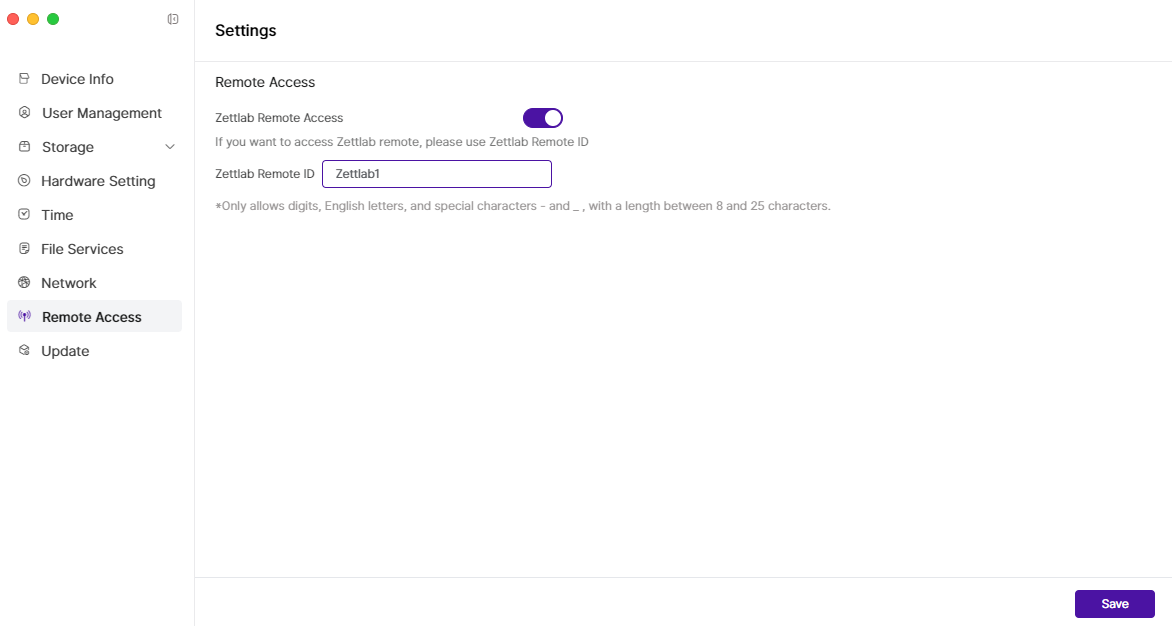
You can enable Zettlab Remote Access, modify the Zettlab Remote ID (also referred to as "Remote ID" elsewhere), and click Save at the bottom right to complete the settings.
Hardware Setting
Setting Fan Mode
Open the Settings app at the bottom of the main interface.

After entering the "Settings" page, click on Hardware Setting in the left sidebar.
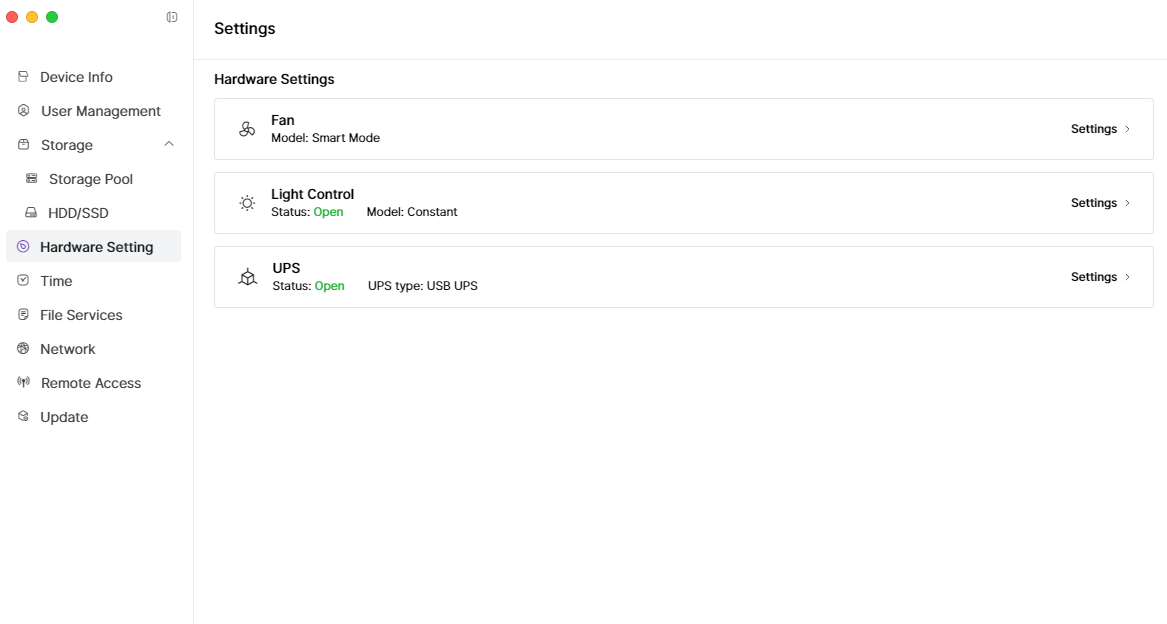
Continue by clicking on Fan Settings on the right side. You can choose between Smart Mode, Silent Mode, or Full-Speed Mode:
- Smart Mode: The device fan adjusts its speed automatically based on temperature to balance noise and device temperature.
- Silent Mode: The device fan runs at a lower speed to reduce noise.
- Full-Speed Mode: The device fan runs at full speed to quickly lower the device temperature but produces more noise.

Controlling Lights
Open the Settings app at the bottom of the main interface.

After entering the "Settings" page, click on Hardware Setting in the left sidebar.

Continue by clicking on Light Control Settings on the right side.
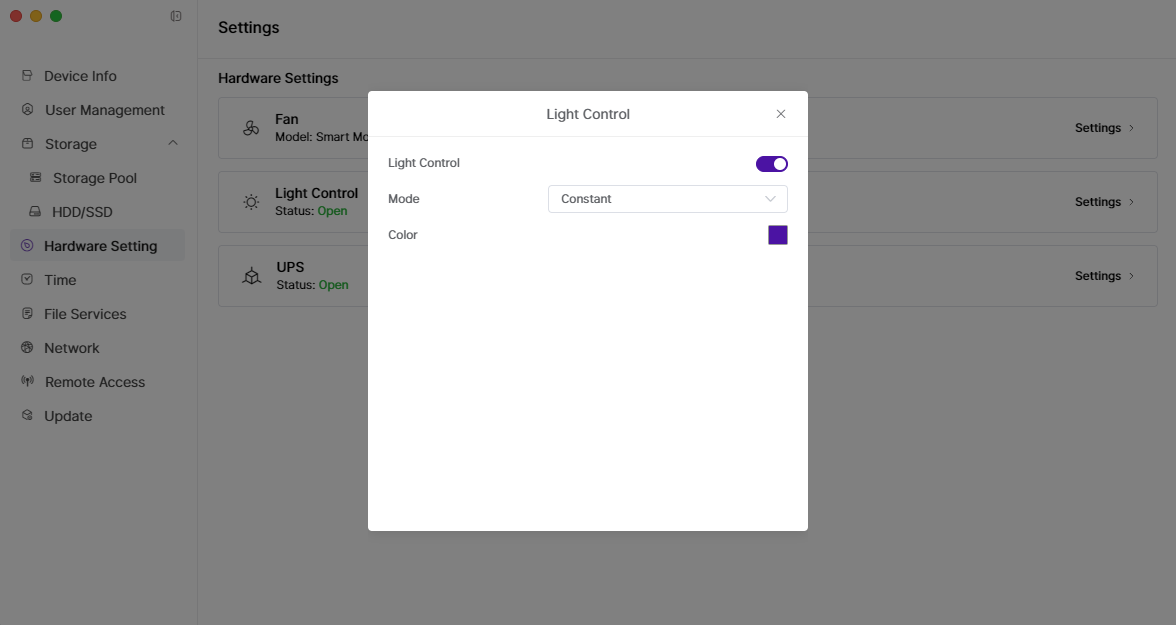
You can turn the lights on/off or select modes and colors.
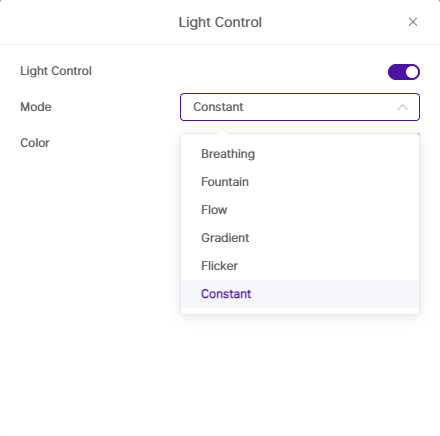
Model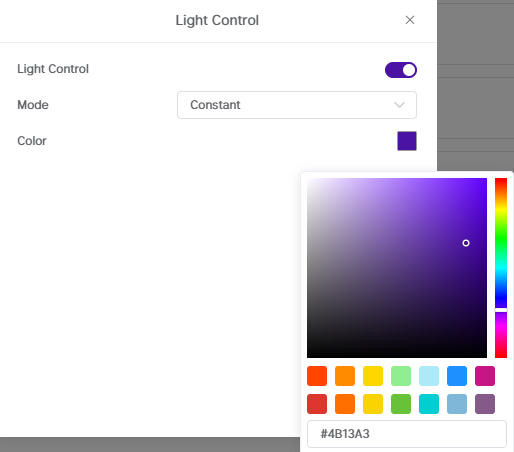
Color
Setting UPS
Open the Settings app at the bottom of the main interface.

After entering the "Settings" page, click on Hardware Setting in the left sidebar.

Continue by clicking on UPS Settings on the right side.
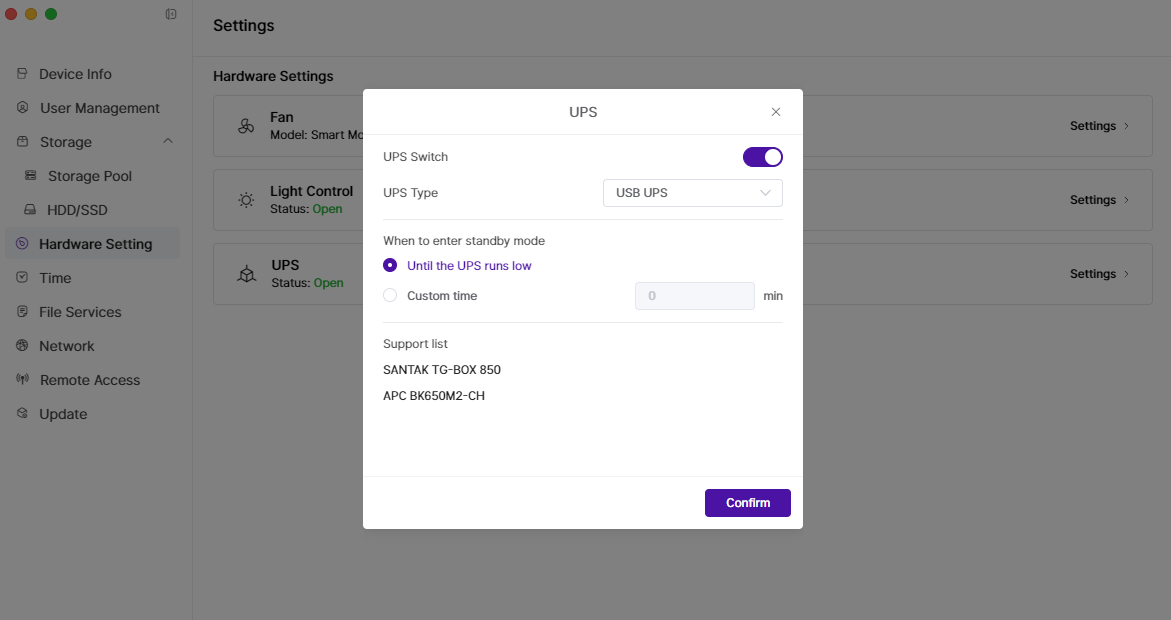
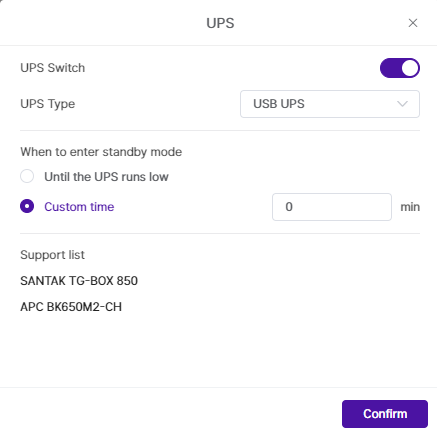
You can enable or disable UPS and select settings for “When to enter standby mode.” Click Confirm at the bottom right to complete the settings.
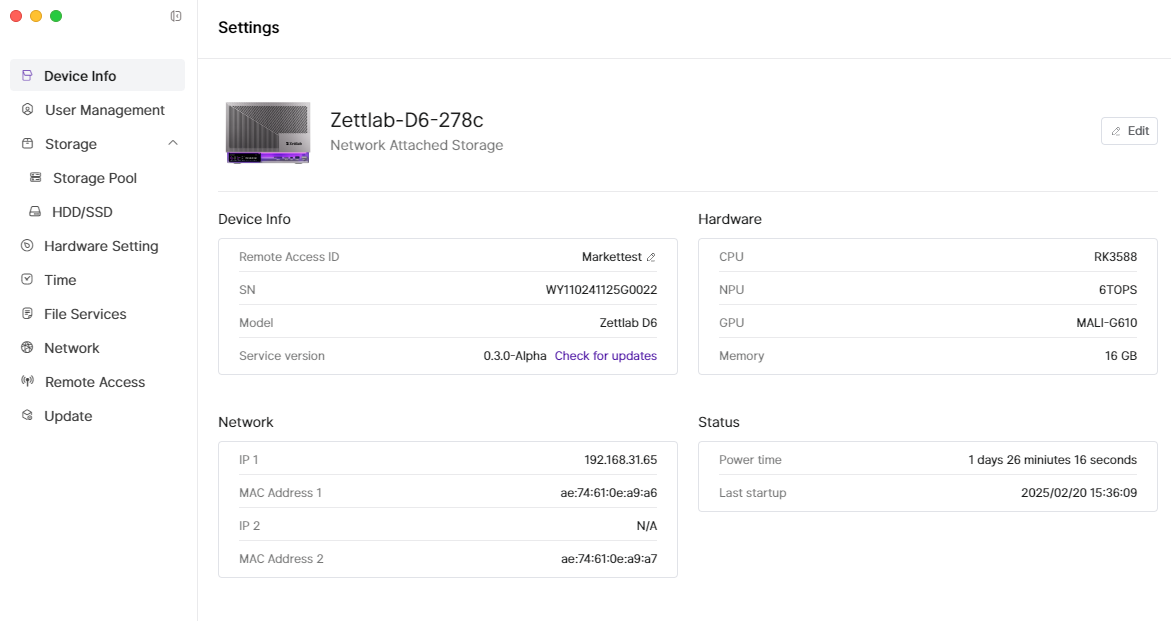
Modifying Device Time Zone and Time
Open the Settings app at the bottom of the main interface.

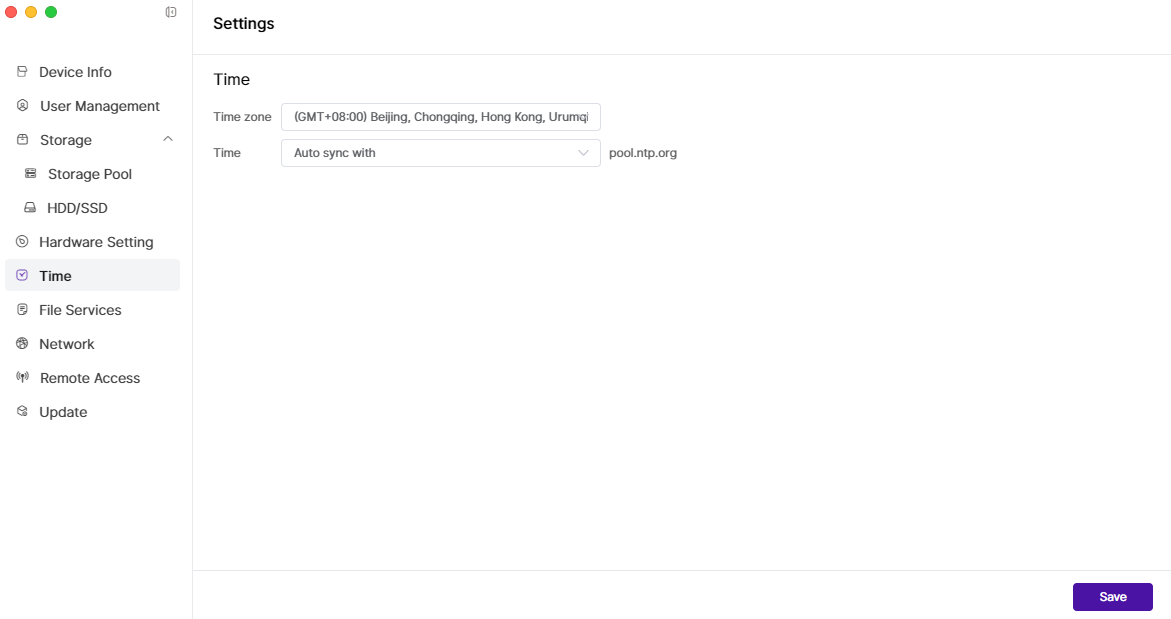
After entering the "Settings" page, click on Time in the left sidebar.
On the "Time" settings page, select your Time Zone and click Save at the bottom right to save your settings.
Network Settings
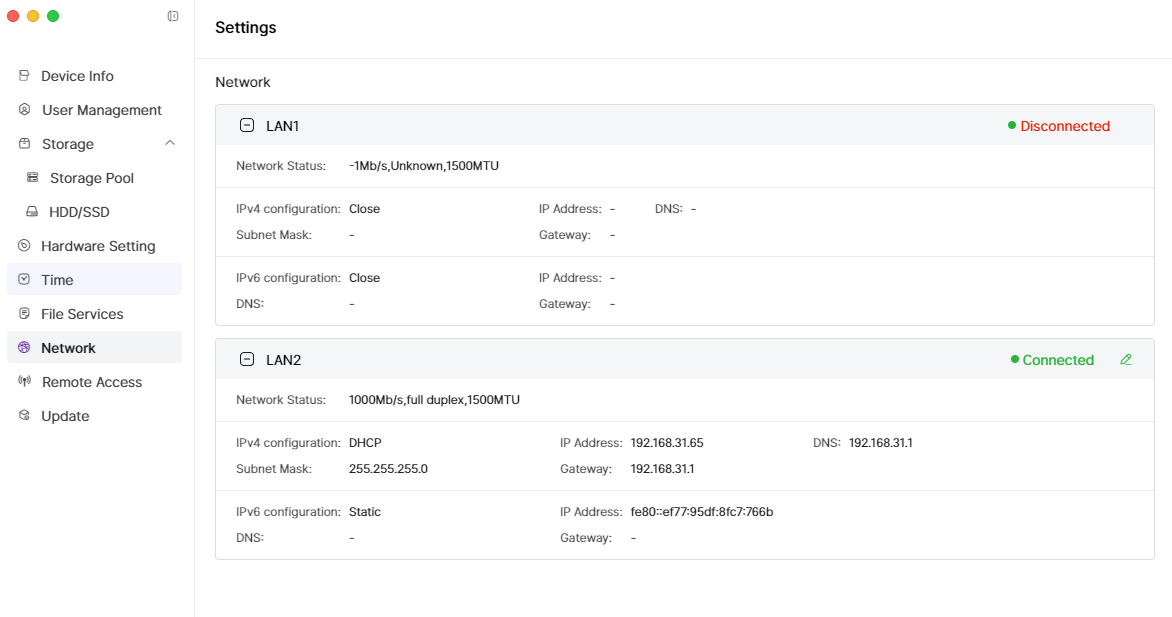
Open the Settings app at the bottom of the main interface.

After entering the "Settings" page, click on Network in the left sidebar to access the network settings page.
Update
OTA Update